Table of Contents
Each KMail specific menu item is discussed below. When there is a keyboard shortcut that performs a menu item function, the default shortcut is listed with the menu item.
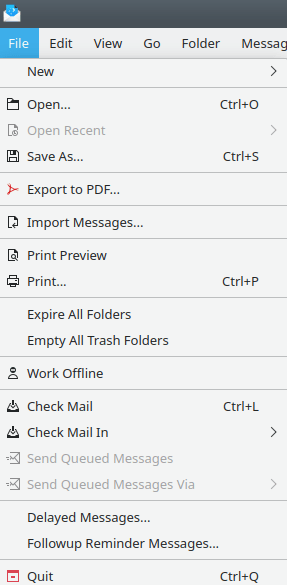
The File Menu
- →
Here you can choose to create one of four new items, as follows:
- → → (Ctrl+N)
Compose a new message. This will open a Composer window, where you can write a new message.
- → →
Creates a new message from a selected template. Please see Compose From Templates for additional information on creating templates. If you do not have any templates saved, you will see → → .
- → →
Creates a new folder. The ensuing dialog will ask you to give the new folder a name. The new folder will be created as a subfolder of the currently selected folder.
- → →
Launches the New Contact dialog, permitting you to add a new entry in KAddressBook.
- → (Ctrl+O)
Opens saved email messages (.mbox files).
- →
Displays a list of recently opened messages. Only those messages that have been saved as .mbox files and subsequently opened will appear on this list. If no such files exist, this menu item will be grayed out.
- → (Ctrl+S)
Saves the currently displayed message to a
.mboxfile. This file includes all the headers and attachments, in MIME format. If you want to save it as a different format (e.g., as a.txtfile), uncheck the Automatically select filename extension (.mbox) box, and add the filename extension before saving the file.- →
Exports the currently displayed message as a .pdf file.
- →
Starts up the KMailCVT program (aka the Email Import Wizard). This application lets you import messages from several email clients into KMail.
- →
Shows how your email will appear when printed.
Note
This will only be enabled if a printer has been configured, is online, and is available for use.
- → (Ctrl+P)
Displays a dialog that lets you print the currently displayed message.
- →
Deletes old messages from all folders. Deletion will occur according to the rules in each folder's Properties dialog (the default is not to delete old messages at all).
- →
Use this item to empty all trash folders, i.e., the local trash folder and all trash folders that may exist on IMAP servers. Messages in Trash will be permanently deleted, and cannot be retrieved.
- →
Sets KMail to offline mode. This turns off all network jobs. This is useful when working without a network connection. When selected, this item will become → , which must be selected to go back online (required to send and receive email).
- → (Ctrl+L)
Checks for new messages in all your accounts.
- →
Checks for new messages from a particular account; your accounts will be listed in a submenu.
- →
Sends the messages that are in your outbox. Messages can end up in your outbox because of transmission errors, or because you composed and attempted to send a message while offline. If there are no messages in your outbox, this menu item will be grayed out.
- →
Sends the messages that are in your outbox via a specific outgoing account. This allows you to choose which server to use to send your queued messages. Servers must be configured in the Configure KMail dialog, under the Accounts+Sending tab, to be listed here. If there are no messages in the outbox folder, this menu item will be grayed out.
- →
Starts the Akonadi Send Later Agent dialog. Any messages queued for later delivery by the composer's → option will appear in this dialog box. You can modify and / or delete them. Note that delayed messages are stored in the drafts folder, not in the outbox folder.
- →
Starts the Akonadi Followup Reminder Agent dialog. Any followup reminder messages ("todos") created via the composer's → function will appear in this dialog box. You can delete those messages with the mouse button context menu.
- → (Ctrl+Q)
Exits KMail.
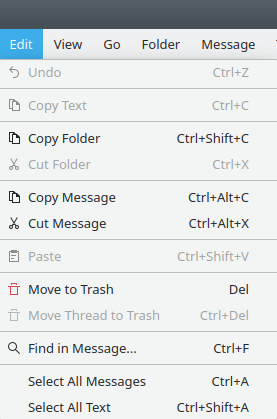
The Edit Menu
If the menu item you are looking for is missing, please see Edit Menu in KDE Fundamentals. The items listed here are KMail specific.
- → (Ctrl+Shift+C)
Creates an "Akonadi" pointer to the entire contents of the currently selected folder, and copies that pointer to the clipboard. A subsequent paste operation in a text editor will simply paste the pointer text. A subsequent paste operation in a KMail folder (or in the Dolphin file manager) will create a second copy of the folder and its contents.
- → (Ctrl+X)
Creates an "Akonadi" pointer to the currently selected folder, and copies that pointer to the clipboard. A subsequent "paste" operation in a text editor or in Dolphin will behave exactly like the preceding operation. A subsequent paste operation in KMail will move the folder and its contents to a different location (if pasted in some folder other than the originating folder).
- → (Ctrl+Alt+C)
Creates an "Akonadi" pointer to the currently selected message(s), and copies that pointer to the clipboard. A subsequent paste operation in a text editor will simply paste the pointer text. A subsequent paste operation in a KMail folder (or in the Dolphin file manager) will create a copy of the message(s), headers and all.
- → (Ctrl+Alt+X)
Creates an "Akonadi" pointer to the currently selected message(s), and copies that pointer to the clipboard. A subsequent "paste" operation in a text editor or in Dolphin will behave exactly like the preceding operation. A subsequent paste operation in KMail will either create a second copy of the message(s) (if pasted in the originating folder) or move the message(s) to a different folder (if pasted in some folder other than the originating folder).
- → (CtrlV)
Pastes either the entire contents of a folder, or the contents of selected messages, depending on the operation that preceded the "paste". This operation cannot be used to paste selected text inside the reader window. If no copy / cut operation is pending, this option will be grayed out.
- → (Del)
Moves the selected messages to the trash folder. If the selected messages are already in the trash folder, they will be permanently deleted.
- → (Ctrl+Del)
Moves the selected thread to the trash folder, e.g., a conversation in a mailing list.
- → (Ctrl+F)
Searches the current message text for a string entered in the Find: textbox.
- → (Ctrl+A)
Selects all messages in the current folder.
- → (Ctrl+T)
Selects the text of the currently displayed message.
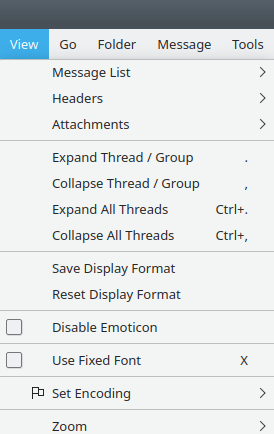
The View Menu
- →
This submenu has the following options to change the appearance of the message list.
Contains options to customize your sort order as follows:
Message Sort Order has several options, most of which are self-explanatory. The following options may not be immediately obvious, and deserve an explanation.
By Smart Sender/Receiver will display the receiver when you are viewing the sent-mail folder, and will display the sender when you are viewing the inbox.
By Action Item Status and By Important Status. These flags need to be set before they can be sorted. Please see Mark Messages for more information on marking your messages.
Message Sort Direction and Group Sort Direction allow you to change the direction in which your messages/groups will be sorted, respectively. Note that the "Group" options are only available when messages are aggregated into groups.
Folder always Uses this Sort Order allows you to specify different sort settings for each folder.
Lets you select an aggregation option. Please see the Message List Appearance tab (under → ) for more information on aggregation.
Lets you select a theme. Please see the Message List Appearance tab (under → ) for more information on themes.
- (Ctrl+Shift+O)
Creates a new tab on the tabbing toolbar. This tab will point to the folder you are viewing when the option is selected. If the tabbing toolbar is not yet visible, selecting this option will create it. The tabbing toolbar can be handy if you have many folders, but only a few of them are regularly accessed.
- (Ctrl+PgDn)
Opens the folder associated with the next tab on the tabbing toolbar.
- (Ctrl+PgUp)
Opens the folder associated with the previous tab on the tabbing toolbar.
Reorders the tabs on the tabbing toolbar by shifting the active tab to the left. If that tab is already at the extreme left end, it will be moved to the right hand end position.
Reorders the tabs on the tabbing toolbar by shifting the active tab to the right. If that tab is already at the extreme right end, it will be moved to the left hand end position.
- (Ctrl+Shift+W)
Closes the currently selected tab.
- →
Selects your headers view. Please see Header Options for details on the available header views.
- →
Changes the way attachments appear in the Message Preview Pane (independent of the MIME Tree). Please see Attachment Options for details on viewing attachments.
- → (.)
This will display the thread of the current message, i.e., all messages that are replies to the current message.
- → (,)
This will hide the thread of the current message, i.e., it will hide all messages that are replies to the current message.
- → (Ctrl+.)
Expands all threads in the current folder.
- → (Ctrl+,)
Collapses all threads in the current folder.
- →
This option is apparently supposed to save something somewhere, but it's not yet working correctly.
- →
This option is apparently supposed to restore whatever the preceding "Save" option is supposed to save, but it's not yet working correctly, either.
- →
Select this option to stop KMail from transforming
:-)into .
.- → (X)
Uses a fixed width (Monospace) font to display the messages in the current folder. The font to be used can be configured in the Fonts tab on the Appearance page of the KMail configuration dialog.
- →
Lets you choose the character encoding to be used in the Message Pane. The default, Auto, should work in almost every case.
- →
This option lets you zoom in or out on every message displayed in the preview pane.
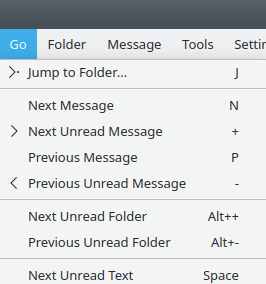
The Go Menu
- → (J)
Shows a dialog box with a list of all your folders. Click on the folder you wish to view, and that folder will be opened for display in the message preview pane.
- → (N)
Selects the next message in the message list. The keyboard shortcut Right also performs this function.
- → (+)
Selects the next unread message in the message list. If there are no unread messages below the currently selected message, the behavior depends on the value of the When trying to find unread messages option.
- → (P)
Selects the previous message in the message list.
- → (−)
Selects the previous unread message in the message list. If there is no unread message above the currently selected message, then the behavior depends on the value of the When trying to find unread messages option.
- → (Alt++)
Jumps to the next folder with unread messages.
- → (Alt+−)
Jumps to the previous folder with unread messages.
- → (Space)
Scrolls down if you are not yet at the bottom of a message, otherwise jumps to the next unread message.
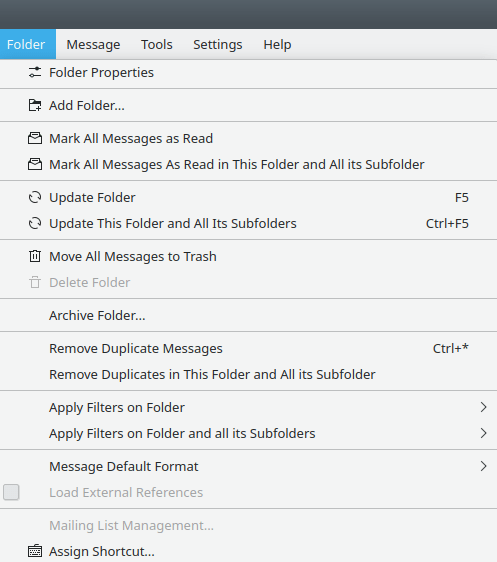
The Folder Menu
Opens the Folder Properties dialog that lets you modify the properties of the current folder.
- →
Prompts you for a name, then creates a new folder as a subfolder of the current folder. This is exactly like → → .
- →
Sets the status of all unread messages in the current folder to "read".
- →
Sets the status of all unread messages in the current folder (and all its subfolders) to "read".
- → (F5)
Checks whether new mail has arrived in the currently selected folder.
Note
This option only works in IMAP folders.
- → (Ctrl+F5)
Checks whether new mail has arrived in the currently selected folder, or in any of its subfolders.
Note
This option only works in IMAP folders.
- →
Moves all of the messages in the selected folder into the trash folder.
Note
This is only available if the currently selected folder is not a trash folder. If the currently selected folder is a trash folder, you will see Empty Trash, instead. Selecting that option will empty the trash by permanently deleting the messages in the trash folder.
- →
Deletes the selected folder and all its contents. A warning message will be displayed. If the current folder is one of KMail's pre-defined folders (inbox, etc.), this menu item will be grayed out.
- →
Brings up a dialog so you can create an archive of the currently selected folder. Please see the → section of "Using KMail" for details.
- → (Ctrl+*)
Searches the folder for duplicate messages and deletes them.
- →
Searches the folder, and its subfolders, for duplicate messages, then deletes the duplicates.
- →
Applies selected filters (All, Spam, or Not Spam) to the currently selected folder. Please see the Filter dialog for more information on filters.
- →
Applies selected filters (All, Spam, or Not Spam) to the currently selected folder, and to its subfolders. Please see the Filter dialog for more information on filters.
- →
Here you may select one of three options: Prefer HTML to Plain Text, Prefer Plain Text to HTML, or Use Global Setting.
Warning
For security reasons, we recommend you only select Prefer HTML to Plain Text in folders which can never contain untrusted messages.
- →
If you have HTML messages enabled (see above), then you will also have the option to have images and other resources linked from the web downloaded automatically.
Warning
This option is only available if Prefer HTML to Plain Text has been selected. If you turn this option on, and later decide to change , be sure to clear this checkbox before making the switch. There is a bug in KMail -- if the checkbox on this item has not been cleared, and this option has been grayed out, results are unpredictable.
- →
This opens the mailing list management dialog. This option is only available if the current folder contains messages from a mailing list. Please see the Mailing List dialog for more information on mailing lists.
- →
This lets you assign a keyboard shortcut to the currently selected folder.
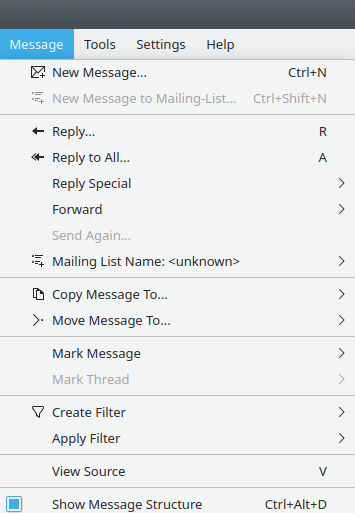
The Message Menu
- → (Ctrl+N)
Opens the composer window so you can write a new message.
- → (Ctrl+Shift+N)
Opens the composer window so you can write a new message. If the current folder holds a mailing list and has a posting address defined, that posting address will automatically be entered as the To: address when the composer window is opened. If the current folder does not contain a mailing list, this item will be grayed out.
- → (R)
Opens the composer window, inserts quoted text from the currently selected message, and sets the To: field to either the mailing-list address (if you reply to a mailing-list message), or to the preferred reply-to address of the sender. If you want to control which address is set in the To: field, you should use Reply Special. The sending identity will automatically be set to the identity to which this message was addressed.
- → (A)
Opens the composer window, inserts the quoted text of the currently selected message, and sets the To: field to either the mailing-list address (when replying to a mailing-list message), or to the preferred reply-to address of the sender. The Copy to (CC): field is filled with the addresses of all the other recipients of the currently selected message, excluding your own address. The sending identity will automatically be set to the identity to which this message was addressed.
- → → (Shift+A)
Opens the composer window, inserts the quoted text from the currently selected message, and sets the To: field to the preferred reply-to address of the sender. The sending identity will automatically be set to the identity to which this message was addressed.
- → → (L)
Opens the composer window, inserts the quoted text of the currently selected message, and sets the To: field to the mailing-list address. If you did not specify a mailing-list address for the currently selected folder and KMail cannot determine the posting address from the currently selected message, the To: field will be empty. The sending identity will automatically be set to the identity to which this message was addressed.
- → → (Shift+R)
Works just like , except that the text of the currently selected message is not quoted.
- → →
Works just like with an added option: you may select a custom template configured via Custom Templates.
- → →
Works just like with an added option: you may select a custom template configured via Custom Templates.
- → → (Shift+F)
Forwards the message to a new recipient. The message and its attachments will be attached to the new message. The original message headers will be included in the forwarded message.
- → → (F)
The message's text and some important header fields will be copied to the body of the new message, with text marking where the forwarded part begins. Attachments will be attached to the new message.
- → → (E)
This works like "Forward", except that the message stays the same (even the From: field). The user who redirected the message is identified by special header fields (
Redirect-From,Redirect-Date,Redirect-To, etc.).- → →
Works just like "Forward", but gives you the option to select a custom template configured via the composer custom templates tab in Custom Templates.
- →
Opens a composer window with the currently selected message so it can be sent again.
Note
This menu item is only available for messages which you have sent or, more precisely, for messages which have the sent status. If you wish to resend some other message, double-click its entry in the message list. Or view the message and use the T shortcut. You may also do this by adding an button to the toolbar.
- →
Offers several options for mailing list messages.
Note
The current working folder must be configured as a mailing list for this option to be available. Please see Folder Properties Mailing List to learn about setting up mailing lists.
The following options are available in mailing list folders:
will set the To: address to the address configured as "Post to List".
will set the To: address to the address configured in "Post to List" and will place the word
helpin the Subject: field.will point your default web browser to the "subscribe" web site of the configured mailing list.
will set the To: address to the mailing list subscription address, and place the word
subscribein the Subject: field.will point your default web browser to the "unsubscribe" web site of the configured mailing list.
will set the To: address to the mailing list subscription address, and place the word
unsubscribein the Subject: field.
- →
Copies the selected message(s) to a specified folder. You may choose from recent folders, local folders, or a specific IMAP account folder.
- →
The same as "Copy Message To", above, except this option will permanently move the selected message(s) to the chosen folder.
- →
Lets you change the status of the selected message to one of the following values:
Status Symbol Meaning (Ctrl+R) 
The message has been read. (Ctrl+U) 
The message has not been read yet. 
This status will not automatically be set by KMail. You can use it freely to mark messages that are in some way important to you. 
Removes a previously set important flag from the message. 
This status will not automatically be set by KMail. Use this to mark messages that are action items; e.g., a to-do list. 
Removes a previously set action item mark from the message. - →
Lets you change the status of all messages in a thread as follows:
Status Symbol Meaning 
The entire thread has been read. 
The thread has not been read yet. 
This status will not automatically be set by KMail. You can use it freely to mark threads that are in some way important to you. 
Removes a previously set "important" flag from the thread. 
This status will not automatically be set by KMail. Use this to mark threads that are action items (e.g., a to-do list). 
Removes a previously set action item mark from the thread. 
Sets the watched thread status, which lets you easily view threads you're interested in by selecting the status in the drop down box found in the Quick Search Bar. (Click on the  icon to display the filterable categories.)
Allows you to ignore entire threads. - →
Opens the Filter dialog with a new filter added. This new filter is based on fields in the current message, depending on the submenu item you select:
Filter on Subject... Filter on From... Filter on To... Filter on Mailing-List...(currently selected message must be a mailing list for this to be available). - →
Lets you . If you have spam filtering set up via the Anti-Spam Wizard, the options and will also be available here.
- → (V)
Shows the message and its complete headers in plain text format in a new window. This can help you figure out where a message really came from.
Note
You should be aware that it is easy to fake, or spoof, the
From:header in a message. You can always find out which mail servers were used to send the message by examining theReceived:lines in the message headers.- → (Ctrl+Alt+D)
Displays the structure viewer, an area below the preview pane that lets you view each MIME component of a message separately. This item will only be present if the Expert Plugin has been activated.
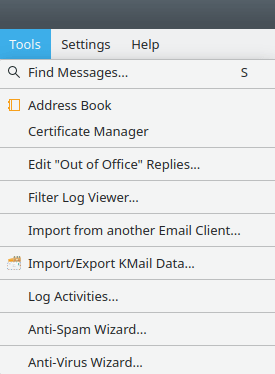
The Tools Menu
- → (S)
Opens a search window that lets you search for messages with certain characteristics, e.g., a certain subject. Please see Filter Criteria for details on search options.
Your search results will be displayed in the text area; you may either to see a folder containing the messages that were located, or highlight the desired message and select . Additional actions are available via a context menu, which can be activated by clicking the mouse button.
- →
Starts KAddressBook, the KDE email address / personal contact information management program.
- →
Starts Kleopatra, the KDE certificate manager.
- →
Launches the Configure "Out of Office" Replies dialog, which allows you to set up vacation notifications.
Note
Out of Office reply functionality relies on server-side filtering. To use it you must configure the Filtering tab (see options relevant to a Kolab server) of your IMAP account set-up.
- →
Opens the viewer window for the filter log; there you will find some options to control the logging of the filtering process. In the log you will find valuable information about the filter rules used, the result of evaluating those rules, and which filter actions were applied to a particular message.
- →
Launches the Akonadi Import Wizard dialog, which assists in importing settings and email from a wide variety of email clients. Please see the Import Wizard documentation for details.
Note
Close KMail before importing data. The wizard may modify KMail's configuration file, and can cause unpredictable results if you attempt to import data while KMail is running.
- →
Launches the PIM Data Exporter dialog, which assists in exporting your settings and email, or restoring them from a back up copy. Please see Pim Data Exporter for details.
- →
Starts the Activity Logger, which logs certain activities. This option is only available when the Log Activities plugin has been loaded. Primarily for developers.
- →
Launches the Anti-Spam Wizard, which can help you set up spam filtering. Please see Anti-Spam Wizard for details. This option is only available when the Antispam plugin has been loaded.
- →
Launches the Anti-Virus Wizard, which can help you set up anti-virus scanning. Please see Anti-Virus Wizard for details. This option is only available when the Antivirus plugin has been loaded.
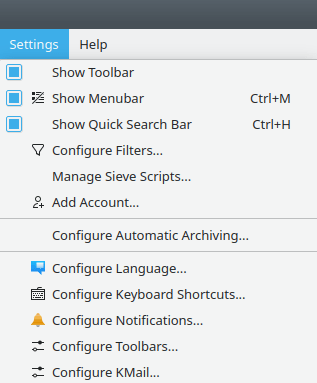
The Settings Menu
If the menu item you are looking for is missing, please see Settings Menu in KDE Fundamentals. The items listed here are KMail specific.
- → (Ctrl+H)
Enables the Quick Search bar, which lets you quickly search for messages matching your criteria.
- →
Opens the Message Filters dialog.
- →
If your mail server supports sieves (server side filtering), you may configure those scripts here.
- →
Starts the Account Wizard dialog, which assists in setting up new or additional accounts. Please see Account Wizard for details.
- →
Initiates a dialog to set up automatic archiving. See Automatic Archiving for details.
- →
Opens the Configure KMail dialog. There are hundreds of variables to play with. Have fun!
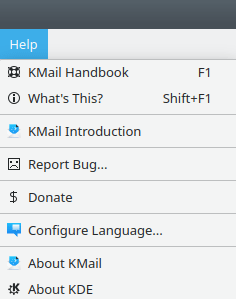
The Help Menu
This is the Help Menu of the KDE Fundamentals, with one additional item.
- →
Opens the Introduction welcome screen.