The Appearance page lets you adjust many aspects of KMail's graphical user interface, including color schemes, font selection, and even the physical arrangement of the message list in the main window.
The Appearance (General) Tab
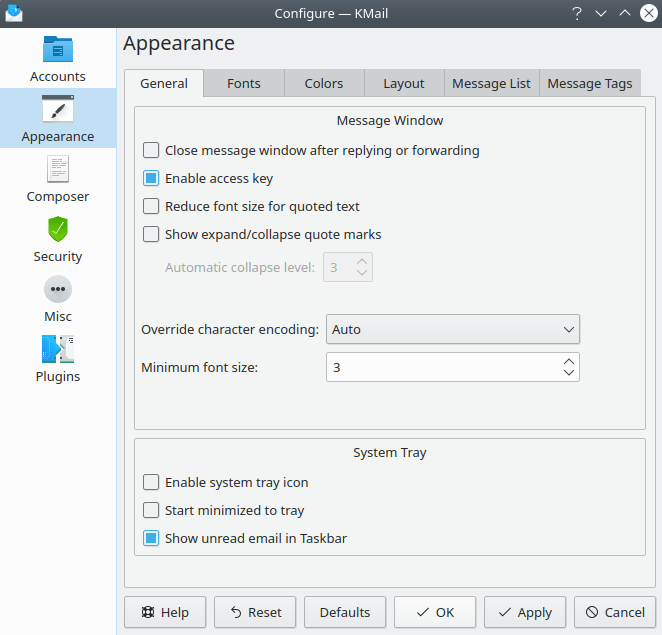
If the Close message window after replying or forwarding option is activated, KMail will close the separate message window when a composer window (for a reply, or to forward the message) is opened. Enable access key is selected by default. Access keys allow you to use the keyboard for functions normally done with the mouse, such as following links. For more information see Access keys.
Enable Reduce font size for quoted text to show quoted text (in a reply) with a smaller type face. Show expand/collapse quote marks displays little widgets along with each bit of quoted text. These allow you to show (+) or hide (-) nested quotes beyond a certain level. This is useful in protracted email conversations where nobody deletes what has gone before.
Changing Override character encoding: from its default value Auto will force the use of the specified encoding for all messages, no matter what the MIME headers say. Minimum font size: lets you control the smallest font KMail will use. Set this higher if you have trouble reading really small fonts.
System Tray provides three ways to control KMail's interaction
with the KDE task bar / panel. If Enable system tray icon is
selected, a small icon ( ) will be displayed in the system tray
area. If Start minimized to tray is activated, only this icon will
appear when KMail is launched. Selecting Show unread email in taskbar
causes the number of currently unread messages to appear on KMail's taskbar button.
) will be displayed in the system tray
area. If Start minimized to tray is activated, only this icon will
appear when KMail is launched. Selecting Show unread email in taskbar
causes the number of currently unread messages to appear on KMail's taskbar button.
When the icon is visible, you may hide KMail's main window either by clicking on the icon or by clicking on the window's close button. Clicking on the icon will make KMail's main window visible again. If you click on the icon with the mouse button, a context menu will appear. You can check for new mail, create a new message, or quit KMail. If there are any unread messages, the entry New Messages In > will appear, along with a list of the folders containing unread messages. Select one of these folders, and it will be opened in KMail's main window.
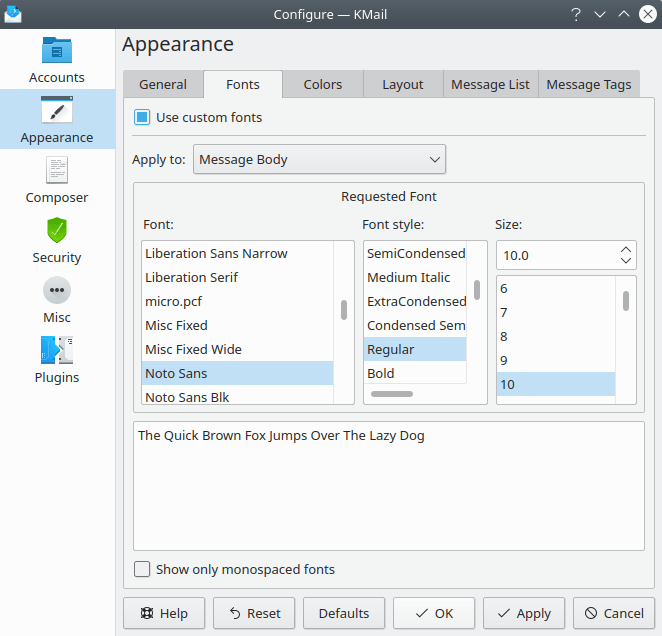
The Appearance (Fonts) Tab
This section lets you tailor the fonts KMail uses. Select Use custom fonts to activate the dialog. Apply to: Message Body sets the font for the reader pane. The Composer option sets the font in which new plain text messages are shown while they are being written. Message List changes the font used to display the message list. You can also choose special fonts for Unread, Important, and Action Item message list entries. Printing Output alters the font used when printing. Fixed Width Font affects the display of some HTML messages.
Show only monospaced fonts restricts the number of fonts available. Only the names of fixed-width fonts will be displayed when this option is in effect.
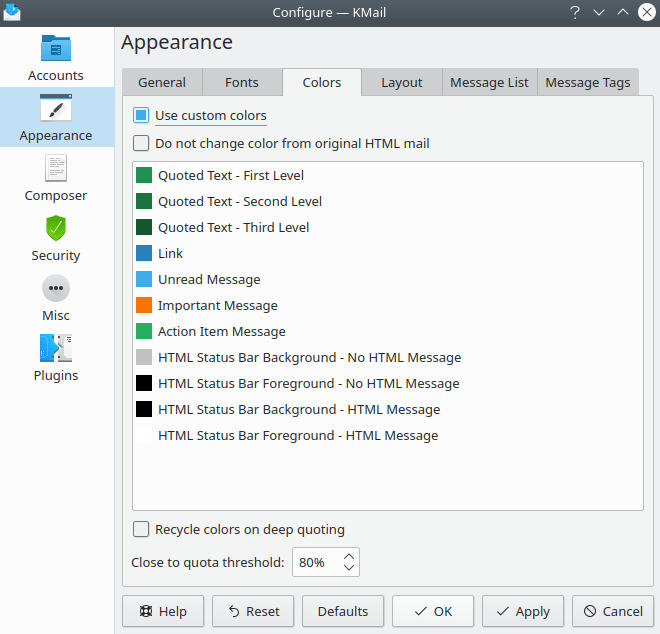
The Appearance (Colors) Tab
This section allows you to change the color of a few things by double clicking on an entry in the list box. Select Use custom colors to activate this feature. Select Do not change color from original HTML mail to preserve the color scheme selected by the sender of any HTML message.
Recycle colors on deep quoting will restart the quote coloring at the first level after the third level of quoting has been reached. Note that the Quoted text colors only work in the message reader, not in the composer. If you want folders which are getting close to their quota (space allotment, used on IMAP servers) to be displayed in a different color, you may specify a percentage value as a threshold.

The Appearance (Layout) Tab
This tab lets you configure the layout of KMail's main window.
In the Folder List section you may choose between the Long folder list (default option), which uses the full height of the window, and the Short folder list. With the Short option, if you have selected Show the message preview pane below the message list, the message list and the folder list will occupy a horizontal strip, with the message preview pane using the entire bottom portion of the window. If you have selected Show the message preview pane next to the message list, the folder list and the message list will occupy a vertical strip, with the message preview pane on the right.
Select Show folder quick search field to create a small text box at the top of the folder list. When you type something in that box, only the folders whose names match the characters you entered will appear. Clear the box to display all your folders.
The Show Favorite Folders View section allows you to change how your favorite folders are displayed. As Icons uses a lot of space, so if you have several favorite folders you might try As List. If you do not care about favorite folders you can disable this feature altogether by selecting Never.
On by default, Folder Tooltips display additional information (total number of messages, unread messages, and storage size) when hovering over a folder with the mouse pointer. Select Never to disable this feature.
In the Message Preview Pane section you can choose where in relation to the message list you want the message preview pane to appear. Or you can remove it entirely, and use only the full screen reader to view selected messages (press Enter).
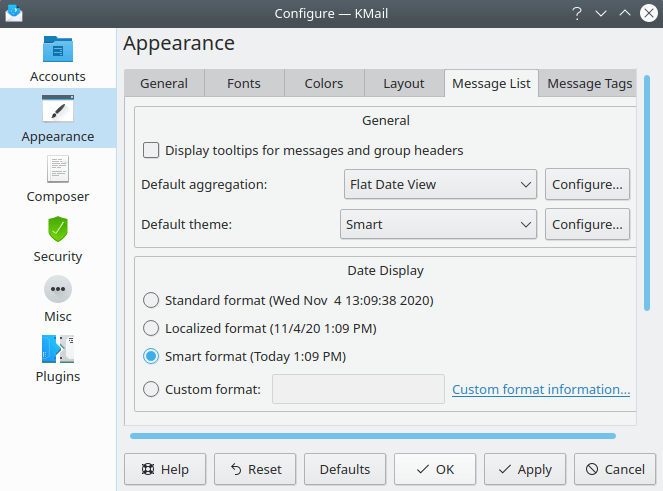
The Appearance (Message List) Tab
Use this dialog to alter the appearance of the Message List pane.
If you select Display tooltips for messages and group headers, you will see a brief summary of each message (or group -- depends on the view mode) when the mouse cursor hovers over a message list item.
Default Aggregation and Default Theme may be overridden using the Folder Properties dialog for each folder individually. Clicking the button opens a window to customize the pre-configured aggregations / themes; you can create your own schemes that way.
Eight aggregation modes and three themes have been pre-configured.
- Default aggregation: (drop down list)
- Activity by Date, Flat
This view uses day-by-day groups. Messages are not threaded. So for example, in “Today” you will simply find all the messages that arrived today. The groups are displayed by default in reverse chronological order, and labeled "Today", "Yesterday", then the preceding five days of the week, followed by mm/dd/yy.
- Activity by Date, Threaded
This view uses day-by-day groups. Messages are threaded. So for example, in “Today” you will find all the messages that arrived today and all the threads that have been active today. Uses the same grouping as Activity by Date, Flat.
- Current Activity, Flat
This view uses smart date range groups. Messages are not threaded. So for example, in “Today” you will simply find all the messages that arrived today. The groups are displayed by default in reverse chronological order: "Today", "Yesterday", the five preceding days of the week, "Last Week", "Two Weeks Ago", and then month by month.
- Current Activity, Threaded
This view uses smart date range groups. Messages are threaded. So for example, in “Today” you will find all the messages that arrived today and all the threads that have been active today. Otherwise the same as Current Activity, Flat.
- Flat Date View
This is a plain, old-fashioned list of messages sorted by date. No groups and no threading.
- Senders/Receivers, Flat
This view groups the messages by senders or receivers (depending on the folder type). You may specify senders (or receivers) in the → dialog ("View" tab, Show Column:). Messages are not threaded.
- Standard Mailing List
This is a plain, old-fashioned mailing list view: no groups and heavy threading, ordered by the date each thread began.
- Thread Starters
This view arranges the messages in threads and then groups the threads by the starting user.
- button
To create a custom aggregation theme, click the button. Select an existing aggregation similar to the one you want to create, then click . If none are similar, click the button. The General tab allows you to change the Name: and Description:. The Groups & Threading tab lets you configure several elements to customize your aggregation.
Grouping: lets you select from dates, sender/receiver or none. With the smart options KMail will group related emails together.
Group expand policy: lets you set whether KMail will automatically expand grouped emails, or not.
Threading: allows you to decide if KMail will include references and subject to determine perfect threading. You may also turn off threading altogether.
Thread leader: lets you change the leader of the thread: most recent message, or the first one.
Thread expand policy: allows you to change how KMail determines whether a thread should be expanded.
The Advanced tab lets you change the Fill view strategy: Choose "Favor speed" if you have a slow connection. "Interactivity" will show all of your current conversations first. "Batch" mode will not do any sorting.
- Default Theme: (drop down list)
- Classic
A simple, backward compatible, single row theme
- Smart
A smart multi-line and multi-item theme
- Smart with Clickable Status
A smart multi-line and multi-item theme with a clickable status column
- button
To create a custom message list theme, click the button. Select an existing theme similar to the one you want to create, then click . If none are similar, click the button. The General tab allows you to change the Name: and Description:.
The Appearance tab lets you configure visible columns and status items. To add a column, right click the column bar and select Add Column. Name the column, then select what the column will represent from the Header click sorts messages: drop down list. Visible by default is automatically checked. Uncheck it if you only want the column to be available on the context menu for the clickable sort bar. Drag the appropriate label from the Content Items to the column view box under the column bar, e.g., if you chose to add a size column you would drag the Size label underneath the Size column. Continue to do this until you have all the columns you desire. You can change the font and color of column items through the view area mouse button menu. Move, delete and resize columns via the mouse button menu on the column bar.
The Advanced tab lets you show headers. You may also change the size of status icons.
In the Date Display section you may choose one of three date formats (or create your own). The Standard Format shows the day of the week and the date. The Localized Format is shorter, omitting the day of the week. The Smart format will show today, yesterday, etc. If you want to create a Custom date format, just click on Custom format information and follow the directions.
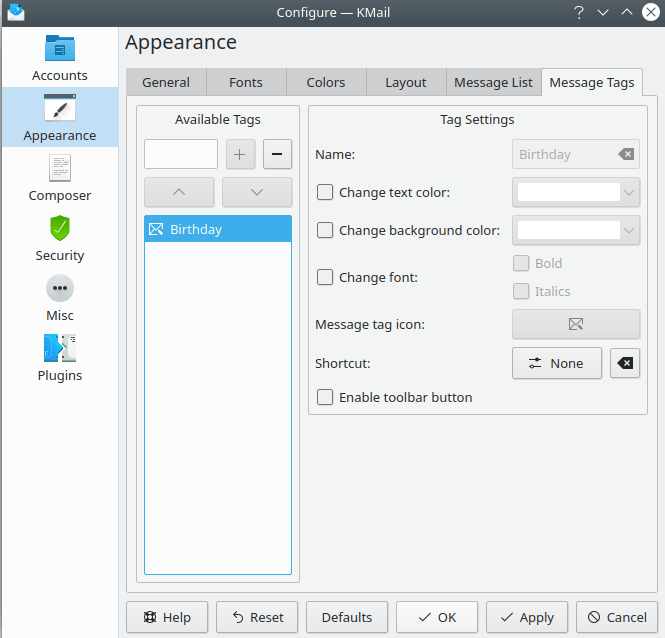
The Appearance (Tags) Tab
KMail by default gives you several ways to mark messages (Important / Action Item / Birthday), accessible via the → sub-menu. You may also define additional tags to help you categorize messages.
Use the Available Tags input field to name your special tag. Use the button to add this name to the list. Use the button to remove a tag. (The "Birthday" tag is built-in, and cannot be removed.) Use the up and down arrow buttons to sort the items in the list.
Highlight an item in the list to activate the Tag Settings dialog. You may choose any or all of six options.
- Change text color:
Select this option to display tagged message list entries in a different color. A color palette will be presented when you choose this option. Select a preset color, or choose "Custom..." for more flexibility.
- Change background color:
Choose this option to alter the background color of tagged message list entries.
- Change font:
You may select either a bold or italic type face.
- Message tag icon:
Click this button to open an icon selection dialog. The icon will be displayed on tagged message list entries.
- Shortcut:
Use this button to create a keyboard shortcut for associating this tag with selected messages.
- Enable toolbar button:
Select this option to add a new button to the KMail toolbar. Clicking the button will tag the currently selected message.
All the tags defined here will automatically appear as new options in the → sub-menu.