The Filter Creation Dialog
After using KMail for a while, you may find that you have trouble sorting out the new messages in your inbox when they arrive. Filters allow you to automatically perform certain actions on incoming messages and to manually perform actions on selected messages in a folder.
Filters consist of filter criteria, whose rules are used to determine whether this filter should be applied to a given message, and a list of filter actions, which describe what is to be done with, or to, the message if the search pattern matches.
Note
Filters are considered one after the other, starting with the first filter in the list. The first one whose pattern matches the given message is applied; you can request that the remaining filters also be processed, but the default is to stop processing at the first matching filter.
Usually, filters are used on incoming messages, but they can also be applied to sent messages or to an arbitrary message or group of messages. To selectively filter messages, select the messages you want to filter in the message list and either type Ctrl+J or select → . This will apply the filters (the ones that have been marked for manual filtering in the advanced filter dialog) to those messages.
There are two methods for creating a filter; the quick method is to use → and select a criterion from the submenu. This will open the filter dialog and present you with a new filter which has the first rule of the search pattern and the first action (as Move into Folder) preset. In most cases, all you have to do is select the folder where the message should be moved, but you can, of course, edit the filter as you like.
When creating a filter on mailing list messages, this method will try to find a criterion that uniquely identifies messages from the list. If it succeeds, the guessed name of the list is presented in the → → menu entry.
The second method is to manually construct a filter from scratch by calling the filter dialog through → . The filter dialog is described in detail in the following subsection.
This dialog allows you to manage and edit your list of filters.
You can reach it either via → or → .
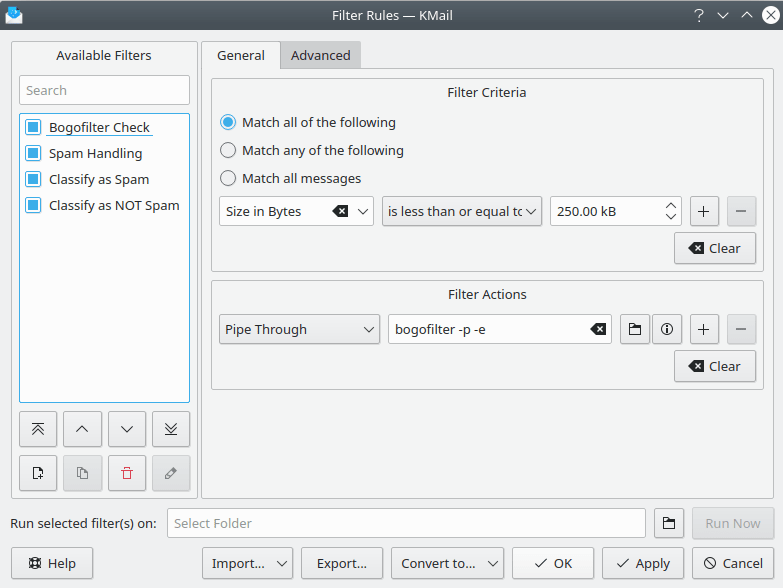
The dialog is divided into three main sections on the General and Advanced tabs.
- Available Filters
This group contains the list of filters and some action buttons to modify the filters, namely: create new filters; move them up or down the list; copy one of them; delete them; or rename them. If you select a filter from the list, its properties are shown in the right-hand half of the dialog.
- Filter Criteria
In this group you can edit the pattern that messages must match before the filter is applied to them. You can select whether all of the defined rules must match, or whether a single match is enough. See Search Patterns below for a detailed description of each search rule type.
You can click on to get an additional (initially empty) rule if you want to define more complex patterns, and on to remove the selected rule. clears the pattern, i.e., it removes all but one rule from the screen and resets it.
- Filter Actions
In this group you can edit the list of actions that are applied to all messages that match the defined filter criteria. See Filter Actions below for a detailed description of each action type.
You can click on to get a new, empty action (if you want to define more than one action), and on to remove the selected action. clears the list, i.e. it removes all but one action and resets that one.
- Advanced Options
In this group you can define a few advanced options that allow you to fine tune your filtering.
Using the first row of check boxes, you can toggle when the filter is applied: the Apply this filter to incoming messages option means that the filter is applied to messages when you receive them (i.e. on
 Check Mail).
The filter can be applied to all messages, to all but online IMAP accounts, or
to particular incoming email accounts.
Check Mail).
The filter can be applied to all messages, to all but online IMAP accounts, or
to particular incoming email accounts.The Apply this filter to sent messages option means that the filter is applied to messages when you send them, and the Apply this filter on manual filtering option controls whether to apply this filter when filtering is specifically selected (i.e. via → .)
If Apply this filter to sent messages is checked the filter will be triggered after the message is sent and it will only affect the local copy of the message. If the recipient's copy also needs to be modified, please use Apply this filter before sending messages.
The If this filter matches, stop processing here check box controls whether or not the filters after the current filter will be processed when the current filter matches.
If the Add this filter to the Apply Filter menu check box is selected, this filter will be inserted in the → submenu. You can then apply this single filter to a message or a set of messages. If you select this option, you may optionally select a keyboard shortcut and insert a special icon to invoke this filter from the toolbar.
Another way of applying filters is to use the → menu option, which applies all the filters – one after another – until they are all used or one of the filters that matches specifies the If this filter matches, stop processing here option.
Note
Filters are automatically named unless you explicitly
rename them using the  Rename... button.
The dialog assumes that it should continue auto-naming the filter
as long as the filter name starts with “<”.
Rename... button.
The dialog assumes that it should continue auto-naming the filter
as long as the filter name starts with “<”.
If you apply filter changes, via or , only the valid filters are actually copied to the internal filter manager.
Similarly, empty rules and actions are removed from the pattern and action lists, respectively, before the filter is saved.
The most common use of filters is to filter on the sender of messages. This can be done by choosing From. A good bet for a mailing list would be All Recipients, but there are other criteria a filter can search for (note that all patterns are interpreted case-insensitively).
- Complete Message
Searches the whole message (i.e. headers, body and attachments, if any).
- Body of Message
Searches the body of the message (i.e. the whole message except the headers).
- Anywhere in Headers
Searches all the headers in the message.
- All Recipients
Searches the “To” and “CC” header fields of the message.
- Size in Bytes
Sets upper or lower bounds on the message's size.
- Age in Days
Sets upper or lower bounds on the message's age.
- Message Status
Sets restrictions on the status of the message (Important / Read / Unread / etc. see → ).
- Message Tag
Checks for tagged messages. See → .
- Encrypted
Checks for encrypted messages.
- Any other value (From, To, Date, etc.)
Searches the header field with that name.
The list of possible rules depends on what you selected in the first drop down box. The available rules are:
| Rule | Available for | Description |
|---|---|---|
| contains/does not contain | all textual search items | Matches if the searched item contains (or does not contain) the given text. |
| equals/does not equal | most textual search items | Matches if the searched item is equal to (or not equal to) the given text. |
| starts with/does not start with | most textual search items | Matches if the searched item begins with (or does not begin with) the given text. |
| ends with/does not end with | most textual search items | Matches if the searched item ends with (or does not end with) the given text. |
| matches regular expr./does not match reg. expr. | all textual search items | Matches if a part of the searched item matches the given regular expression (or does not match it). If the regular expression editor is installed then you can edit the regular expression by clicking on the Edit... button. |
| has an attachment/has no attachment | Complete Message | Matches if the message has an attachment (or does not have an attachment). |
| is equal to/is not equal to | numerical search items | Matches if the value of the search item is equal to (or not equal to) the specified value. |
| is less than | numerical search items | Matches if the value of the search item is less than the specified value. |
| is greater than | numerical search items | Matches if the value of the search item is greater than the specified value. |
| is less than or equal to | numerical search items | Matches if the value of the search item is less than or equal to the specified value. |
| is greater than or equal to | numerical search items | Matches if the value of the search item is greater than or equal to the specified value. |
| is/is not | Message Status | Matches if the message has (or does not have) the specified status. |
| is after/is before or equal to | Date header | Matches if the message was sent after (not after) the specified date. |
| is before/is after or equal to | Date header | Matches if the message was sent before (not before) the specified date. |
The most common use of filters is to divert some incoming messages to particular folders; this can be done by choosing Move into Folder. Here is a list of all possible actions.
- Move Into Folder
This will move the message into another folder, and remove it from its current folder.
- Copy Into Folder
This will copy the message to another folder, and leave the message in the current folder.
- Set Identity To
This will set the identity that will be used when you reply to this message.
- Mark As
This allows you to mark the message as read or important (flagged), but also as forwarded, replied, etc.
- Add Tag
This will add a tag to the message. You may choose from a list of all the tags that have been defined.
- Send Fake MDN
This will send a faked message disposition notification (i.e. a read receipt) to the sender of the message.
- Set Transport To
This will set the method of transport (e.g. SMTP) that will be used when you reply to the message. You may choose from a list of all your outgoing email accounts.
- Set Reply-To To
This will modify the Reply-To field of this message. This can be useful for mailing lists that automatically set a Reply-To address you do not wish to use.
- Forward To
This will forward the message inline (i.e. as if you selected → → ) to another email address. You may select a custom forwarding template if such a template has been defined. If KAddressBook is installed, you may choose the “Forward To” address from a pop-up window.
- Redirect To
This will redirect the message as-is to another email address. If KAddressBook is installed, you may choose the “Redirect To” address from a pop-up window.
- Confirm Delivery
Will return a message to the sender that verifies successful delivery of their message, if the sender requested that.
This action allows you to select who will get delivery receipts from you. Though you can globally enable the sending of delivery confirmations in the Configure KMail... dialog (Security page) we do not recommend that you send them to everyone, since this makes tracking of spam messages very easy for the spammers.
- Execute Command (for advanced users only)
This will execute a program, but will not modify the message. Specify the full path to the program you want to execute; KMail will then wait until the program returns. If you do not want KMail to wait, append '&' to the command. You can feed the segments of the message into the program one by one: %0, %1, etc. stand for files representing the message segments. For common messages, %0 is the plain text message, %1 the first attachment and so on. Additionally, the whole message is fed into the program's stdin; and every occurrence of %{foo} is replaced by the content of the foo header. If you need to identify the message via its storage location in the Akonadi database, you can use the %{itemid} or %{itemurl} placeholders to achieve that.
Warning
This currently only works if the message has at least one attachment. No, not even %0 will work in the general case!
Tip
You can enter arbitrarily-complex shell commands here, since KMail uses a sub shell to execute the command line; therefore, even this command will work (within its limits):
uudecode-o$(mktemp kmail-uudecoded.XXXXXX)&& echo$'\a'- Pipe Through
This will feed the message to a program: if the program returns output, the entire message (including the headers) will be replaced with this output; if the program does not return output or exits with a return code other than 0 (indicating an error occurred), the message will not change. Specify the full path to the program. The same substitutions (%n, %{foo} as with Execute Command may be performed on the command line.
Both the Anti-Spam Wizard and the Anti-Virus Wizard use the “Pipe Through” action to check for spam / malware. The commonly available anti-spam and anti-virus programs return the message, and insert an extra header record, if spam (or a virus) is detected.
Warning
Be cautious with this action, as it can damage your messages if the filter program returns garbage or extra lines.
- Remove Header
Will remove all header fields with the given name from the message. This is useful mainly for removing bogus “Reply-To:” headers.
- Add Header
If no such field is already present this will add a new header field with the given name and value to the message; if there already is a header field with that name, it is overwritten with the given value; if there are already multiple headers with the given name (e.g. “Received:” headers), an arbitrary one of them is overwritten and the others are left unchanged -- this is a known limitation. You may want to combine this filter with the Remove Header filter above to make sure that there are no other headers with that name in the message.
- Rewrite Header
Will scan the given header field, modify its contents and write it back. The search string is always interpreted as a case-sensitive regular expression. The replacement string is inserted literally except for occurrences of
\n,$nand${nn}, wherenis a positive (single-digit, except for the third form) number or0. These constructs are interpreted as back references to substrings captured with parentheses in the search string.Analogous restrictions as in the Add Header action apply here, too.
- Play Sound
Will play the specified sound. A browse button lets you choose a pre-recorded sound (e.g. .wav) file.
- Add to Address Book
If KAddressBook is installed, this action will let you specify which header to scan (From, To, CC, or BCC), what tag to assign, if any, and which named address book to store the addresses in.
- Delete Message
Deletes the selected message(s). Use this option cautiously. Deleted messages cannot be recovered.
- Unset Status
This is the inverse of Mark As, above. Instead of marking the selected message as important, read, etc., this action will clear the specified flag.
- Encrypt
Will encrypt the selected message(s) with the specified public key. You may choose from any public / private key pairs saved on your key ring.
- Decrypt
Will decrypt the selected message(s). Use this action with caution. KMail will decrypt messages automatically when you open them for viewing, so you probably don't really need to use this action.
As of yet KMail does not highlight or mark mails that
have an extra Priority: header.
If you want to flag all “urgent” messages as being
important, you can use a filter:
Procedure 3.1. Tagging urgent messages as important
Open up the → dialog and click the
 New icon below the Available Filters
list.
New icon below the Available Filters
list.In the Filter Criteria area, select Anywhere in Headers and contains from the drop down boxes and type
Priorityin the text field. Select the same criterion in the next line and typeurgentin the text field of the second drop down box.So your filter will match all messages containing a “Priority: urgent” header field.
Skip down to the Filter Actions area. Select Mark As from the first drop down box. A new drop down box containing a list of marker flags is shown to the right. Select Important from the drop down box.
Since you want this filter to not prevent other filters' message rules from being applied, carefully uncheck the If this filter matches, stop processing here option on the “Advanced” tab.
Click on , and you are done.
Just remember to move the “Priority: urgent” filter entry to the top of the Available Filters list each time you add a new filter, so that your flow-through filter is always applied first.
If you are subscribed to the (general) KDE List, you could create a
folder for the list (let's call it
KDE-General) and use a filter to
automatically transfer new messages from your inbox to your
KDE-General folder if they came from the
KDE List. Here is how to create this filter:
Procedure 3.2. Filtering a mailing list
Check if → → can identify the mailing list (the name of the list should then appear in the menu item); in this case, this works and you are presented with a filter that has “List-Id contains <kde.kde.org>” preset. Then select the desired destination folder from the folder pull-down menu in the Filter Action group and that is it.
If that does not work, think of a unique way of identifying the messages you want to filter. The (almost) unique property of KDE List messages is that they always contain “kde@kde.org” in the To: or CC: field. It is not quite perfect, because this fails for cross-posted messages.
Select → .
Press the
button to create an empty
filter. It will appear as <unknown>.In the Filter Criteria area, select All Recipients from the first drop down box, contains from the second drop down box, and type
kde@kde.orgin the text field.Skip down to the Filter Actions section. Select Move Into Folder from the first drop down box. Click on the folder icon and a window containing a list of folders will appear. Select the folder that you want the filtered messages to be transferred to. For this example, you would select KDE-General.
You may find that you need to use more powerful criteria to
properly filter your messages; for example, you may only want to
filter the KDE List messages that are written by your friend Fred
Johnson <fj@anywhere.com>. This is where the rest of the
matching criteria section comes into play:
Procedure 3.3. Extending the filter
Open up the Configure Filters... window and select the filter you just created.
Since you want to filter all messages that have
kde@kde.orgin the To: or CC: field and that are from Fred, check the radio button.Now, go to the second search rule and select the following from the pull-down menus: From, contains. Now, type
fj@anywhere.comin the text field.
You now have a filter that identifies all KDE List messages
that are from fj@anywhere.com.
It is important to realize that the order of the filters has an impact on the speed of the filtering process. Here are some ideas which can help you to improve filter performance.
- Stop filter processing as soon as possible:
If you know that a filter finally processes a certain class of messages, please make sure to check the option If this filter matches, stop processing here for the filter. This will avoid the evaluation of the filter rules of all subsequent filters. (See the advanced options in the Filter Dialog).
An example is filtering messages from mailing lists via List-Id header into separate folders. Having found out that a message came from list A means that you can avoid checking the next filter for messages from list B.
- Consider the costs of the evaluation of filter rules:
The time required to evaluate a filter rule depends on the way the rule is constructed. In particular, scanning for a substring using the contains operation is faster than a pattern matching using the matches regular expr. operation.
Another dependency is on the amount of data which is used for the evaluation of a filter rule. If the rule is based on a message header, its evaluation should normally be much faster than the evaluation of a rule based on the complete message.
Try to keep the filter rules as simple as possible.
- Check the order of your filters:
The various filter actions have different degrees of complexity. The most expensive filter actions are Pipe Through and Execute Command, because both need external programs to be run. Placing filters containing these filter actions behind other filters that can reduce the number of times these complex actions are required is useful, if the filter logic allows this.
An example is filtering messages from a mailing list and detecting spam messages. For the spam detection you will usually use an external tool via a Pipe Through action. Filtering the messages for the mailing list is done via the List-Id header. If you do not want to check the messages from the mailing list for spam too, it is better to use the filter for the mailing list messages before the filter for the spam detection. This way you avoid the expensive and slow spam check for all messages which were identified as mailing list messages.
If you want to verify that your filters work as intended, you can open a viewer for the filter log via → .
In the viewer you can configure logging of the filter process. You can control the level of detail recorded, clear the log, limit the size of the log, and save the log as a file. The log can provide valuable information when you want to improve your filter rules.