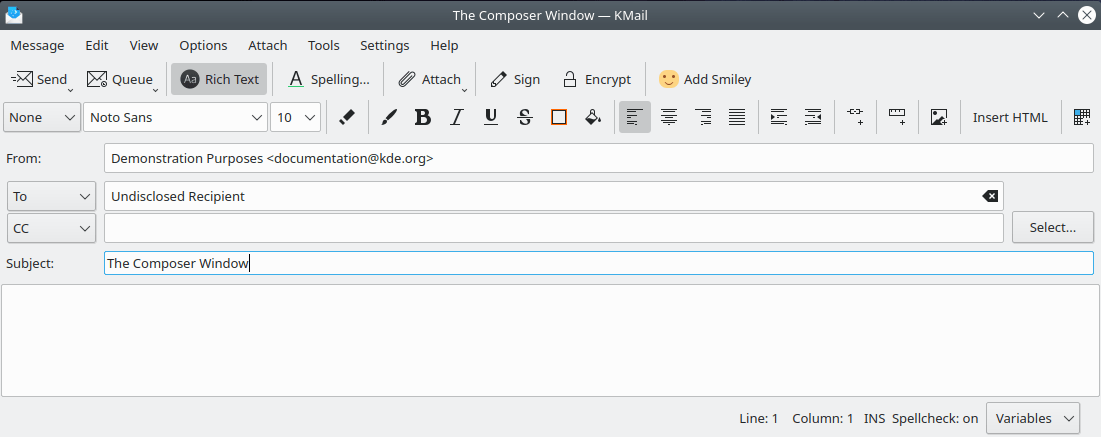
The Composer Window in HTML composition mode.
The composer window is used to write new messages, to compose replies, and to forward messages. It can be opened in several ways. Here are the various options for composing messages.
- New Message...
The New Message composer window can be invoked in four different ways:
→ →
→
Via the
 New icon on the main toolbar.
Via the keyboard shortcut Ctrl+N.
To write your message, fill in the appropriate fields in the composer window. Use the menu to select which header fields are displayed. Any selection you make will remain as the default when you open a new composer window. These items are available.
The drop down box lets you select an identity to use.
The drop down box lets you choose a dictionary for spell checking.
lets you specify where a local copy of this message will be saved when you send it.
lets you select an outgoing mail server.
The traditional From:, To:, and Subject: fields. (The Reply To: field will appear only if you have specified an alternative Reply To address on the Advanced tab in the → → → dialog.)
toggles fixed width fonts on and off.
displays the snippets window, where you may save frequently used bits of verbiage.
There are a variety of shortcuts to help you select recipients. The button next to the To:, CC:, and BCC: fields opens a list from KAddressBook so you can select one or more people who should receive this message.
Alternatively, when you start typing an address in one of the To:/CC:/BCC: fields, a popup will appear that suggests similar recently used addresses and closely matching addresses from KAddressBook; if you do not like this automatic popup, you can disable it by clicking the mouse button in the field where you're typing, then choosing a different Text Completion > mode. You can also use this context menu to fine-tune the order in which suggested completions appear (via Configure Completion...).
Whenever you want to add more than one recipient in one of the fields, use a comma to separate one address from the next one. You may have to specify fully qualified addresses (i.e.
user@example.com) even for local users, depending on your system configuration.When you are finished with your message, click the
 Send icon to send the message now,
or click the
Send icon to send the message now,
or click the  Queue icon to put the message in the outbox.
If your message is not finished yet, select →
to save it for later editing.
If you want to print your message, select →
to preview the message, and → to print it.
Queue icon to put the message in the outbox.
If your message is not finished yet, select →
to save it for later editing.
If you want to print your message, select →
to preview the message, and → to print it.→ lets you schedule your emails to be sent at a specific date and time. Please see Send Later Agent for details.
- → → →
Composing a new message from a template is useful when you have created a masterpiece that you would like to use as a template for future new messages. Select → ; this will place your new template in the templates folder. You can revise the template at any time by selecting it from this folder. Double click on the template's name (or press the shortcut key, T) to open it in a composition window. You may also select the template via the menu, as shown above.
If you want to send an encrypted
or digitally signed message, select the
 Sign and / or
  Encrypt icon in the toolbar.
Use the → dropdown list to select the format used to encrypt the
message. (The Options menu also lets you sign / encrypt the message.)
You may choose one of five formatting options.
Encrypt icon in the toolbar.
Use the → dropdown list to select the format used to encrypt the
message. (The Options menu also lets you sign / encrypt the message.)
You may choose one of five formatting options.
- Any
KMail will use a format which is understood by all recipients of the message. The preferred format for each recipient can be specified via KAddressBook.
- Inline OpenPGP (deprecated)
This format is deprecated, but is supported for backward compatibility. If you use this format then only the message text will be signed and/or encrypted. Attachments will neither be signed nor encrypted. HTML messages cannot be signed with this format. You should only use this format when necessary, i.e. if you send messages to people who use email clients that cannot handle the more advanced formats.
- OpenPGP/MIME
This format is the successor to the inline OpenPGP format. If you use this format then the message text and all attachments will be signed and/or encrypted (at least by default). This is the recommended format if you use OpenPGP encryption.
- S/MIME
This format is an alternative format to OpenPGP/MIME. If you use this format then the message text and all attachments will be signed and/or encrypted (at least by default). This format is mostly used by corporations. It relies on an x.509 certificate, not a PGP / GPG key.
- S/MIME opaque
This format is a variant of the S/MIME format. Because it rolls the message, any attachments, and the digital signature into a single MIME object, it is cpu-intensive and should only be used if necessary.
Note that HTML messages are often regarded as an annoyance; therefore, you should use HTML messages judiciously. In particular, you should never send HTML messages to mailing list recipients unless HTML messages are explicitly allowed.
To create HTML messages, you must first enable
the markup tools. To do this, enable
in the menu, or click on
the  Rich Text icon on the KMail toolbar.
An additional toolbar with several formatting tools will appear. Via the HTML toolbar you can choose
standard text or bulleted / numbered lists. (Use the None
Rich Text icon on the KMail toolbar.
An additional toolbar with several formatting tools will appear. Via the HTML toolbar you can choose
standard text or bulleted / numbered lists. (Use the None  drop-down list at the left edge of the toolbar to control the style of bulleted / numbered lists.)
You can also control the font family, the font size, the font style (bold,
italic, underlined, or strike-through) and the text / background color. And you can specify
the alignment of the text (left aligned, centered, right aligned, or justified) and
insert anchor tags (aka links), horizontal lines, images, tables, and arbitrary HTML code
(although support for some of the more advanced HTML tags is still incomplete).
drop-down list at the left edge of the toolbar to control the style of bulleted / numbered lists.)
You can also control the font family, the font size, the font style (bold,
italic, underlined, or strike-through) and the text / background color. And you can specify
the alignment of the text (left aligned, centered, right aligned, or justified) and
insert anchor tags (aka links), horizontal lines, images, tables, and arbitrary HTML code
(although support for some of the more advanced HTML tags is still incomplete).
You can attach files to your message by using any of these methods.
Use the → dropdown list and ensuing dialog to choose a file;
Click the
 Attach icon and select the file you wish to attach;
Drag a file from the desktop or another folder into the composer window;
Drag a message from KMail's message list into the composer window – that message will then be attached;
Select one of the additional options in the menu; or
Select →
 Insert Text File ...
or → Insert Recent Text File >.
Insert Text File ...
or → Insert Recent Text File >.
Once a file is attached to your message, it appears in the attachments pane at the bottom of the composer window. You can use the mouse button on each attachment to , , , , , or the attachment. (This context menu varies a little, depending on the file type of the attachment.) Several options (Compress / Encrypt / Sign / Suggest Automatic Display) may be toggled on or off for each file attached to a message.
Use the item in the context menu to open the Attachment Properties dialog. The first field contains the attachment's MIME type. Just like the Name field, it is automatically filled with an appropriate value. Sometimes the MIME type may be wrong. You can then type in any MIME type or choose from the list of common MIME types. You can also select an encoding method for your file from the list of encoding options (normally, the default value works fine). Check the Suggest automatic display option if you want to suggest to the recipient the automatic (inline) display of this attachment. Whether this works, or not, depends on the recipient's email client, and on his settings.
You can also attach public crypto keys to the message by choosing the appropriate options in the menu. GnuPG keys and x.509 certificates are (usually) handled as file attachments.
KMail can automatically check the spelling of your message and underline unknown words in red. If there are too many unknown words, KMail will disable its checking. To select the language used when checking, select → . You can disable automatic spell checking in the menu.
If you need to write mails in different languages, enable the Dictionary drop down box with → from the menu. Using this drop down box allows you to change the spell checker's language with one mouse click.
To check the spelling of your message via a dialog, select → . KMail uses Sonnet to check spelling; Sonnet is the KDE frontend to the Aspell, Hspell, Enchant, and HUNSPELL spell checking programs. Note that you may need to configure the spell checker using → .
When editing in the composer window you can insert frequently used bits of text as snippets. To configure mail snippets, select → from the menubar. A new panel will appear on the right side of the composer window.
To add a new snippet to the Snippet Panel, right click on the panel, then click in the context menu. A snippet editor dialog will appear, in which new text can be added and the snippet can be given a name. A Shortcut can also be associated with the snippet. Snippets can be grouped together by creating groups and adding snippets to a particular group. Use the mouse button context menu to add, edit, or remove snippets of text from the saved collection.
The Snippets tool enables insertion of variable text in predefined places any time you insert a snippet in a file. To do this, Snippets provides its own variables mechanism. You can insert variables in the snippet text itself by using separators ( $ ) to enclose the variable names. For example: $variablename$, $invoicenumber$, $weekno$.
The variable separator can be changed to another character by changing snippetDelimiter in the
[SnippetPart] section in the Text Snippet configuration file, which can be found at ~./config/kmailsnippetrc.
snippetDelimiter=$
The KMail 2 composer provides a built-in translator that can be accessed by selecting → from the menu bar. A new panel will appear at the bottom of the composer window.
To translate a section of text, first enter the text you would like translated in the box labeled Drag text that you want to translate.. Select the language in which it is written in the From: drop down box. Select the language you would like to translate to in the To: drop down box, then click the button. After being translated by Google Translate, a free online service, your translated text will appear in the next box. If you need to translate in the other direction you can just click the button. To clear all text, click the button.