Table of Contents
FITS, or Flexible Image Transport System, is the standard format for representing images and data in Astronomy. The KStars FITS Viewer is a tool to view those images. It is not designed for editing of FITS Images.
The FITS Viewer can be automatically invoked for images received from the camera. It can also be invoked directly from the main KStars menu. To open a FITS file, select the → menu item, or press Ctrl+O.

The above diagram illustrates the FITS Viewer main work area and window. There is also a hidden area that can be exposed by moving the mouse over the 6 small dots on the left side (about center of the image vertically) and pressing and holding the mouse, sliding it over to the right a bit.
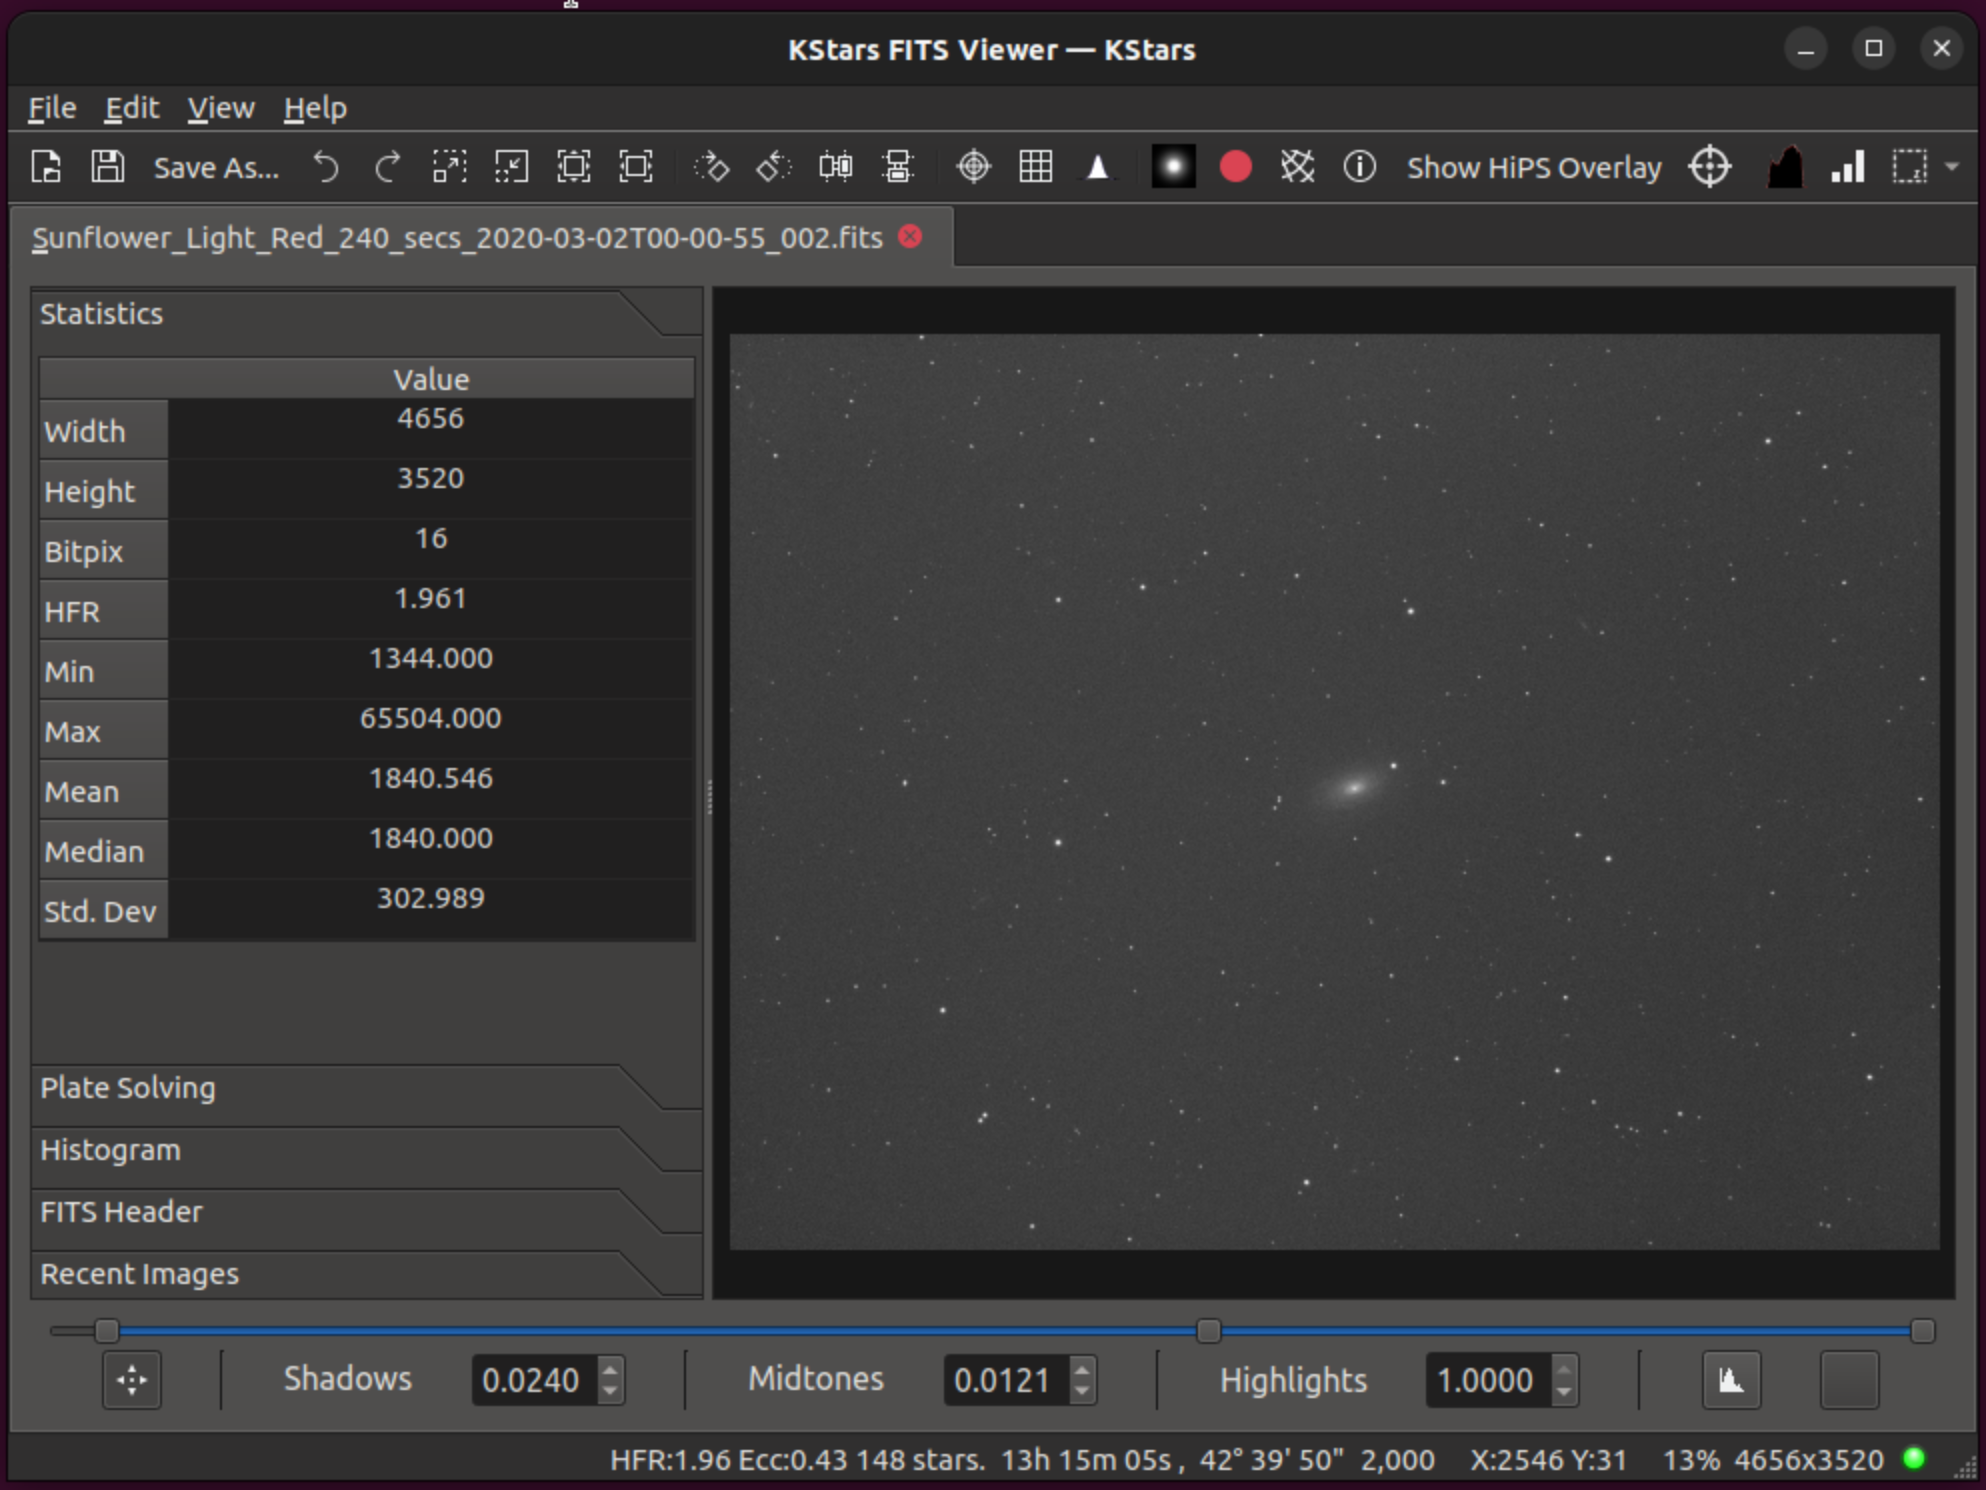
The various controls and displays for the FITS Viewer are shown below. The tool provides basic functions for image display. While the tool adhere to the FITS standard, it does not support all possible FITS features:
Support for only one image per file.
Support for only 2D and 3D data. 1D data are discarded.
The FITS Viewer window is divided into the following regions:
Main Menu
File
Standard Open, Save, and Save As.
FITS Header: Display FITS header table data.
Debayer: Covert RAW image to RGB.
Edit
Undo: Undo last action.
Redo: Redo last action.
Copy: Copy image to clipboard.
View
Zoom Controls: Zoom in, Zoom out, standard Zoom.
Filters: Auto Stretch, Contrast, High Pass, Rotate, Flip.
Mark Stars: Detect and mark stars in the image.
Show Clipping: Display in red which stars have pixels that appear to be clipped.
Main Toolbar
Open File.
Save File: Save FITS data. Any filters applied to the image will be saved.
Save File As.
Undo last action.
Redo last action.
Zoom In: Zoom in up to a maximum of 400%. For large images this operation can be very memory intensive. Turn on Limited Resource Mode to save memory.
Zoom Out.
View in Actual Size.
Zoom to fit.
Rotate Right.
Rotate Left.
Flip Horizontal.
Flip Vertical.
Show Cross Hairs: Toggles crosshairs in the center of the image.
Show Pixel Gridlines: Toggles pixel grid.
Mark Stars: Detect and mark stars in the image.
Show Clipping: Display in red which stars have pixels that appear to be clipped.
Show Equatorial Gridlines: Toggles Equatorial Grid if FITS contains a valid WCS header.
Show Objects in Image: Identifies objects such as stars, galaxies, and nebulae within the image.
Center Telescope: Toggle Center Telescope mode. When active and if the image contains a valid WCS header, clicking anywhere in the image triggers the telescope slewing to the clicked point.
Histogram: Toggle histogram view in the side panel.
Statistics: Toggle FITS Statistic view in the side panel.
Auto Stretch: Apply Auto Stretch filter to the image.
Toggle Selection Rectangle: Toggle selection rectangle for statistics of a region of interest.
Side Panel: The side panel can be opened by dragging the separator to the right. When dragged to the left, the side panel can also be closed.
Statistics: Displays image statistics including Minimum, Maximum, Average, and Median values.
Plate Solving: A tool plate-solve the loaded image. This is useful to debug plate-solving issues.
Histogram: Displays image histogram with controls to adjust the minimum and maximum values for each channel. Both linear and logarithmic scalings are available to apply to the image. This is somewhat redundant with the below-image histogram and may be removed in the future.
FITS Header: Displays a table for FITS header keywords, values, and comments.
Recent Images: Displays recently opened images. Clicking on any image will load it.
Image Display Area.
Mouse: Hovering over the image will update the status bar values accordingly.
Mouse: Hovering over the image will move a cursor in the histogram display below the image, if that histogram is activated.
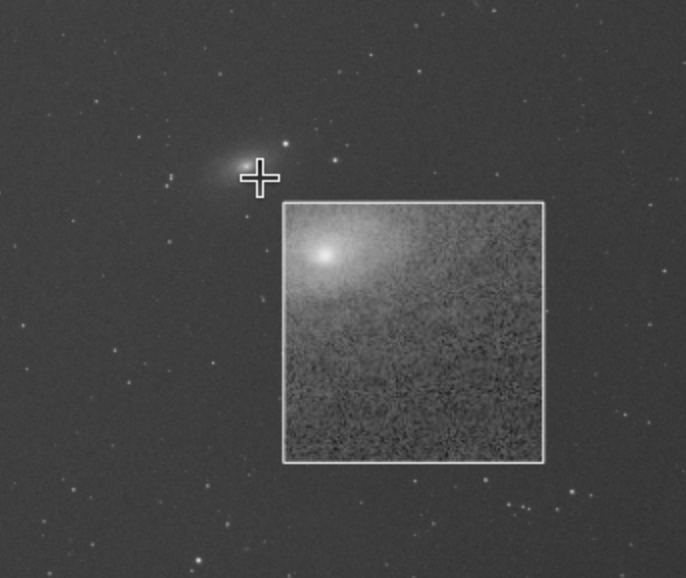
Control key: Holding down the control key and then moving the mouse will show a magnified portion of the image.
Statistics of region of interest
Provides simple statistics average mean, average standard deviation and average median of the selected region by the user in a tooltip.
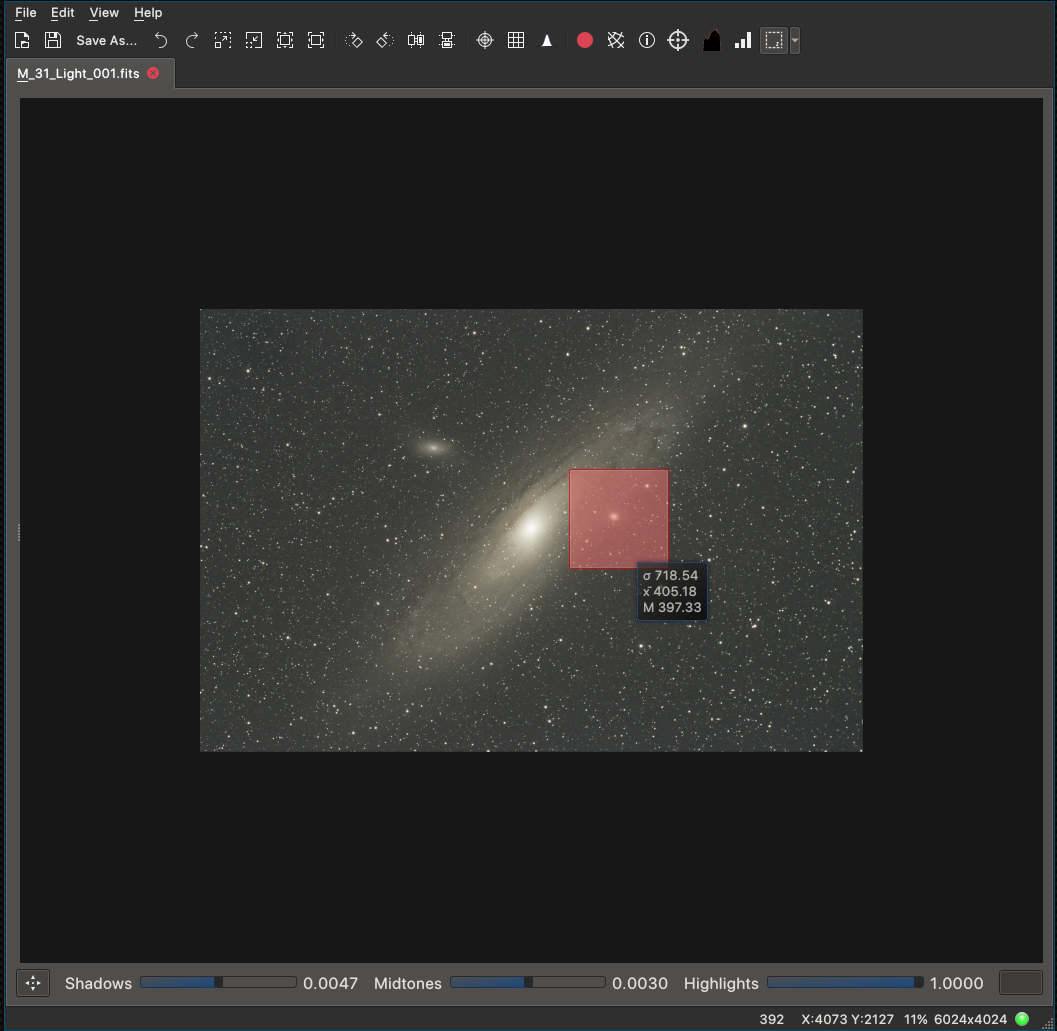
The user can either set the selection region by Shift+Left Click dragging (when the selection statistics is activated) or by choosing an entry from the drop down menu of the Toggle Selection Rectangle button. In addition to this, the user can translate the region by simple Left Click drag of the mouse. The statistics of the region are shown as a tooltip once the cursor is brought over the selection region. For smaller images, the statistics are updated instantly, and for larger images, the statistics are updated once the user releases the Left Click button after modification of the region.
Stretching Controls

Near the bottom of the window are controls for stretching the image and displaying its histogram. They are described below from left to right.
Enable Stretching: On the very left of this display is a button that enables or disables stretching.
Shadow Value: The value below which pixels are displayed as black can be manually entered (scale is 0 to 1.0, even for integer pixel values).
Midtones Value: The midtones value which controls the brightness of the image can be manually entered (scale is 0 to 1.0, even for integer pixel values).
Highlights Value: The value above which pixels are displayed as white can be manually entered (scale is 0 to 1.0, even for integer pixel values).
Show Histogram: A button that displays or hides the image histogram is to the right of the highlights number box.
Auto Stretch: A button (magic wand icon) that will automatically create a pleasing stretch is found on the right. It is disabled if the stretch is already at the automatically computed value.
In addition, there are sliders that can be used to adjust the Shadow, Midtones and Highlights values. Adjusting them will change the values displayed.
The histogram, if it is enabled, may be zoomed by using the mouse's scroll wheel, and panned by dragging with the mouse. A cursor in the histogram shows the position of the pixel in the image under the mouse.
Status Bar

From right to left, the following status indicators are available:
Loading Indicator: The LED becomes yellow when an image is getting loaded and turns green after loading is successfully done. If there are problems with loading the image, it turns red.
Resolution: Image resolution in pixels. 4656x3520 in the screenshot above.
Zoom Percentage. 13% above.
Cartesian Coordinates: Displays and updates the current mouse position as you hover over the image. X:769 Y:3508 above.
Pixel Value: Value of the pixel under the mouse. 1,792 above.
Equatorial Coordinates: If the image contains a valid WCS header, the J2000 Right Ascension (RA) and declination (DE) values are displayed. 13h 14' 22" 42 37' 35" above.
Image Stats: Displays the HFR, Eccentricity and number of stars if computed. HFR:1.96 Ecc:0.43 143 stars above.
Clipped Stars: If Show Clipping is activated in the main toolbar, it displays the number of possibly clipped pixels. Clip:403 above.
In addition to image display, the viewer can process World-Coordinate-System (WCS) header if present within the FITS file and provides useful information regarding the objects found within the image, equatorial grid overlay, popup menu, and the ability to slew the mount (if connected) to any point within the image.
Several filters can be applied to enhance the image include auto stretch and high contrast. Depending on the image size, these operations can take a few seconds to complete. The bottom status bar displays the current pixel value and current X & Y coordinates of the mouse pointer within the image. Furthermore, it includes the current zoom level and the image resolution.
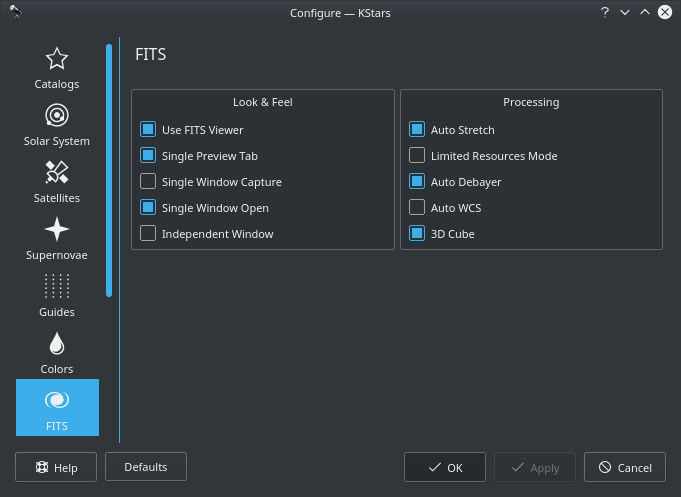
When loading a bayered image, the viewer can automatically debayer the image if Auto Debayer is checked in the FITS Settings. The debayering operation fetches the bayer pattern (e.g. RGGB) from the FITS header. If none exists, you can alter the debayering algorithm and pattern from the menu or by using the Ctrl+D shortcut.
Since operations such as auto debayering and auto WCS are computationally expensive and stress the processor on low-powered embedded devices, you can toggle their behavior in KStars Settings FITS page.
Hovering over any option shall display a detailed tooltip that explains its function.