The Ekos Guide Module performs autoguiding using either the powerful built-in guider, or at your option, external guiding via PHD2 or lin_guider. Using the internal guiding, guider camera frames are captured and sent to Ekos for analysis. Depending on the deviations of the stars from their lock positions, guiding pulses corrections are sent to your mount's RA and DEC axes motors. Most of the GUI options in the Guide Module are well documented so just hover your mouse over an item and a tooltip will popup with helpful information.
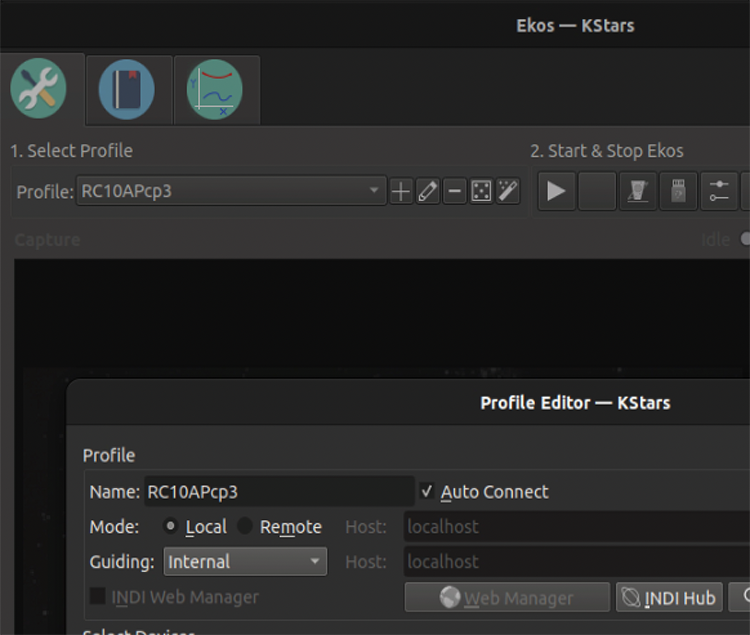
To perform guiding, you need (one time) to select a Guider in the Profile Editor for the profile you will be using. In the profile editor, choose Internal for the Ekos internal guider, or PHD2.
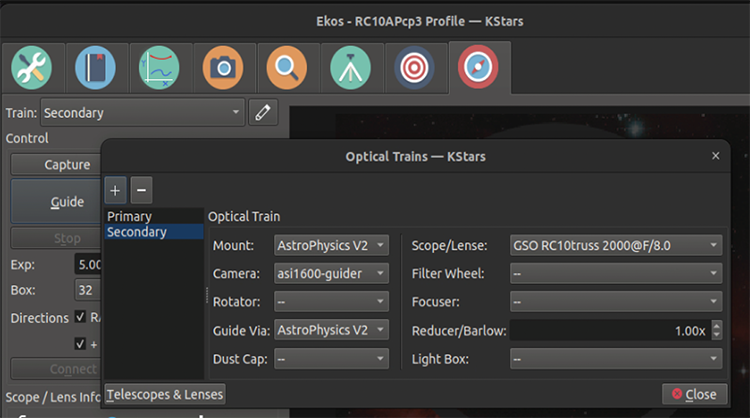
To perform guiding, you also need to set up your guiding optical train. This 2nd optical train is almost always different from the one you are using with capture/align/focus. See the image above for an example guider optical train configuration. Note that the telescope chosen is the guiding scope, which may be the same as your main telescope if you are using an OAG (off-axis-guiding) or ONAG guiding scheme. The camera selected is, of course, your guiding camera. The Guide Via should be your mount, assuming you are sending guide pulses directly to your mount, or the name of the ST4 device (e.g. your camera) should you be using ST4 guide pulses.
Please look at the main guider page shown at the start of this Guider section. There are many parameters that also can be adjusted, some of which are listed below.
Exposure: On the main guiding page you can adjust the guiding exposure time. After the guide-camera completes the exposure, the guide algorithm computes and sends the guide pulses to the mount, then it waits a user-configurable delay, and then then begins its next exposure.
Binning: Pixel binning for the guide image. It usually makes sense to bin the pixels 2x2. The algorithms can still find sub-pixel star positions and send proper guide pulses to the mount.
Box: This only is applicable to guide algorithms other than MultiStar, and MultiStar is the recommended guiding scheme. Size of the box enclosing the guide star. Select a suitable size that is neither too large or too small for the selected star.
Directions: Typically you want to keep all the directions boxes checked. Unchecking them will disable guiding in those directions. For instance it is possible to disable DEC guiding in the North direction.
Dark: Check this to enable dark-frame corrections to your guiding image. See below.
Clear Calibration: Check this to delete your calibration data. See the calibration section below.
Subframe, AutoStar: These only apply to guide algorithms other than MultiStar, and MultiStar is the recommended guiding scheme.
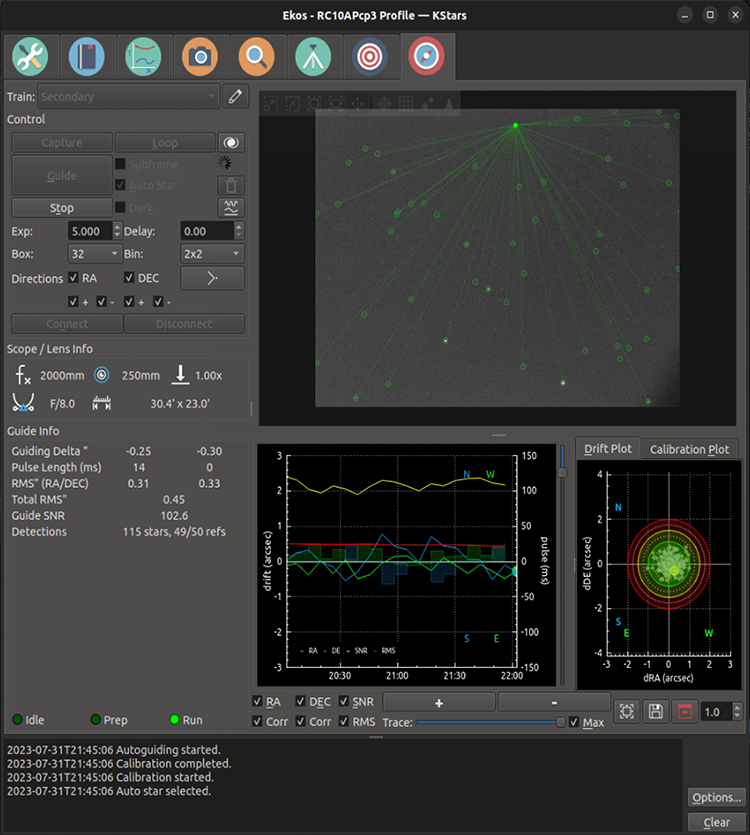
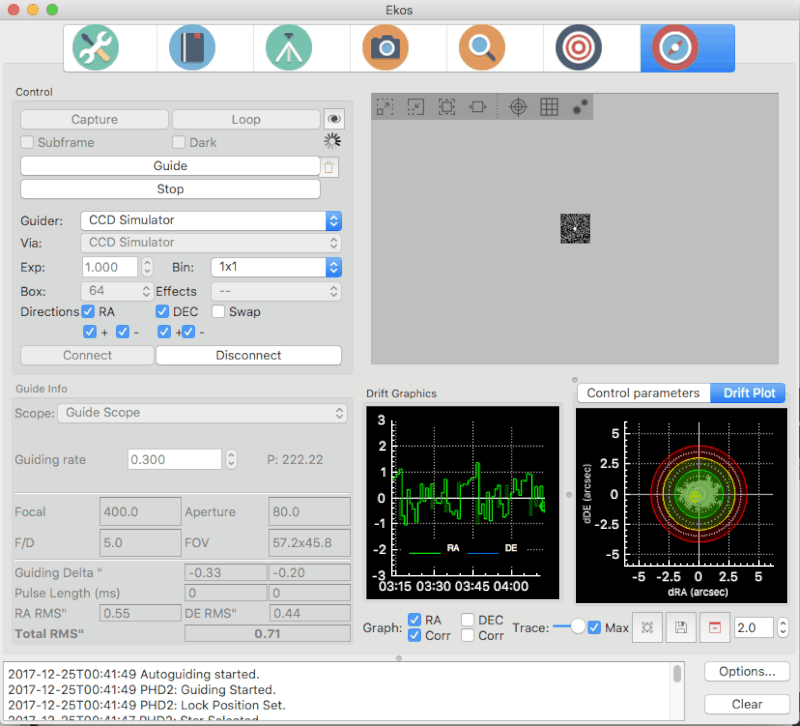
Autoguiding is a two-step process: Calibration & Guiding. Calibration is needed for the scheme to understand the camera's orientation, relative to the RA and DEC axes, and also the effects of guide pulses (e.g. how much a 100ms RA guide pulse will typically move the RA axis). Once it estimates these values, the guider can correct the mount's position effectively. You can see calibrated values for those parameters in the above image in the "Calibrated Values" section.
Similar to other guiders, we recommend that you carefully calibrate once, and then only re-calibrate when necessary. It is necessary to re-calibrate when the camera is moved (e.g. rotate) relative to the mount. It should not be necessary to calibrate every time you slew the mount. You should calibrate when pointing near the Meridian and along the Celestial Equator (probably just West of it). Guiding (and guide calibration) is problematic near the pole--it probably won't work. This slide show contains good advice on how to calibrate the Internal Guider and/or PHD2.
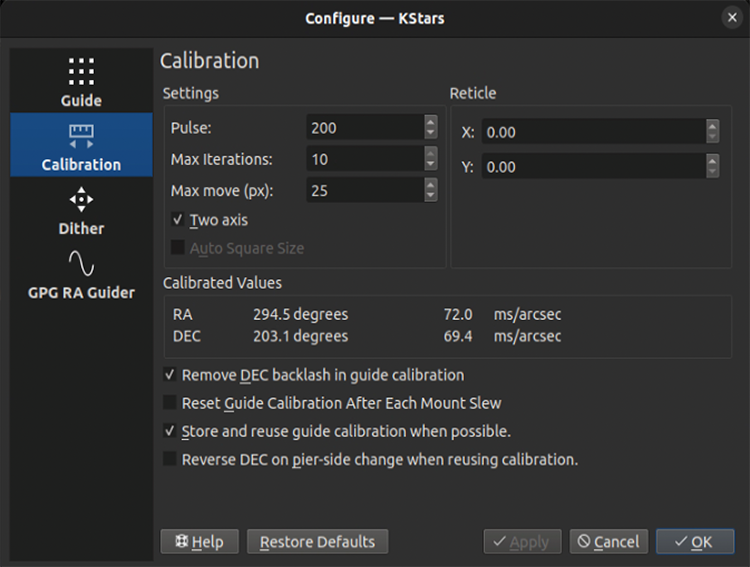
The important options on the calibration options page (above) are:
Pulse Size: should be large enough to move your image a few pixels.
Re-using Calibration: There are two checkboxes related to keeping your calibration. We recommend checking "Store and re-use guide calibration when possible", and un-checking "Reset Guide Calibration After Each Mount Slew".
Reverse DEC...: It is also important to check or un-check (it is mount dependent) "Reverse DEC on pier-side change when re-using calibration". To find out the right setting for your mount, you need to successfully calibrate on one pier side, make sure guiding is working well on that side, then switch to the other side. Guide for a minute or two. If DEC runs away, then you probably have the wrong setting for the "Reverse DEC..." checkbox.
Max Move, Iterations: We recommend you keep iterations large (e.g. 10) and Max Move large (e.g. 20+ pixels). This way you should get a good estimate of the guiding calibration parameters. Calibration should be something you do rarely, so it is best to take a little extra time and get right.
To (re)calibrate, clear your calibration on the main guiding page, and then simply click on the button. Note that if calibration was already completed successfully before, and you didn't clear the calibration, and you are re-using calibrations, then the autoguiding process will begin immediately, otherwise, it will start the calibration process.
Ekos begins the calibration process by sending pulses to move the mount in RA and DEC. It pulses out the RA axis, then pulses it back in. After that it moves a little in DEC to clear and backlash that might exist, and then pulses out and back in for DEC. To view this graphically, click on the "Calibration Plot" subtab on the main guiding page.
Calibration can fail for a variety of reasons. To improve the chances of success, try the tips below.
Bad sky conditions. If your sky condition are not great, it may not be worth fighting guiding/calibration.
Guide camera focus.
Leave algorithm to the default value () in the Guide Option tab.
Try the "Guide-Default" SEP star-detection parameters (in the Guide Option tab) and adjust them if necessary.
Better Polar Alignment: This is critical to the success of any astrophotography session. Use the Ekos Polar Alignment procedure in the Align module.
Set binning to 2x2: Binning improves SNR and is often very important to the success of the calibration and guiding procedures.
Take dark frames to reduce noise.
Once the calibration process is completed successfully, guiding begins automatically. The guiding performance is displayed in the Drift Graphics region where Green reflects deviations in RA and Blue deviations in DEC. The colors of the RA/DE lines can be changed in KStars color scheme in KStars settings dialog. The vertical axis denotes the deviation in arcsecs from the lock position and the horizontal axis denotes time. You can hover over the line to get the exact deviation at this particular point in time. You can also zoom and drag/pan the graph to inspect a specific region of the graph. Another convenient place to examine guiding performance is in the Analyze tab.
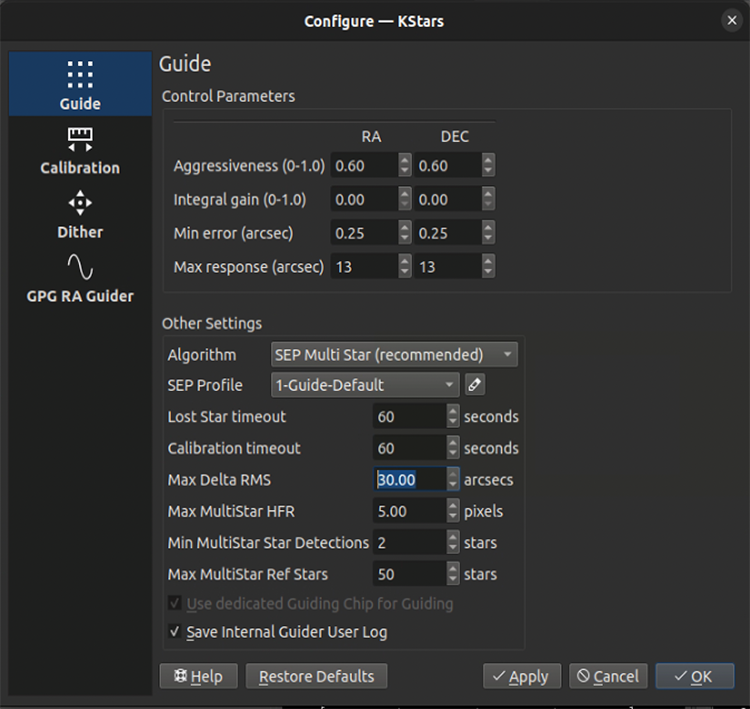
Ekos can utilize multiple algorithms to determine the drift from the (original) lock position, but by far the most accurate is the (default) SEP MultiStar algorithm. It uses the detected position of many stars (in the above settings, up to 50) to determine its best estimate for the current drift. It is dependent on accurate star detection. Thus, it may be important to adjust star-detection parameters. Start with the default Guide-Default SEP profile, and optionally edit its parameters if you feel stars are not being detected accurately.
Here are some of the parameters you may want to adjust. Again, good advice in choosing parameters is available on the internet, e.g. from the above slideshow.
Aggressiveness. How quickly you want the guider to correct the error. Values of 0.5 or 0.6 are usually best (i.e. correcting about half the observed error). Unintuitively, it seems that correcting 100% of the error can cause poor performance as the guider will often oscillate with overcorrections.
Algorithm. We strongly recommend you use the most up-to-date algorithm: SEP MultiStar. Pretty much the only reason not to would be if you can't get your SEP star-detection to perform adequately.
SEP Profile. Start with Guide-Default, though you may choose others if you have very large or small stars (in terms of number of pixels in diameter).

To enable automatic dithering between frames, make sure to check the Dither checkbox. By default, Ekos should dither (i.e. move) the guiding box by up to 3 pixels after every N frames captured in Ekos Capture Module. The motion duration and direction are randomized. Since the guiding performance can oscillate immediately after dithering, you can set the appropriate Settle duration to wait after dither is complete before resuming the capture process. In rare cases where the dithering process can get stuck in an endless loop, set the appropriate Timeout to abort the process. But even if dithering fails, you can select whether this failure should terminate the autoguiding process or not. Toggle Abort Autoguide on failure to select the desired behavior.
Dithering does not result in a long wander from the original target position. Ekos keeps track of the original and current target positions, and moves the target back towards the original target should the position have drifted too far.
One-pulse dithering is an interesting quicker option which sends a pulse to dither, but does not verify that the dither reached its desired location. It is possible that the dithering for any given dither isn't as much as desired, but the overall effect should be good.
Non-guide dithering is also supported. This is useful when no guide camera is available or when performing short exposures. In this case, the mount can be commanded to dither in a random direction for up to the pulse specified in the Non-Guide Dither Pulse option.

The drift graphics is a very useful tool to monitor the guiding performance. It is a 2D plot of guiding deviations and corrections. By default, only the guiding deviations in RA and DE are displayed. The horizontal axis is the time in seconds since the autoguiding process was started while the vertical axis plots the guiding drift/deviation in arcsecs for each axis. Guiding corrections (pulses) can also be plotted in the same graph and you can enable them by checking the Corr checkbox below each Axis. The corrections are plotted as shaded areas in the background with the same color as that of the axis.
You can pan and zoom the plot, and when hovering the mouse over the graph, a tooltip is displayed containing information about this specific point in time. It contains the guiding drift and any corrections made, in addition to the local time, this event was recorded. A vertical slider to the right of the image can be used to adjust the height of the secondary Y-axis for pulses corrections.
The Trace horizontal slider at the bottom can be used to scroll through the guide history. Alternatively, you can click the Max checkbox to lock the graph onto the latest point so that the drift graphics autoscrolls. The buttons to the right of the slider are used for autoscaling the graphs, exporting the guide data to a CSV file, clearing all the guide data, and for scaling the target in the Drift Plot. Furthermore, the guide graph includes a label to indicate when a dither occurred so the user knows guiding was not bad at those points.
The colors of each axis can be customized in KStars Settings color scheme.
A bulls-eye scatter plot can be used to gauge the accuracy of the overall guiding performance. It is composed of three concentric rings of varying radii with the central green ring having a default radius of 2 arcsecs. The last RMS value is plotted as  with its color reflecting which concentric ring it falls within. You can change the radius of the innermost green circle by adjusting the drift plot accuracy.
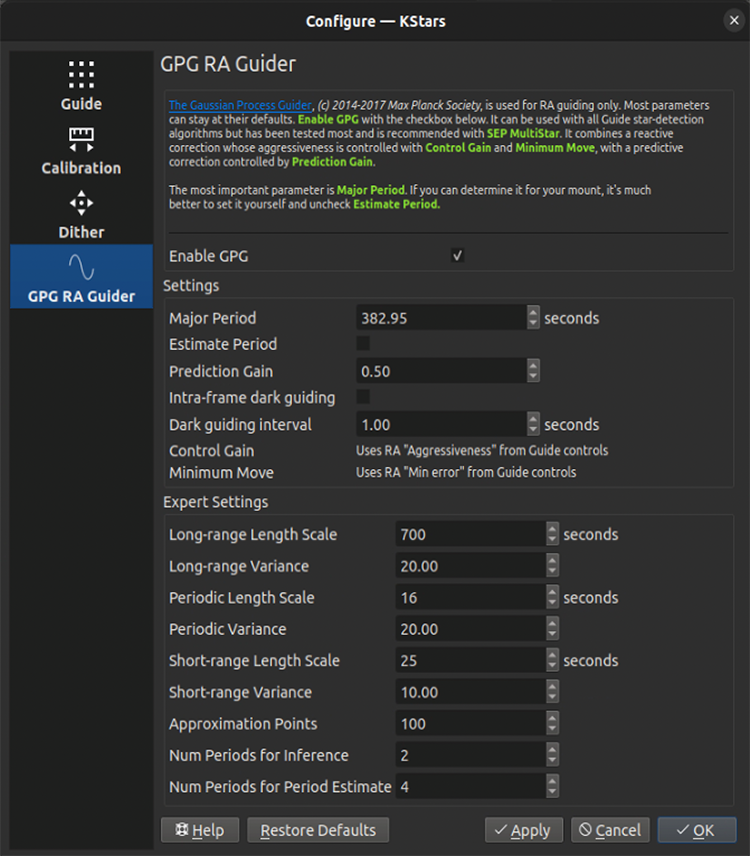
With GPG guiding, the internal guider uses predictive and adaptive guiding for the RA axis. This adaptively models the periodic error of the mount, and adds its predicted contribution to each guide pulse.
The main settings to consider are Major Period and Estimate Period. If you know the worm period for your mount, perhaps by examining this table, then uncheck Estimate Period and enter your known Major Period. If not, then check Estimate Period. Intra-frame dark guiding can be used to "spread out the GPG prediction. For instance, if you guide at 5s, you can set the dark guiding interval to 1s and its prediction is pulsed every second, but the guiding drift correction would be sent every 5s. In this way, it outputs the predicted corrections much faster than the guide camera exposure rate, effectively performing periodic error correction and allowing longer guide camera exposures. All the other parameters are best left to defaults.
Dark frames can be helpful to reduce noise in your guide frames. If you choose to use this option, then it is recommended that you take dark frames before you begin your calibration or guiding procedure. To take a dark frame, check the Dark checkbox and then click . For the first time this is performed, Ekos will ask you about your camera shutter. If your camera does not have a shutter, then Ekos will warn you anytime you take a dark frame to cover your camera/telescope before proceeding with the capture. On the other hand, if the camera already includes a shutter, then Ekos will directly proceed with taking the dark frame. All dark frames are automatically saved to Ekos Dark Frame Library. By default, the Dark Library keeps reusing dark frames for 30 days after which it will capture new dark frames. This value is configurable and can be adjusted in Ekos settings in the KStars settings dialog.
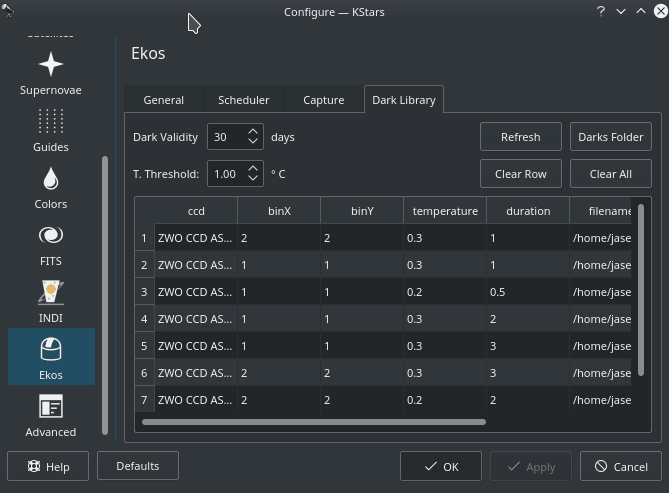
It is recommended to take dark frames covering several binning and exposure values so that they may be reused transparently by Ekos whenever needed.
You can opt to select external PHD2 application to perform guiding instead of the built-in guider.
If PHD2 is selected, the and buttons are enabled to allow you to establish a connection with the PHD2 server. You can control PHD2 exposure and DEC guide settings. When clicking , PHD2 should perform all the required actions to start the guiding process. PHD2 must be started and configured before Ekos.
After launching PHD2, select your INDI equipment and set their options. From Ekos, connect to PHD2 by clicking the button. On startup, Ekos will attempt to automatically connect to PHD2. Once the connection is established, you may begin the guiding immediately by click on the button. PHD2 performs calibration if necessary. If dithering is selected, PHD2 is commanded to dither given the offset pixels indicated, and once guiding is settled and stable, the capture process in Ekos resumes.
Ekos' internal guider saves a CSV guide log in PHD2 format data that can be useful for analysis of the mount's performance. In Linux this is stored under ~/.local/share/kstars/guidelogs/. This log is only available when using Ekos' internal guider. It should be compatible with PHD2's guide log viewer.