Workflow is rather important aspect in digital imaging. In this chapter we describe different workflows that fit on different needs. There are many different factors that must be considered when developing a workflow. Hopefully these examples will provide you with sufficient ideas of how to tune-up your own method of working with digital imaging.
When shooting RAW images the files from camera must be developed to commonly recognized format like JPEG or TIFF. There are a few options to choose from when working on Linux. For example RawTherapee and Ufraw are open-source alternatives when Bibble5/AfterShot Pro are commercial application for this purpose.
A few settings are recommended for a RAW workflow. First is to enable the using of the embedded thumbnail. This will give a tremendous speed boost over decoding each raw file each time they are viewed (check also the minimum dimension configuration to ensure decent quality). Second one is for the New Image Finder to automatically stack the developed versions over the RAW file (developed image must be on same directory as the original). This requires regular expressions as described in the section called “New Image Finder Settings”. Two helper scripts are provided in KPhotoAlbum sources to help in RAW workflow. These are open-raw.desktop and open-raw.pl. The first one enables GUI applications to open the RAW files in the open-raw.pl script that tries to find the original RAW file and open that instead of the developed image.
First step in actual workflow is to copy the images from camera to the computer. A simple copy on a terminal window is all that is needed:
cp -a /media/.../101CANON/ ~/Pictures/2012/sample
Then either start KPhotoAlbum or run → . New images should be found and now is time for initially tagging the images. As I usually photograph while traveling I first insert the place. Select Folder and browse to the new directory. Then go to the Show Thumbnails, select all and or Ctrl+2. Insert the proper place like Finland-Helsinki (see the section called “Sub-categories”).
Now that the new images are easy to find I do the initial ranking and deletion. For this I go to the thumbnail view and start the Viewer by hitting Enter. I use rating for good images, just press the appropriate number from 1 to 5. I only give 3 to 5 ratings and hit Ctrl+Del for the bad photos to delete them. At this point I might add also People names if there happens to be a diver in the photo. Once the first round is done I exit the Viewer by hitting Esc and select to get rid off the bad images for good.
Next I select only the images that have high enough rating using
the search function. Naturally the Place has to be set if search is
started with Ctrl+F.
However, if search is invoked from the Main Window the current
selection is drilled down to the more precise match. Anyway, at this
point I go through the better rated images again doing refining on the
rating. E.g. if I have 5 similar photos of one Nudibranch species I
generally decrease the rating of the poorer images and might increase
the best one. Comparing images can be done by selecting the ones you
want to compare and starting the Viewer. Removing images from the
Viewer selection can be done with Delete. This only
disables the viewing of the current image while within the Viewer,
nothing is removed or deleted. This allows comparing 2 or 3 better
images next to each other moving between them with
PgUp and PgDn. I quite commonly use
a tmp category to mark e.g. crabs and shrimps to be
easily able to display only selected type of images during the later
phases of selection and identification.
After a reduced amount of images is left I start tagging them. I add the Latin Name of the species and Common Name. Whenever I have these two categories completed I consider the image Done and get rid of the Untagged marking. Note that if you still need to do tagging after developing the RAW image (and auto-stacking them) you need to select the top of collapsed stack (or all images on expanded stack) and select Annotate Multiple Items at a Time to get the whole stack annotated instead of only the topmost image.
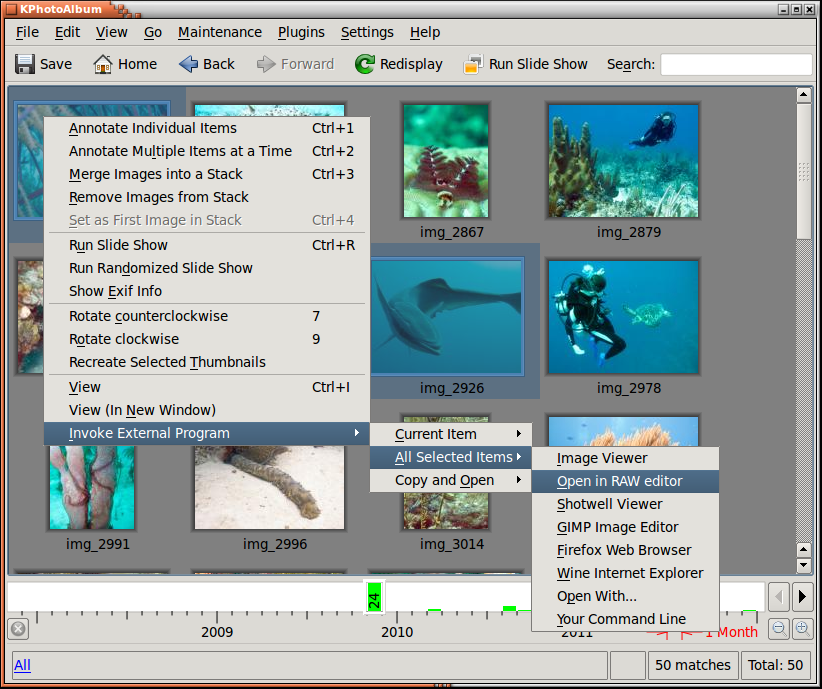
The best images are sent to external application for developing. With wanted images selected, right click on selected thumbnail and select → → . The application selected is actually my script that detects if there is a RAW file for the possibly already developed images available and uses that if possible. Within the external application I do some tuning up and cropping if required and then output the developed JPEGs next to the original RAW file. File naming is rather simple, change the extension or add underscore and running number if needed.
Now that there is plenty of new JPEGs in the image directories I let KPhotoAlbum search for new images and automatically stack the new ones on top of the original RAW (Figure 9.2, “File Searching & Versions”). Then a final round of selection with the developed images and adding some descriptions if needed.
Final step is to generate static HTML pages and upload to my web server for the enjoyment of friends and colleagues. This I do with the stacks collapsed to only get the developed images to the web page. HTML generation is described in Chapter 7, Generating HTML.
