The Ekos Scheduler is an important component of your imaging workflow. It connects to INDI, starts and stops all the other Ekos modules, schedules jobs according to their constraints and priorities, monitors those jobs as they execute, and then safely brings down the system when jobs are done, or before dawn. Whether you are running multi-day imaging sessions for multiple targets, or simply trying to image a single target for a few hours, it is advisable to have the Scheduler control your imaging sessions.
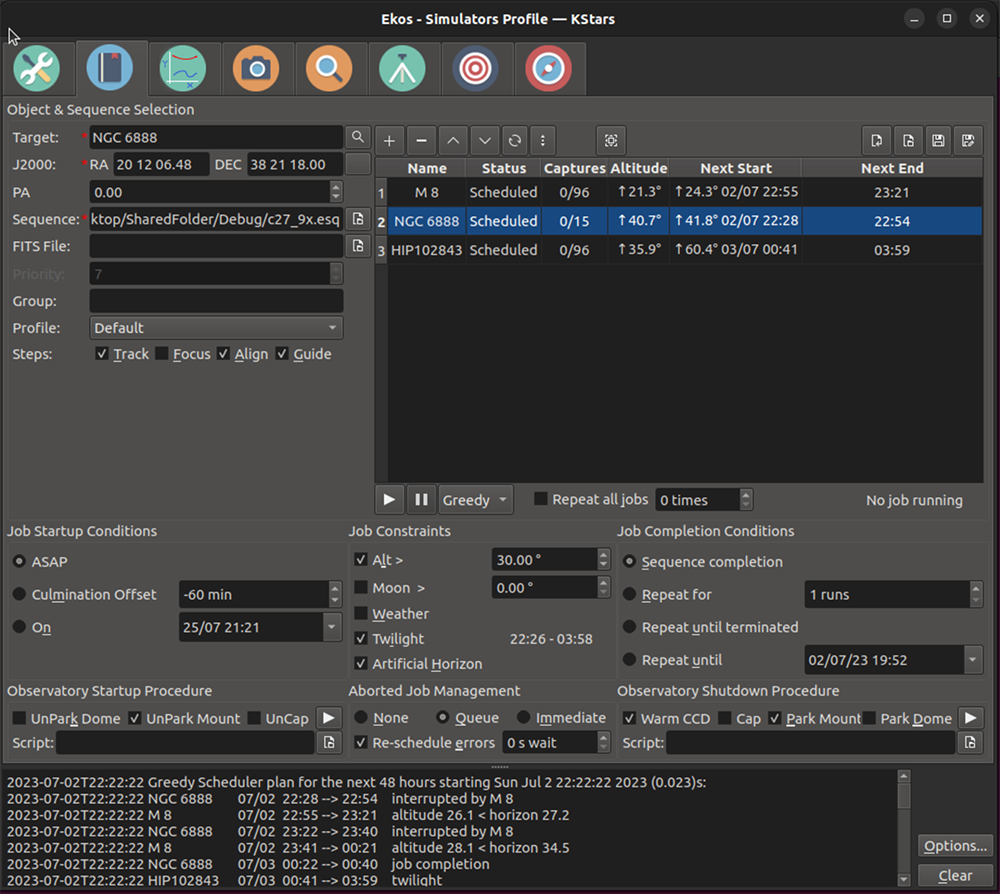
The heart of the Scheduler is a table displaying the list of Scheduler jobs the user wants to run. Associated with each jobs are attributes (mostly described in the settings section below). The attributes describe the name of the job, where the telescope should be pointed when imaging that job, a description of what types of images should be captured, constraints about when the jobs should run (e.g. altitude, twilight, moon, landscape blockages, etc.), things that need to be done before and after the job is run, and strategies for dealing with errors.
You can add, delete, modify or change the order of rows in the Scheduler table.
You can add a Scheduler job row into the table by clicking the + control above the table, if all required attributes are filled out (name, position, and sequence file).
If you click on a row, you can then click the - control above the table to delete that row.
If you click on a row, you can then click the ^ or v controls to move those rows up or down in the job list.
If you double click on a row, the attributes of that job are filled in to the various settings on the Scheduler page. You can then change one or more of those attributes, and then click the checkmark above the table (after your double-click, the + became a checkmark), and the new attributes are assigned to that job.
The Scheduler table (above) lists jobs in order of priority, with higher jobs (on lower-numbered rows) having higher priority than jobs further down the list (with higher-numbered rows).
The Scheduler regularly plans (and re-plans) which jobs should be run, and when. It can start executing a given job, and then later preempt that job for a new one. It can become idle if no jobs can be run (e.g. in daylight), and sleep until such a time that it becomes active again. Its aim is to keep the equipment as busy as possible, while respecting the scheduler-table's priorities. Here's how it works.
When the scheduler starts (or when it replans, which it does every second while active), it looks through the entire list of jobs, starting at the highest priority job, and working its way down to the lowest priority one if necessary. When it finds a job that can run, it starts that job, possibly preempting the currently running job. A jobs can run if its constraints are met, e.g. the target is not blocked by the local terrain, it meets the minimum altitude constraint, it has not already completed all the desired imaging, ...
The algorithm shows its projected next start times and stop times for all job in the Scheduler table. It also shows its estimate of times jobs will run during the next 48 hours in the log panel at the bottom of the window. See the screenshot of the scheduler window at the top of this section.
The scheduling algorithm described in the above paragraph is known as the Greedy Scheduling algorithm. It is the recommended one to use. In previous versions of Ekos, there was another "Classic scheduling algorithm" which is no longer in Ekos. That scheme could not preempt running jobs, and thus did not make as much use of the equipment as the Greedy Algorithm.
There is a checkbox option in the scheduler options menu called Use greedy scheduling which defaults to being checked. The system works as described above when it is checked. When it is unchecked the scheduler is prevented from scheduling lower priority jobs when uncompleted higher priority jobs cannot run. This results in less efficient use of the system, but may give you more control over scheduling.
The scheduler table with its list of jobs and attributes can be saved onto disk and read back in. It writes an .esl file. Controls for writing the current Scheduler table to disk, and reading back other .esl files are located above the table to the right.
Ekos Scheduler provides a simple interface to aid the user in setting the conditions and constraints required for an Scheduler job. You must select the Target, its coordinates, and the Sequence before you can add a job to the Scheduler.
Each Scheduler job is composed of the following:
Target name and coordinates: Select target from the Find Dialog or it from Observation Planner. You can also enter a custom name. Coordinates can also be copied from the SkyMap using the button just to the right of the coordinates.
Optional PA: The position angle (or image rotation) can be specified for systems with camera rotation hardware.
Optional FITS File: If a FITS file is specified, the astrometry solver solves the file and use the central RA/DEC as the target coordinates.
Sequence file: The sequence file is constructed in the Ekos Capture Module. It has a list of capture specifications, where each spec details the number of images to capture, which filter to use, the exposure length, the gain, file naming details, temperature settings, prefixes, download directory, etc.
Profile: Select which equipment profile to utilize when starting Ekos. If Ekos & INDI are already started and online, this selection is ignored.
Steps: The user selects what steps should be taken at the start of the job. The possibilities are: (1) Start mount tracking, (2) autofocus, (3) run a plate solving alignment, (4) start the auto-guider. One or more can be chosen.
Startup Conditions: Conditions that must be met before the Scheduler job is started. Currently, the user may select to start as soon as possible, , or when the target is near or past culmination, or at a specific time.
Constraints: These are conditions that must be met at all times during the Scheduler job execution process. These include minimum target altitude, minimum moon separation, twilight observation, artificial horizon altitude constraints, and weather monitoring.
Completion Conditions: Conditions that trigger completion of the Scheduler job. The default selection is to simply mark the Scheduler job as complete once the sequence process is complete. Additional conditions enable the user to repeat the sequence process a number of times or indefinitely, or up until a specific time.
There are several other options to control how the Scheduler behaves. These are found in the general KStars Settings menu, shown below, in its Ekos tab and Scheduler sub-tab.
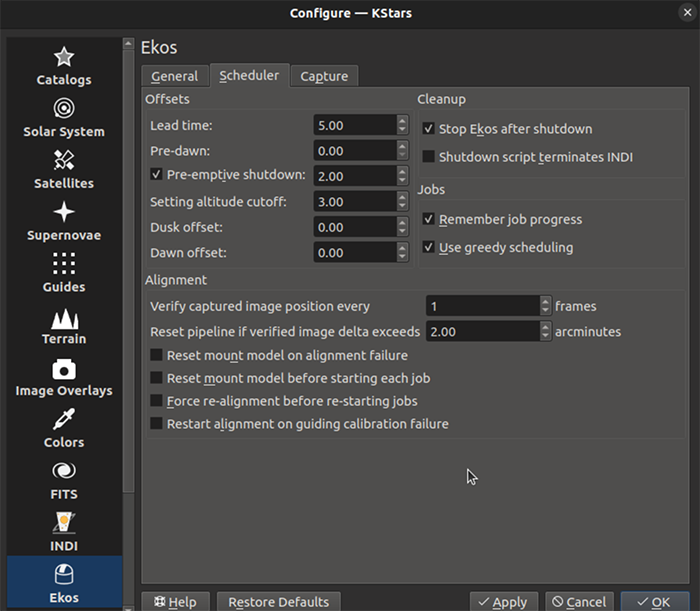
Among the settings shown above, one important one is known as Remember job progress. When this box is checked and a job is running, the Scheduler looks at the job's images already captured on disk, and doesn't re-capture the ones that are already there. The benefit is that if a job is restarted, or re-run another night, or if multiple jobs are being run together, stopping and starting when they are runnable, then jobs re-start right where they left off. This works well with the Repeat until terminated job-completion option. If Remember job progress is unchecked, jobs would restart from the start of their sequence specification each time, which probably isn't what you want. Unfortunately, if the images are not stored on the same computer that Ekos is running on, then this feature doesn't work and the jobs restart from their beginning.
A possibly confusing side-effect of Remember job progress is that if you've run a job using the (default) Sequence Completion finish condition, and it has captured all its images, and now you want to run the job again, the Scheduler won't schedule the job because it believes that all the images have already been captured. You'd either need to move those images elsewhere on disk, or change the finish condition to Repeat for N Times, or Repeat Until Terminated.
This feature allows you to run two or more scheduler jobs at roughly the same priority, such that if they were both runnable, they would progress at roughly the same rate. This may be applicable, for example, to jobs imaging the multiple tiles in a mosaic, but is generally applicable to any set of jobs.
Normally the (Greedy) scheduler's job priority is set by the row the job is listed in the Scheduler's job table. Jobs on rows closer to the top run with higher priority than jobs lower down. Thus, if a job on row 2 (Job2) uses Repeat Until Terminated, and that job's running constraints are satisfied, a lower down job (e.g. Job3) will not be scheduled to run.
If you wish to alternate jobs, you can assign each of the jobs the same group name, and give the jobs one of the repeating finish conditions (e.g. Repeat for N times, or Repeat Until Terminated). With that setup, jobs in the same group will cede to each other if they have completed more 'Repeat Iterations' than the other job. So, if Job2 with group "MyGroup" completes its 2nd iteration, and Job3 with the same group name has only completed 0 or 1 iterations, when the time comes to schedule Job2, Job3 will run instead.
Practically speaking, imagine you had a 6-panel mosaic you wanted to alternate. You might give all of those jobs the same group name, make them all e.g. "Repeat for 5 times". Then, they would run in lock-step. The cadence of job switching would be controlled by the length of the sequence file assigned to each of those jobs. You wouldn't want to make the cadence too short (e.g. capturing one 2-minute image), as there is overhead in switching jobs. For instance, starting jobs may involved aligning, starting guiding, and even focusing.
There is a checkbox and number input right below the Scheduler jobs table that allows you to repeat the entire schedule N times. This can be used to alternate a few jobs. You can just list the jobs on the scheduler, set it to repeat N times, and the jobs will repeat. However, this change is incompatible with 'Remember job progress (above) and unavailable if Remember Job Progress is checked. (Note: Remember Job Progress is recommended.)
It is possible to edit the scheduler's job table, and attributes of individual jobs, while the scheduler is running. As always, you double click on a job, change the desired attributes, and click the checkbox to finalize the change. If you edit the running job it will be restarted (i.e. the startup steps (slew, focus, align, guide) will be re-done. You can also move jobs up and down in priority, add new jobs, or deleted existing ones. You cannot delete the running job.
One important attribute of scheduler jobs is their sequence file (.esq) which controls the capture module while the job is running. For example, it sets number of captures, filters used, gain/ISO, etc. The .esq is normally created and edited in the capture tab, but that cannot be done while the scheduler is running. If you desire to make changes to a .esq file while the scheduler is running, or create a new one, the scheduler provides a tool called the Capture Sequence Editor.
The Capture Sequence Editor is a tool to create and edit capture sequence files (.esq) which can be started by clicking the edit (pencil) icon just above the scheduler table. A screenshot is shown below.
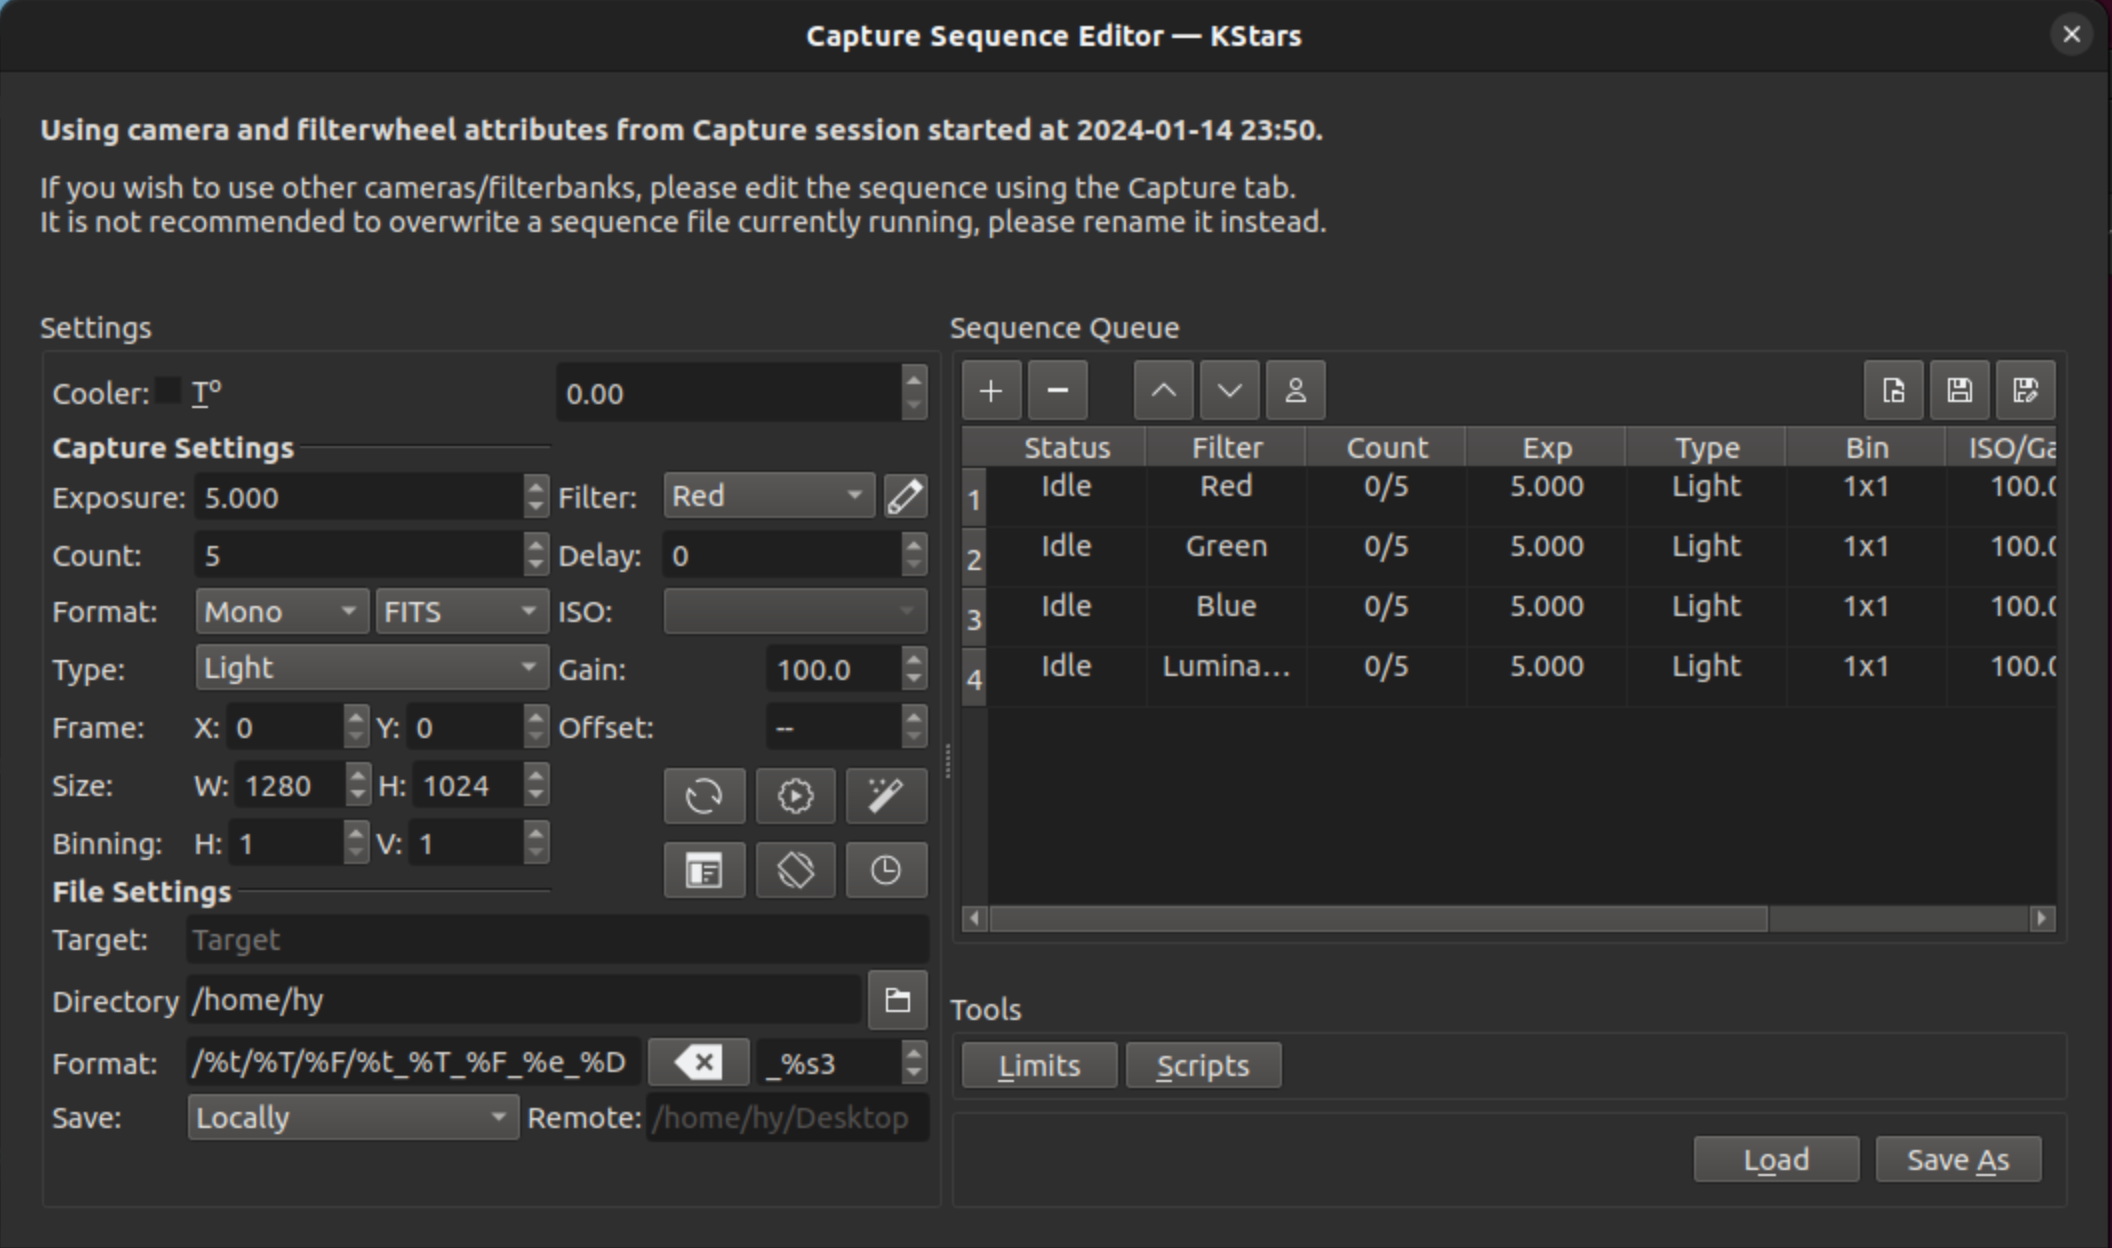
The editor is very similar in use and layout to the capture tab--though it is missing all the controls to actually capture image. You edit jobs the same way you do in capture, and load or save sequence queues the same way too (though there are additional Load and Save-To buttons provided in the editor).
Important
It is important to understand that capture sequences rely to some extent on the filterwheel and camera being used (e.g. the filter names, the possible ISO values, ...). The Capture Sequence Editor, which is not connected to the device drivers, does not have direct access to this information. Instead, the editor uses the values from the last time the capture tab connected to its devices. Thus, it may not make sense to try and create a .esq file for a different camera or filterwheel than the last one connected-to. You may need to wait until your scheduler job is completed and edit that .esq directly in the capture tab.
It is also recommended that you don't overwrite .esq files when scheduler jobs are currently using those same files. (It is OK if the scheduler is running, but not running that job.) This can get the scheduler and capture modules out of sync, as they read the files at different times. Instead, you can save to a different filename and then edit the scheduler job to use the new .esq filename.
The description above only tackles the Data Acquisition stage of the observatory workflow. The overall procedure typically utilized in an observatory can be summarized in three primary stages:
Startup
Data Acquisition (including preprocessing and storage)
Shutdown
Startup procedure is unique to each observatory but may include:
Turning on power to equipment
Running safety/sanity checks
Checking weather conditions
Turning off light
Fan/Light control
Unparking dome
Unparking mount
etc.
Ekos Scheduler only initiates the startup procedure once the startup time for the first Scheduler job is close (default lead time is 5 minutes before startup time). Once the startup procedure is completed successfully, the scheduler picks the Scheduler job target and starts the sequence process. If a startup script is specified, it shall be executed first.
Depending the on the user selection, the typical workflow proceeds as follows:
Slew mount to target. If a FITS file was specified, it first solves the files and slew to the file coordinates.
Auto-focus target. The autofocus process automatically selects the best star in the frame and runs the autofocus algorithm against it.
Perform plate solving, sync mount, and slew to target coordinates.
Perform post-alignment focusing since the frame might have moved during the plate solving process.
Perform calibration and start auto-guiding: The calibration process automatically selects the best guide star, performs calibration, and starts the autoguide process.
Load the sequence file in the Capture module and start the imaging process.
Coordinate module issues, such as failures in guiding or alignment. They may result is Scheduler job suspensions and rescheduling.
Note--some of the inter-module interactions are initiated by the modules themselves, but are monitored by the Scheduler. These include meridian flips, autofocus runs initiated by temperature change or timer expiration, and minimum guiding deviation requirements for capture.
Once the Scheduler job is completed successfully, the scheduler selects the next Scheduler job. If no job can be scheduled at this time, the mount is parked until a next job can run. Furthermore, if the next job is not due for a user-configurable time limit, the scheduler performs a preemptive shutdown to preserve resources and performs the startup procedure again when the target is due.
If an unrecoverable error occurs, the observatory initiates shutdown procedure. If there is a shutdown script, it will be executed last.
The following video demonstrates an earlier version of the scheduler, but the basic principles still apply today:
Ekos Scheduler
Another critical feature of any remotely operated robotic observatory is weather monitoring. For weather updates, Ekos relies on the selected INDI weather driver to continuously monitor the weather conditions. For simplicity sake, the weather conditions can be summed in three states:
Ok: Weather conditions are clear and optimal for imaging.
Warning: Weather conditions are not clear, seeing is subpar, or partially obstructed and not suitable for imaging. Any further imaging process is suspended until the weather improves. Warning weather status does not pose any danger to the observatory equipment so the observatory is kept operational. The exact behavior to take under Warning status can be configured.
Alert: Weather conditions are detrimental to the observatory safety and shutdown must be initiated as soon as possible.
Due to the uniqueness of each observatory, Ekos enables the user to select startup and shutdown scripts. The scripts take care of any necessary procedures that must take place on startup and shutdown stages. On startup, Ekos executes the startup scripts and only proceeds to the remainder of the startup procedure (unpark dome/unpark mount) if the script completes successfully. Conversely, the shutdown procedure begins with parking the mount & dome before executing the shutdown script as the final procedure.
Startup and shutdown scripts can be written any language that can be executed on the local machine. It must return 0 to report success, any other exist value is considered an error indicator. The script's standard output is also directed to Ekos logger window. The following is an sample demo startup script in Python:
#!/usr/bin/env python
# -*- coding: utf-8 -*-

import os
import time
import sys

print "Turning on observatory equipment..."
sys.stdout.flush()

time.sleep(5)

print "Checking safety switches..."
sys.stdout.flush()

time.sleep(5)

print "All systems are GO"
sys.stdout.flush()

exit(0)
The startup and shutdown scripts must be executable in order for Ekos to invoke them (e.g. use chmod +x startup_script.py to mark the script as executable). Ekos Scheduler enables truly simple robotic operation without the need of any human intervention in any step of the process. Without human presence, it becomes increasingly critical to gracefully recover from failures in any stage of the observation run. Using Plasma™ notifications, the user can configure audible alarms and email notifications for the various events in the Scheduler.
Hubble-like super wide field images of galaxies and nebulae are truly awe-inspiring, and while it takes great skills to obtain such images and process them; many notable names in the field of astrophotography employ gear that is not vastly different from yours or mine. I emphasize vastly because some do indeed have impressive equipment and dedicated observatories worth tens of the thousands of dollars. Nevertheless, many amateurs can obtain stellar wide-field images by combining smaller images into a single grand mosaic.
We are often limited by our camera+telescope Field of View (FOV). By increasing FOV by means of a focal reducer or a shorter tube, we gain a larger sky coverage at the expense of spatial resolution. At the same time, many attractive wide-field targets span multiple FOVs across the sky. Without any changes to your astrophotography gear, it is possible to create a super mosaic image stitched together from several smaller images. There are two major steps to accomplish a super mosaic image:
Capture multiple images spanning the target with some overlap between images. The overlap is necessary to enable the processing software from aligning and joining the sub-images.
Process the images and stitch them into a super mosaic image.
The 2nd step is handled by image processing applications such as PixInsight, among others, and will not be the topic of discussion here. The first step can be accomplished in Ekos Scheduler where it creates a mosaic suitable for your equipment and in accordance with the desired field of view. Not only Ekos creates the mosaic panels for your target, but it also constructs the corresponding observatory jobs required to capture all the images. This greatly facilitates the logistics of capturing many images with different filters and calibration frames across a wide area of the sky.
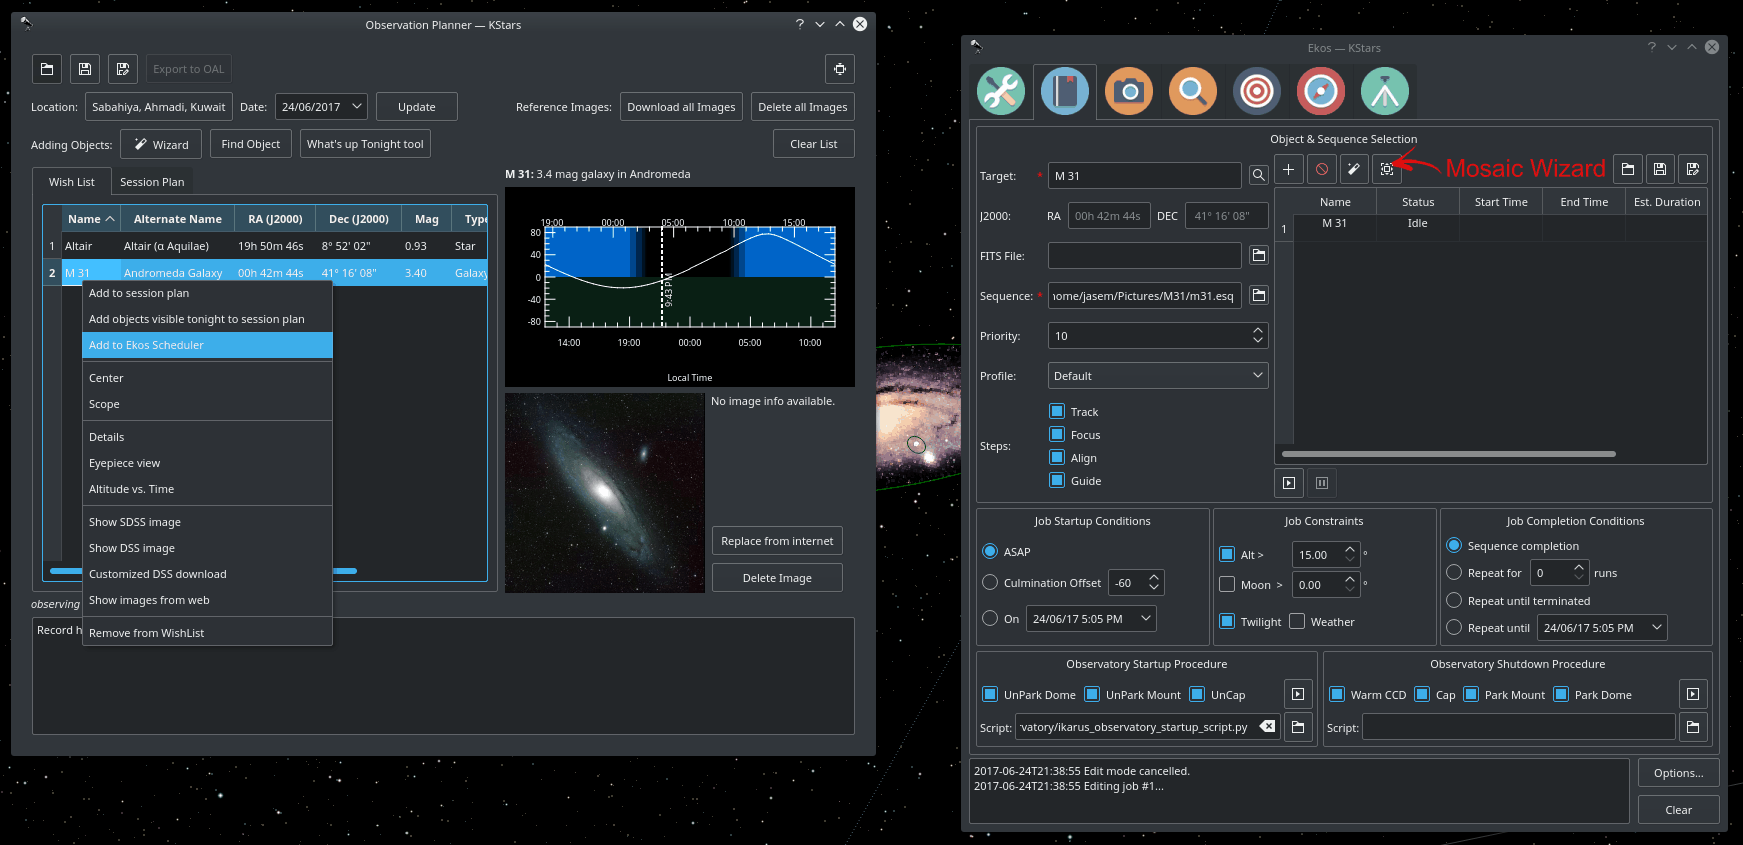
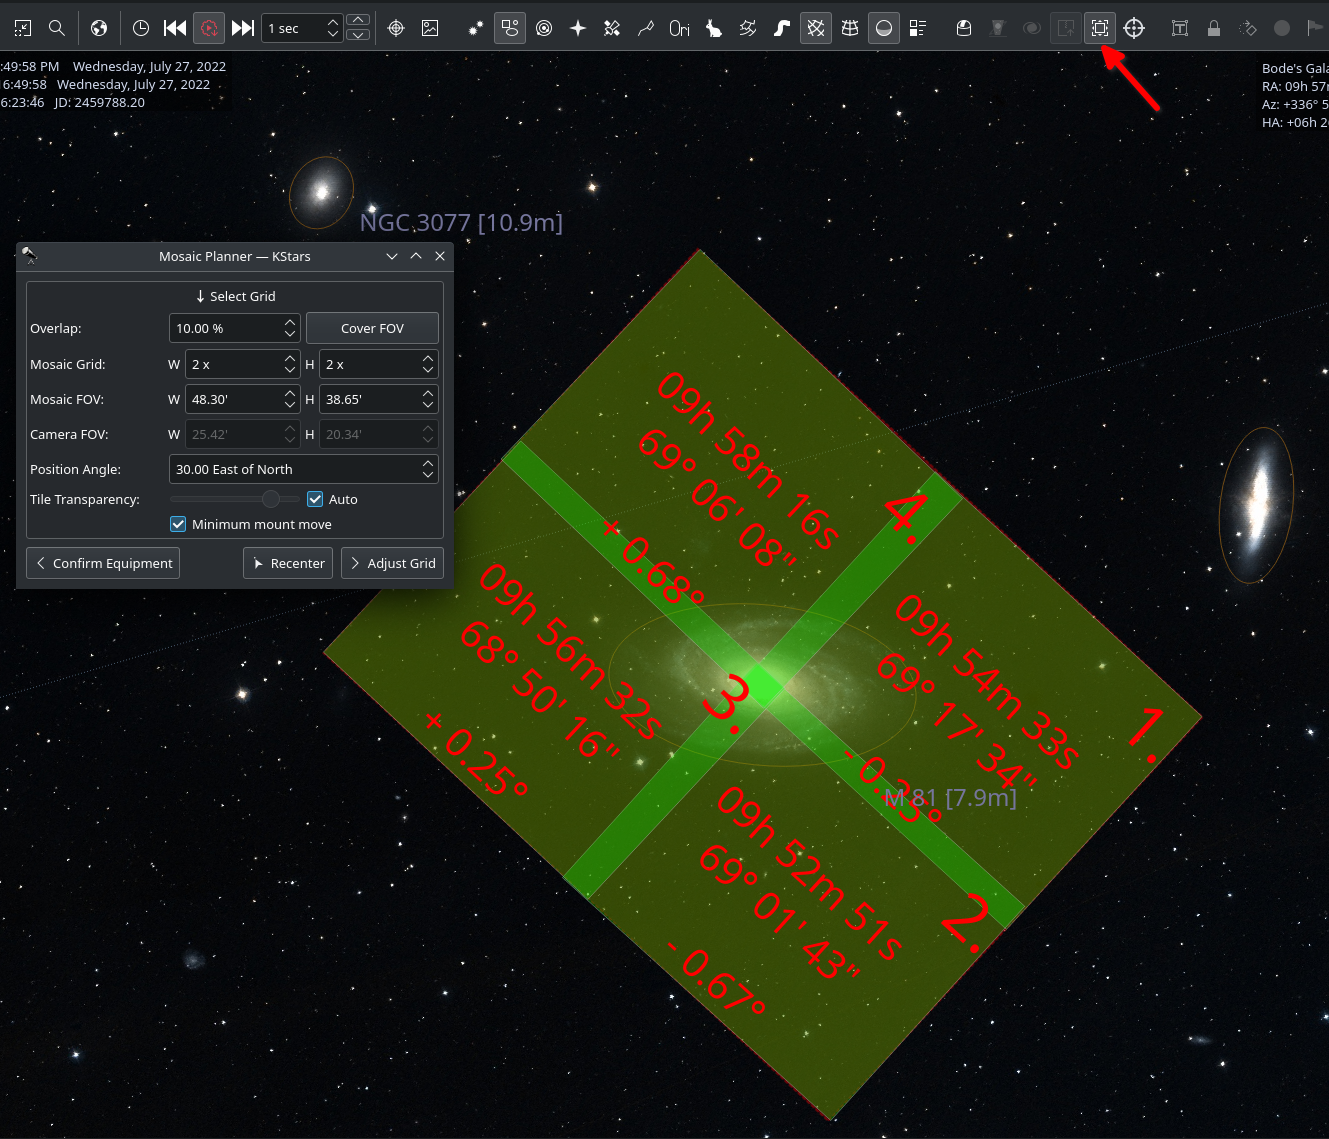
The Mosaic Planner in the Ekos Scheduler will create multiple Scheduler jobs based on a central target. To toggle the planner, click on the button in Ekos Scheduler or KStars INDI toolbar as illustrated in the screenshot. The planner draws the Mosaic Panel directly unto the sky map. It is recommended to enable HiPS overlay for the best experience. The planner is composed of four stages:
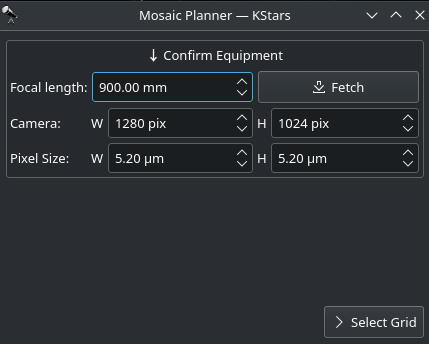
Confirm Equipment: Ekos attempts to load equipment settings from INDI. If unsuccessful, you need to enter your equipment settings including your telescope focal length in addition to camera's width, height, and pixel dimensions. The settings are saved for future sessions.
Adjust Grid: Select the mosaic panel dimension and overlap percentage. The Mosaic Panel is updated accordingly on the sky map. Adjust the Position Angle to match the desired mosaic orientation in the sky. If the Position Angle is different from your camera's usual orientation, you may need to rotate the camera either manually or via a mechanized rotator when the scheduler jobs are executed. Tile transparency is automatically calculated by default but may be turned off and adjusted manually. To compute the mosaic field from the number of tiles, click the button. The mosaic panel can be centered in the sky map by clicking on the button.
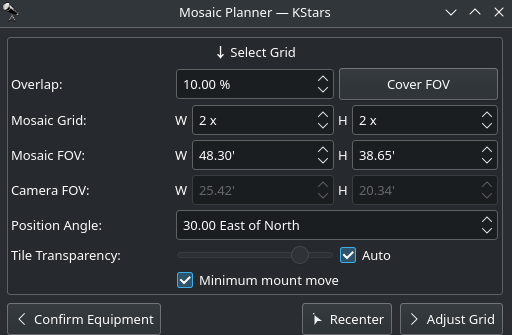
A large overlap will make frame stitching easier during post-processing, but it requires more panes to cover the desired extent. However, if you already know the minimal amount of sub-frames your rejection algorithm will use during post-processing, you may want to increase the overlap to attain that amount on the areas covered by multiple panes. For instance, a 4x4 mosaic grid with 75% overlap has 16 sub-frames covering the central intersection, which is enough for Winsorized Sigma rejection. Although the resulting stack does not have the same height on all parts of the final frame, this method gives you control on signal-to-noise ratio and allows you to provide context to your target while exposing a relatively low number of captures.
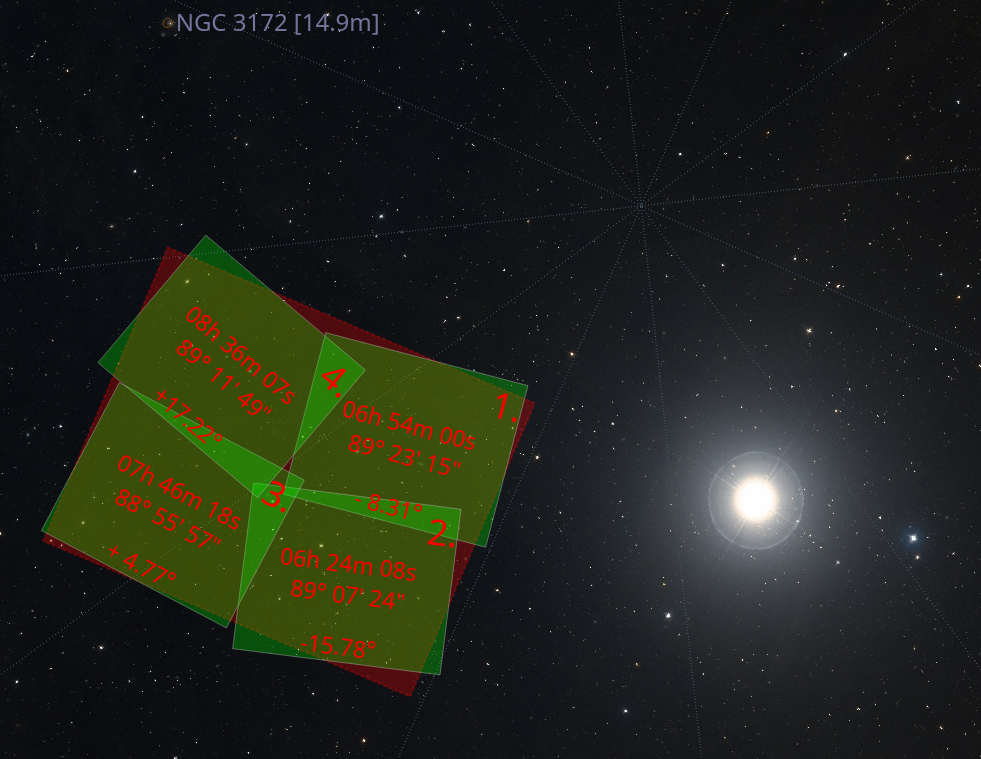
The large number drawn in the corner of each grid pane represents the order in which panes will be captured. The default S-shaped choice (west-east then alternating high-low/low-high moves), ensures minimal movement of the mount during observation. Uncheck Minimum mount move to revert to west-east/high-low movement only. The coordinates of each pane are rendered in their center as degrees, minutes and seconds. Finally, the angle each pane rotates from the center of the mosaic is displayed at the bottom. If your field of view is large, or if your mosaic is located close to a celestial pole, you may observe that rendered panes start rotating visibly due their horizontal position or high declination. Use the overlap to ensure panes cover the desired frame extents properly.
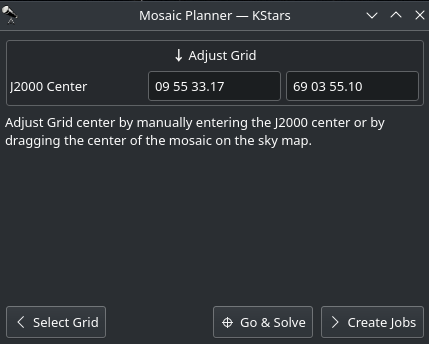
Adjust Grid: Adjust Grid center by manually entering the J2000 center or by dragging the center of the mosaic on the sky map.
Create Jobs: The final step is to select the sequence file and directory to store the images. Target field may be automatically filled but may be changed as desired. Select the steps each scheduler job should execute in sequence (Track -> Focus -> Align -> Guide -> Capture), and adjust the frequency of automatic alignment and focus routines that must be executed during the mosaic operation. For example, if Align Every is set to 2 Scheduler Jobs, then the first job will run the astrometry alignment, while the second job will skip it. When the third job is executed, alignment is performed again and so forth.
If you want the different mosaic tile jobs to alternate, then fill in the group name with an identifier that all the tile jobs will share, and select a repeating completion condition.
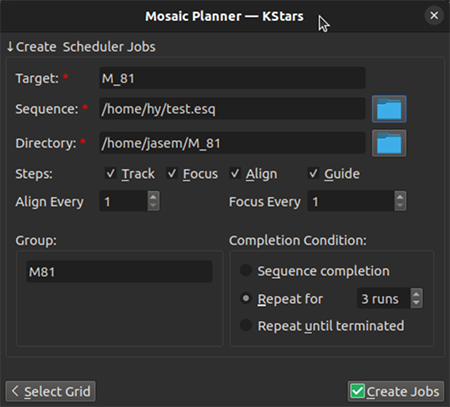
Click to generate mosaic scheduler jobs and add them to the schedule queue. You can further edit the jobs individually, as you would normal Scheduler jobs.