In this section, we discuss how you can put a new project into the CVS repository. If you just want to work with an existing project which is already in a repository, you may skip this section.
There are two ways to put a project into the CVS:
Import the files and folders to a new module, using Cervisia's import dialog. Modules are the top folders in the CVS repository folder tree, and are used to separate and organize the different software projects inside the repository.
Create an empty module and add the new files and folders manually. You will have more control, but it will probably take a little more time.
Important
Keep in mind that CVS was initially designed to handle text files. Many features, like revision merging, creating differences in a readable form, etc. are only performed to text files. This does not mean you cannot use CVS to keep binary files, it just means you have to explicitly tell CVS if it is a text or binary file. If you declare the wrong file type, you will experience problems with the CVS functionality for these files, and they may get corrupted.
Importing a project (as a new module) has some advantages: you will import all files and folders recursively, and the module will automatically be created for you. This makes importing large existing projects to the repository easier. However, there are some disadvantages: you cannot use Cervisia's import dialog to add files to existing modules, and you can either import the files as text or binary files. You can work around this limitation by creating a folder with files of only one of the types, or by informing the patterns of the files that should be ignored during the import process.
For instance, suppose your project contains text files and some PNG images
(binary files) only. You can tell CVS to ignore all files with the pattern
*.png while importing the other files as
text, or you can move the images to a separate folder, and then import
the remaining files (as text files). Either way, you will have to
checkout the newly imported module to a
new working copy, copy the missing files and folders to it,
add and
commit them to the repository to complete
the import process.
As an alternative, you can add the files and folders manually, creating an empty module for them. To add an empty module to a repository, just create a new folder in the CVS repository root folder. The name of this new folder will be the name of the module. Checkout the new empty module. Then copy the files and folders to the working copy, add and commit to upload them to the CVS repository.
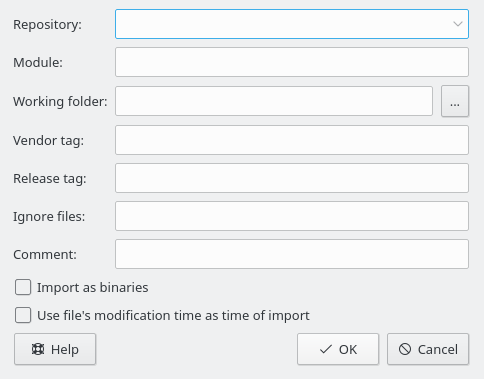
In Figure 2.2, “A screenshot of Cervisia's import dialog” you can see the dialog which helps you to import a project as a module. To access Cervisia's import dialog, choose the → menu item.
- Repository: ❶
Enter or select from the drop down box the name of the CVS repository, also known as $
CVSROOT. You must have write access to it, and the repository must be properly initialized. If the repository does not yet exist, you can create one choosing the → menu item.The drop down box shows a list of the repositories you previously entered using the Configure Access to Repositories dialog box. If the repository is remote, make sure that authentication works. See the section called “Accessing The Repository” for more information.
- Module: ❸
The name of the module under which the project will be stored. After the import, the project can be checked out under this name. See the section called “Checkout a Module From the Repository” for more information. This is also the name of the corresponding folder in the repository.
- Working Folder:
The toplevel folder of the project you want to import. The import starts from this folder and goes down recursively.
- Vendor tag: ❹
The vendor tag is historically used for tracking third-party sources. Just use your user name if you have no better idea. It does not matter much what you enter here.
- Release tag: ❺
This tag is also historically used for importing different versions of third-party software. If you are not doing this, use the word
startor a stringFOO_1_0whereFOOis the name of your project and1.0is the version number of the imported release.- Ignore files:
If you fill out this field, an additional
-Ioption is given go the cvs import command. This entry is interpreted as a whitespace-separated list of file name patterns which are ignored. In general, a cleaner and less error-prone way to control which files go into the repository is to create a folder with only the files which you want to import and start from that. Nevertheless, this entry may be useful if the project contains files which are by default ignored by CVS, e.g. files with the namefile namescore. In such a case, simply enter the character!in this field: this overrules CVS's scheme of ignored files, see the section called “Ignored Files”.- Comment: ❷
Use this field to record the comments you might have about the origin, use, development, etc. of the files you are importing.
- Import as binaries
If you check this box, all files are imported in binary mode, i.e. an argument
-kbis given to cvs import.- Use file's modification as time of import
If you check this box, the time of import will be the file's modification time instead of the import time.
After you have filled out this form and confirmed by pressing , the following CVS command is used:
cvs -d ❶repositoryimport -m "❷" ❸module❹vendortag❺releasetag