Table of Contents
In this section, we show how to use the basic version control system functionality using Cervisia to checkout modules from the repository and work with them. To do that, you must have access to the repository as a client, meaning that someone (probably the administrator of the CVS repository) gave you an account on the server machine. Alternatively, you can easily create a local repository for your own project.
Tip
If you plan to develop a complex project, it is a good idea to use the CVS features, even if you are the only developer. You can make all changes in the working copy, and use Cervisia (or any other CVS tool) to update and commit. This way, you will gain the ability to track changes that caused bugs, revert changes, avoid accidental loss of information, etc. Using Cervisia, it is simple to create a local repository.
Procedure 2.1. Creating a Local Repository
Open the Create New Repository (cvs init) dialog by choosing → .
Press the ... button to select the folder where you want to create the repository, or enter its location in the text box. For instance, if you want to place the repository in the
/home/userfolder, and to name itcvsroot, you should type/home/user/cvsrootin the text box, or select the/home/userfolder using the file picker, and addcvsroot.Confirm by pressing the button. Cervisia will create and initialize the new repository folder.
Now you can import your current work to the repository, or simply create a folder in the repository to start a new module from scratch.
Cervisia offers an integrated front-end to manage all your repository locations, the Configure Access to Repositories dialog. To display it, select the → menu item.
There are several methods to access a CVS repository. It may be reached via password authentication (:pserver:), secure shell (using :ext:), local repository (:local:), etc. The format for the repository location is (optional items appear between square brackets):
[:method:][[user][:password]@]hostname[:[port]]/path/to/repository
Not all these items (user, password, hostname, port) are always necessary to access the repository. The required information depends on the access method used, which can be categorized as follows:
- Local
The local access method is the default method used by CVS. Therefore, it is optional to add the :local: method to the repository location: you can enter simply the path to the folder which stores the CVS repository, and is accessible from your computer, like
/path/to/repositoryor to give a real life example,/home/cvs.It may physically be on a disk which is mounted via NFS, but this is an irrelevant detail. If you created a local repository, the location will be simple the path to it.
- rsh
The repository location is something like
:ext:username@host.url.org:/path/to/repository.This method requires that you have a user account on the server machine (in this example,
host.url.org) and use a remote shell for communication. By default, CVS uses rsh for this purpose; however, rsh has long considered to be insecure, and is widely replaced by ssh.If you wish to use ssh, you must set the environment variable $
CVS_RSHto ssh when using the cvs client. Cervisia supports this easily.Note that Cervisia cannot answer possible password requests from the server machine. You must make sure that a remote login works without requiring you to enter the password. With plain vanilla rsh, this can be achieved for example by creating a
.rhostsfile in your home folder with a list of trusted hosts (see the rsh manpage).With ssh, it can be achieved by copying your public key located in the file
identity.pub, located in the$folder to the server. In this case, the key must not be encrypted with a passphrase, see the ssh manpage.HOME/.ssh/- pserver
The repository location looks like
:pserver:username@host.url.org:/path/to/repositoryThis method accesses the server via a special protocol with a relatively weak authentication (
pserverstands for password authentication). Before you can use such a server, you need a username and password given by the CVS server administrator, and you have to login. Note that your CVS password authentication username does not necessarily match the system's username. Before accessing the CVS server, you will need to login.Open-source projects typically offer Anonymous CVS access to their sources. This means you can easily grab the latest sources, modify, and create patches (differences) against the repository without asking for a CVS account. As a general rule, Anonymous CVS uses password authentication (:pserver:), and is a read-only repository, not allowing you to upload your changes directly.
Knowing the access method and location to the repository, you can add it to Cervisia's repositories list:
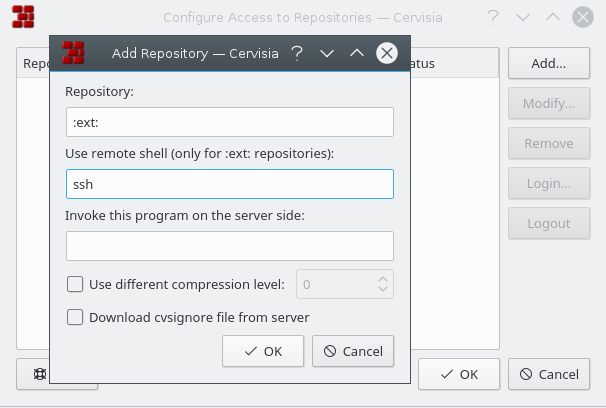
Procedure 2.2. Adding a New Repository
Open the Configure Access to Repositories dialog by choosing the → menu item.
Press the Add... button to open the Add Repository dialog.
Enter the repository location in the Repository: text box. Cervisia will automatically disable the areas of the dialog that are not relevant to the access method you entered.
If you are using the ext method to access the repository, enter the remote shell you wish to use (e.g. ssh) in the Use remote shell (only for :ext: repositories): text box.
Press . You will see the repository you just entered on the repositories list.
If the access method to the repository you just entered is password authentication (pserver), you will need to login before connecting the server. Click the repository on the list to select it, and press the Login... button. Enter your password in the upcoming dialog.
If you successfully enter your password, the Status column entry of the pserver repository will change from Not logged in to Logged in.
Press to apply your modifications, or add another location to the list. Cervisia will store as many locations as you like.