Table of Contents
This chapter gives detailed explanations of all commands available in KDE Partition Manager. It is intended as a reference to accompany the information given in Chapter 2, Using KDE Partition Manager.
- → (Ctrl+Z)
Undoes the last operation that has been added to the operation stack.
This command is only enabled if the list of operations is not empty.
- →
Clears the list of operations without applying any of them.
This command is only enabled if the list of operations is not empty.
- →
Applies the list of operations. This command will apply all operations in the list so that all changes are permanently written to your disks. After the operations have been applied, the list is cleared and there will be no way to undo any operation.
This command is only enabled if the list of operations is not empty.
- →
Allows you to select a device from a submenu with all available devices of the system.
- → (Ctrl+Shift+N)
Creates a new partition table: This command creates a new and empty GPT or MSDOS partition table on the currently selected device. This will delete all partitions on the device and all data on them, so you will want to be careful with this command.
This command is only enabled if a device is selected and no partition on this device is currently mounted.
- →
Allows you to export a list of all partitions on the selected device into a file.
- →
Allows you to import partition table from a previously exported file.
This will delete all partitions on the device and all data on them, so you will want to be careful with this command.
This command is only enabled if a device is selected and no partition on this device is currently mounted. Importing into logical devices such as LVM Volume Groups is currently not supported.
- →
Shows a SMART report. SMART is a monitoring system included in hard disk and solid-state drives that detects and reports on various indicators of drive reliability, with the intent of enabling the anticipation of hardware failures.
- →
Shows information about currently selected devices. In this dialog you can find capacity, sector sizes, partition table type as well as used and maximum number of primary partitions.
- → (Ctrl+Shift+L)
Create a new logical device such as LVM Volume Group.
- →
Shows the file system support dialog. This dialog shows in detail which operations can be performed for which of the supported file systems.
Here is an example how the dialog might look like with most external tools installed:
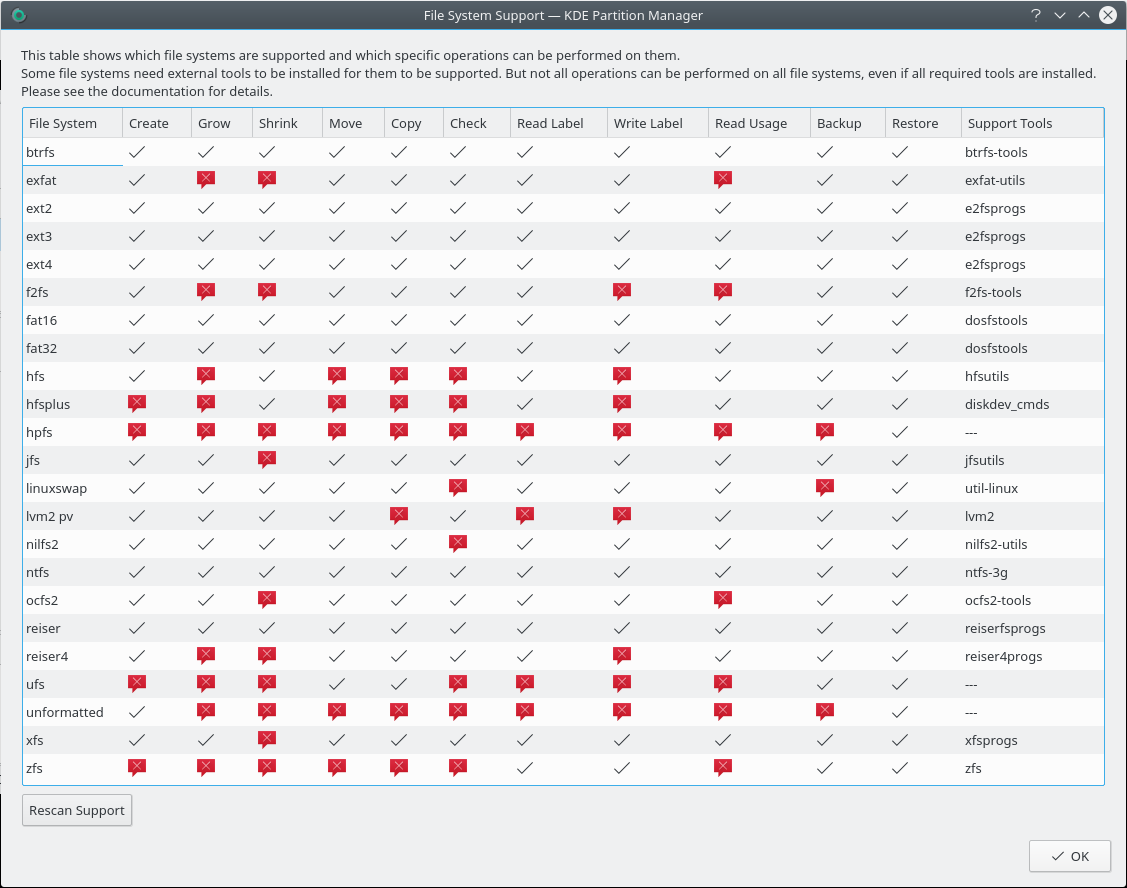
The blue check marks mean “supported”, the red crosses mean “not supported”. Some combinations are never supported, for example checking a linuxswap file system, because they are inherently impossible. Others cannot be supported because the external tools lack the functionality.
If you have installed new tools while KDE Partition Manager is running click on to force a recheck of installed file system support tools.
- → (F5)
Refreshes the devices: This command forces KDE Partition Manager to scan and read the devices on your computer again. This may for example be useful if you plugged in an external USB hard disk after you started KDE Partition Manager.
- → (Ctrl+N)
Creates a new partition: Opens the dialog to create a new partition where you will be able to set type, size, position and file system of the partition to create.
Please note that the partition table on a device may impose restrictions on how many partitions can be created. MS-DOS partition tables, for example, allow only four primary partitions.
This command is only enabled if an unallocated area on a device is selected.
- → (Ctrl+R)
Resizes or moves a partition: Opens the dialog to resize or move an existing partition. Depending on the partition's file system and the external tools installed on your computer, not all three possible resize-related actions -- that is, moving the partition, making it smaller (“shrinking” it) or making it larger (“growing” it) -- may be available in this dialog. See → .
This command is only enabled if a partition is selected that is not currently mounted and whose file system can be shrunk, grown or moved. For an extended partition, it is only enabled if none of the logicals in the extended partition are mounted.
- → (Del)
Deletes a partition: This command deletes the currently selected partition.
This command is only enabled if a partition is selected that is not currently mounted. For an extended partition, it is only enabled if it does not contain any logical partitions.
Warning: Possible loss of data
Deleting a partition means that all data on the partition is destroyed.
- → (Ctrl+Del)
Shreds a partition: This command shreds the currently selected partition.
This command is only enabled if a partition is selected that is not currently mounted. For an extended partition, it is only enabled if it does not contain any logical partitions.
Warning: Loss of data
Shreding a partition means that all data on the partition is destroyed.
- → (Ctrl+C)
Copies a partition: This command copies the currently selected partition to KDE Partition Manager's clipboard.
This command is only enabled if a partition is selected that is not currently mounted and whose file system can be copied. Extended partitions can not be copied.
- → (Ctrl+V)
Paste a partition: This command pastes the partition from KDE Partition Manager's clipboard to the currently selected partition or unallocated area.
When pasting to an unallocated area, a dialog will open allowing you to move or grow the inserted copy. When overwriting an existing partition this dialog will not be shown.
This command is only enabled if a partition is currently in the clipboard and a valid target (either a partition or an unallocated area) is selected. The target must also be large enough to hold the source and can not be mounted. You can not copy a partition onto itself.
Warning: Possible loss of data
Pasting a partition on an existing one means that all data on the existing partition is destroyed and replaced with the data from the pasted partition.
- →
Mounts or umounts a partition: This command mounts or unmounts the selected partition, depending on its current state.
This command is only enabled if a partition is selected that can be mounted or unmounted. If the operating system does not know a mount point for the partition you can not mount it from KDE Partition Manager.
- →
Opens a dialog to edit the mount point and the mount options.
This command is only enabled if a partition unmounted.
- →
Checks a partition: This command checks the selected partition and its file system for errors and tries to correct any problems it finds. During this process the file system on the partition will also be resized to fill the partition completely.
This command is only enabled if a partition is selected that can be checked and is not currently mounted.
- →
Backs up a partition: This command backs up the file system on the selected partition to a file. You will be asked where to store the image file after activating this command.
The created image file is a sector-for-sector copy of the file system on the partition. It is not compressed and does not have any additional meta information or header added to it, thus it can be directly mounted using a loop device outside of KDE Partition Manager if the operation system supports that.
This command is only enabled if a partition is selected and the file system on it can be backed up. The partition must also not be mounted.
- →
Restores a partition: This command restores a file system from an image file to a partition. You will be asked for the name of the image file to restore after activating this command. The target to restore to must be large enough for the image file.
The command is only enabled if either an unallocated area is selected or a partition that is not currently mounted.
Warning: Possible loss of data
Restoring a partition on an existing one means that all data on the existing partition is destroyed and replaced with the data from the restored image file.
- →
Shows a partition's properties: This command shows a dialog with information about the currently selected partition or unallocated space.
What is displayed and what can be modified in this dialog depends on the type of partition, the type of the file system on the partition and on the partition being currently mounted or not.
Not all file systems, for example, support setting a label. It is also generally not possible to modify any properties if the partition is mounted.
This is a list of all partition and file system properties that can in general be modified in this dialog:
Set or modify a file system's label
Change the partition's file system.
Warning: Possible loss of data
Changing the file system for a partition always means that all data on the partition is destroyed.
Recreate the file system on the partition
Warning: Possible loss of data
Recreating a file system on a partition always means that all data on the partition is destroyed. Recreating a file system should only be used as a last resort if the file system on a partition cannot be repaired anymore.
Change a partition's flags
Depending on the type of partition table used, there will be several flags available for each partition on the partition table. In most cases, modifying the flags is not necessary and should be considered an advanced feature.
The command is only enabled if either an unallocated area or a partition is selected.