Table of Contents
The Filelight settings dialog has two tabs for configuring the Filelight options. The two tabs are Scanning and Appearance. Below is a description of the settings tabs. The Filelight settings dialog can be found by clicking → .
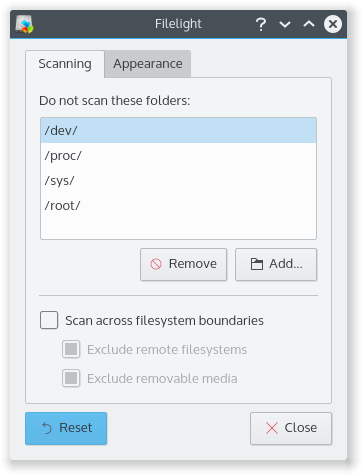
The scanning tab allows you to configure how Filelight scans folders. The Do not scan these folders is used to exclude certain folders from your scan. This option is very useful for skipping folders that you may not have permissions to read, or folders that are part of a virtual filesystem, such as /proc. To add a folder to the list, click the button, this will start a dialog where you can choose the folder of your choice from a tree view. To remove a folder simply select the folder of your choice and click the button.
Using Scan across filesystem boundaries allows scans to enter folders that are part of other filesystems. For example, when unchecked, this will usually prevent the contents of /mnt from being scanned if you scan starting from the root folder /.
A scan of remote filesystems, e.g. NFS or Samba mounts, can generate high network traffic. To prevent scanning them check Exclude remote filesystems. The next option Exclude removable media
prevents Filelight from scanning removable media (e.g. CD-ROMs).