Ekos Astrophotography Tool is organized into several Modules. A module is a set of functions and tasks for a particular step in astrophotography and/or data acquisition. Currently, the following modules are included with Ekos:
Setup & Summary Module
Scheduler Module
Analyze Module
Capture Module
Focus Module
Alignment Module
Guide Module
Mount Module
Each module has its own tab and icon in the graphical user interface as illustrated in the screenshot below:
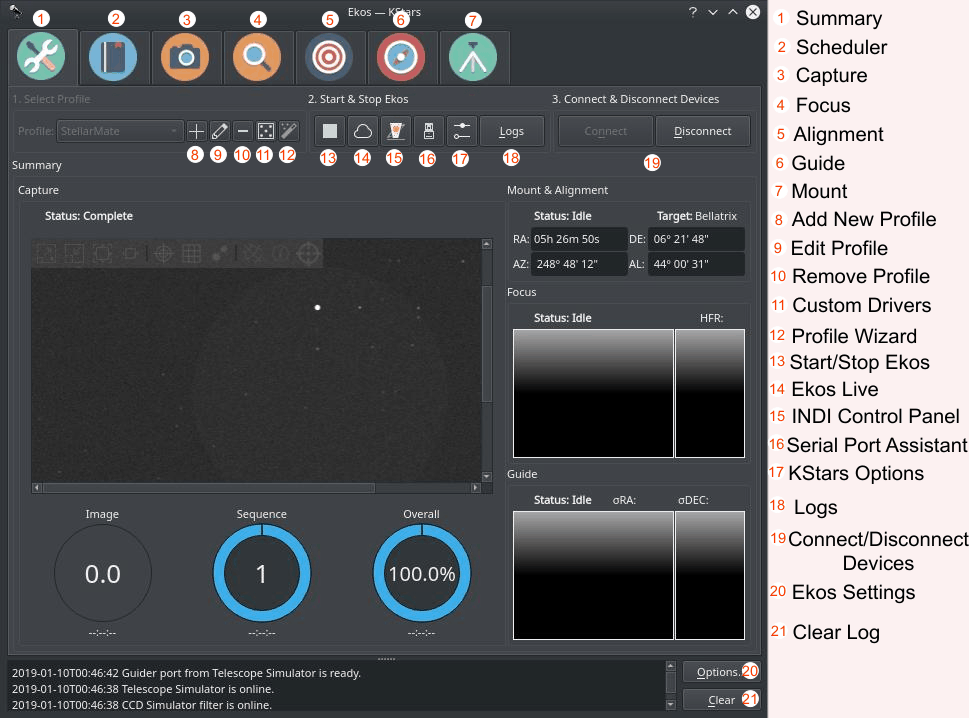
- Summary & Setup Module
As its name suggests, this is where you will create and manage your equipment profile, and connect to your devices. It also provides a summary view where the capture progress along with the focus & guide operations is displayed in a compact format to convey the most important information relevant to the user.
- Scheduler Module
After mastering Ekos, users are encouraged to learn how to use the Scheduler module since it facilitates the complete observation process greatly. It enables you to select multiple targets, specify which conditions and requirements to be met, and what frames are required for capture. Afterwards the scheduler intelligently calculates the best observation time for each object and then proceed to control the complete observatory from startup to shutdown.
- Analyze Module
Analyze displays a high-level summary of what happened during an imaging session. It shows plots and graphs describing the many captures takes during a night, the focus sessions, the guiding, mount movement, meridian flips, etc. Use it to get a feel of "what happened last night" or to see the current state of the system.
- Capture Module
This is the primary module for camera & filter wheel control. Create imaging sequences, capture previews, and watch video streams. It supports rotator control and can automatically capture flat frames in a number of scenarios.
- Focus Module
Measure the sharpness of your images in the focus module by calculating Half-Flux-Radius. The lower the HFR, the sharper the image becomes. You can run the focus module with or without a focuser. With an electronic focuser, you can run an autofocus operation where Ekos iterates and calculates the optical focus position.
- Guide Module
To achieve long exposure astrophotography, guiding is necessary to ensure the image is locked and stabilized for the complete duration of the exposure duration. Deviations from the frame with time can lead to blurry images and star trails. In the guide module, it can automatically select a suitable guide star and then lock the mount to always keep that star in its position. If the guide module detects any deviation from this locked position, it sends correction pulses to the mount to bring it back to the original position.
- Mount Module
Mount control can be either done via the Sky Map interactively or via the Mount Control Panel in the mount module. Configure telescope properties (focal length & aperture) for both your primary imaging telescope and guide scope. However, it is recommended to select the telescopes in the equipment profile and not change the values directly in the mount module.