In general, it is preferable to import OFX. However, not all institutions provide data in that format. CSV (comma separated value) files are almost always available, sometimes described as Excel or spreadsheet files. Also, they can often be created fairly easily by capturing the data you want to import, such as in a text file, and manually editing it.
The primary focus of the plugin is on importing data from bank statements, but there is also a capability to import some investment statements. This plugin was initially created, before becoming a CSV importer, to produce QIF files from CSV, which could then be imported. This functionality is still present, but is likely to be removed, as the plugin now focuses on directly importing CSV files. Also, KMyMoney has the native ability to export QIF files, so there is no real reason to produce a QIF file from a CSV file.
KMyMoney will import CSV files. This functionality is provided as a plugin, and it is now built into the core program, both in distro packages and in the source files. Once the distro package is installed, or the source files are compiled and installed, the menu choice to import CSV files will automatically show up under the → submenu.
The CSV importer plugin is much newer than the OFX plugin, but most distributions are now built with the CSV importer already included or available as a separate package. Ensure that it is enabled within KMyMoney. Check the → → menu item. If the CSV importer does not seem to be installed in your version, the first place to check is in the same place you got your base KMyMoney package. See if a later version is available, or if the importer is available as a separate package.
If you have installed from RPM or Deb, the CSV Importer Plugin should be contained within the kmymoney package. If you have built from source, there should be no additional requirements. The KMyMoney build process should detect the plugin source and compile the plugin.
To import a CSV file, choose the importer from the menu bar: → → . If CSV does not show up under Import, you do not have the CSV Importer Plugin installed correctly. Please see the previous section.
The CSV Importer is in the form of a wizard, with a separate page for each individual step of the process. There may be some minor differences between the text in this handbook, the labels in the screenshots, and the labels you actually see in the wizard. In such cases, the handbook describes what the wizard will look like in the next release.
When started, the CSV Importer displays the Start page. The upper area, where data will be displayed, is initially empty. Below that, on the left, is a list of the steps of the import process, with the current one highlighted. To the right of that are some brief instructions and two radio buttons, allowing the choice of either Banking or Investment. Next there is a profile selector box, which is enabled once one of the radio buttons has been selected. At the bottom of the display are buttons to move on to the next step of the wizard, go to the previous step, or the import. At the initial step, there is also a button Select File to initially select the file to import.

Also, note the Skip setup checkbox next to the profile selector. Initially, you should not select this check-box. Once you have set up a profile and finished the wizard, those parameters are saved in the resource file. Next time you use that same profile, the parameters will be loaded into the UI (User Interface). The wizard would then plod through the following pages of parameters that you won't need to change. So, instead, once you are happy with a profile, it may be helpful to check this box. The wizard will then move directly to the final page, and, assuming no problems are found, you just have to click Import.
First select either Banking or Investment, then click in the selector box, which displays "Add New Profile." If you have previously created any profiles, you can select one of them, otherwise enter a new profile name, possibly the name of the account into which you wish to import. If you enter a new profile name, hit Enter to create it. Then, click on Select File, and a standard file selector box will open, from which you should select the CSV file you wish to import.
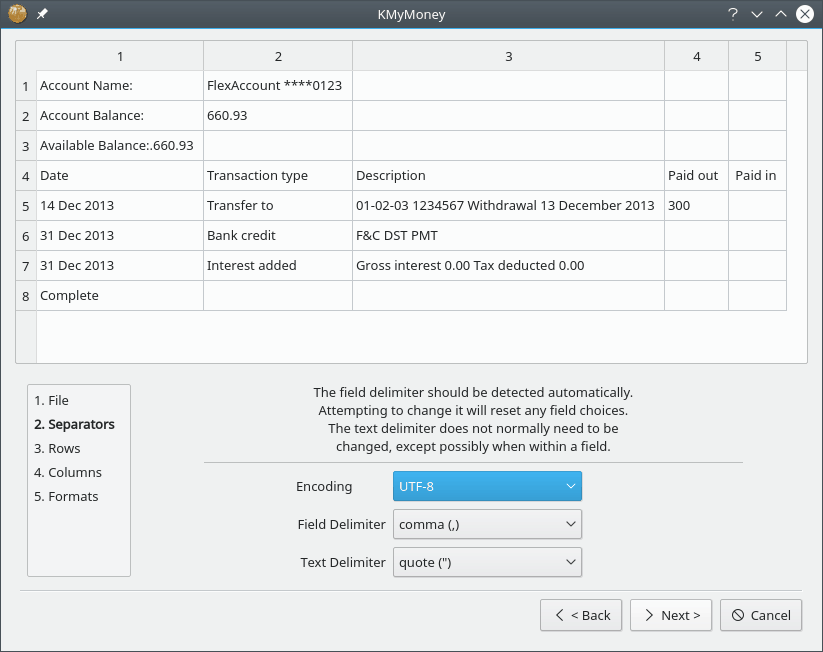
The wizard will now have advanced to the Separators page, and you should now see your data.
Warning
It may appear that the displayed entries in the upper section of the plugin window may be edited, and in fact they may, but any edits are not kept. The table is purely for display, not for editing. The input file is never altered by the plugin, and the data actually imported comes from the input file, not from the display. The one exception to this is covered in Securities and Symbols below.
The plugin should have detected the appropriate Field Separator to use, and it is not usually possible to select a different one. In fact, attempting to do so will reset any field choices you may already have made. There is also a selector for the Text Delimiter, but generally the quote (") is correct. Now click on the button. Depending upon the earlier selection you made, you will now be on either the Banking page or the Investment page.
On this page, you select the column numbers from which to import the relevant fields.
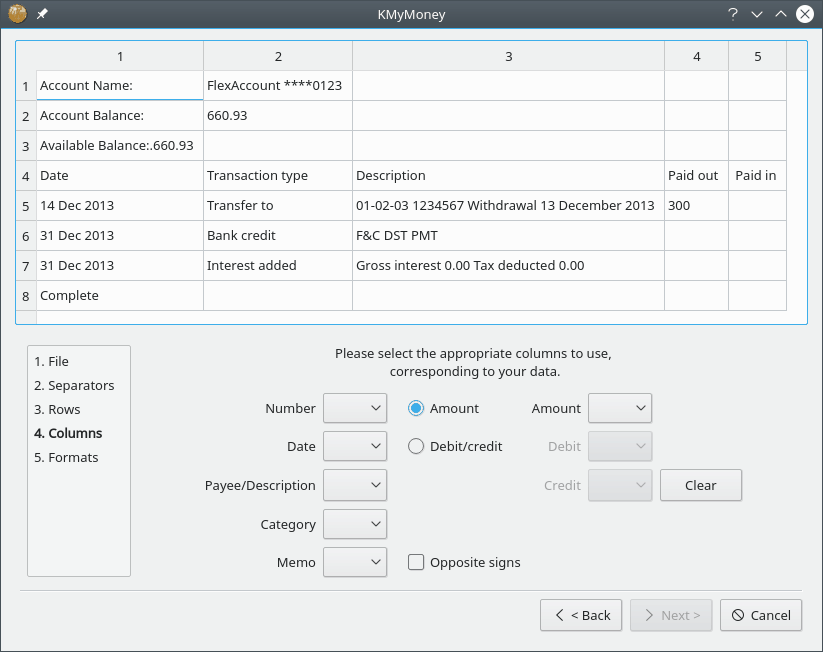
For most fields, you just need to use the appropriate dropdown to select the appropriate column. However, there are a few special considerations.
In the center are two radio buttons. If your file has a single column for all values, select Amount column. However, if there are separate columns for debits and credits, select Debit/credit column. This will enable either the Amount column selector or the Debit and Credit column selectors.
It is possible to select more than one column for the Memo field, by consecutive selections. Memo columns already selected are marked in the drop-down with an asterisk (*). If you select multiple columns in this way, their contents will be concatenated in the Memo field.
If you attempt to choose the same column number for two fields, the plugin will alert you and clear both selections. However, it is possible, if desired, to use the same column in both the Payee/Description and Memo fields. If you select a column for the Payee/Description field, and then select the same field for the Memo field, you will receive a warning that duplicate columns have been selected, but asking if you wish to proceed. If you do, click .
One particular reason to also capture the Payee/Descriptor field in the Memo field is that the incoming Payee/Description field might get completely changed on import when KMyMoney does transaction matching. Selecting that field also as Memo will preserve that data, which would otherwise get lost.
If you notice you have made an incorrect choice, just change that selection. If several changes need to be made, click the Clear button.
Once columns have been chosen for all the necessary fields, the Next button will be enabled, and clicking it will advance the wizard.
This page is similar to the Banking page, although it is somewhat more complex. Most selections are fairly obvious, but there are some items which can seem confusing until you have completed the process once or twice.
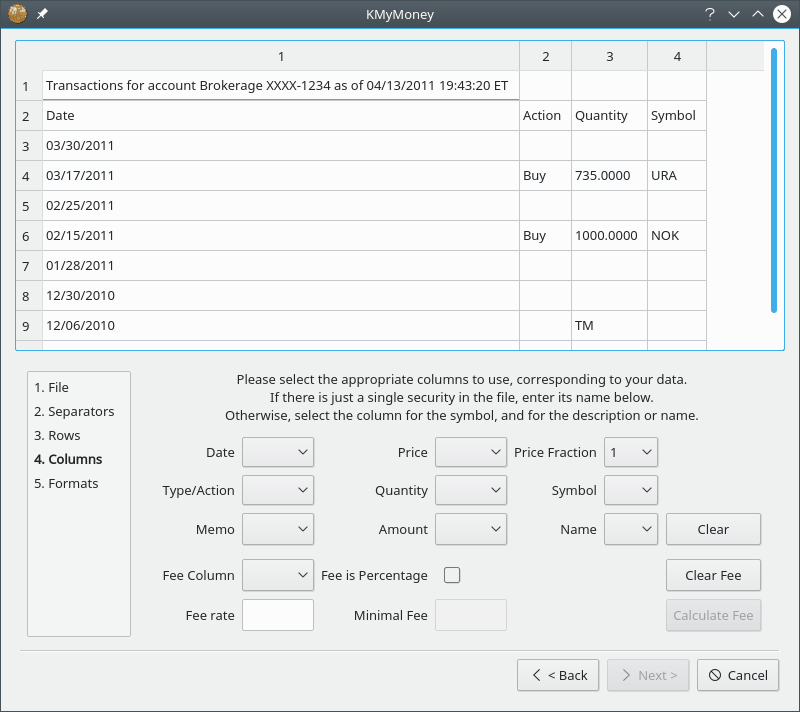
As on the Banking page, you may select more than one column for the Memo field
The Type/Action selector is to identify the column which contains the action type, such as Buy, Sell, Dividend, etc.
The Price Fraction selector is to indicate the fraction/multiplier for compatibility between imported and stored prices. For instance, if the import file price is in cents, but your KMyMoney account is priced in dollars, select 0.01. Or, if your KMyMoney data file pricing is in dollars, and so is the CSV file being imported, then set Price Fraction to 1.0.
Use the Fee Column selector if your file has a distinct column for fees. Beware, though, that the fee might have been taken into account in the price. If there is a fee, and it is a percentage figure, rather than a value, click the Fee is percentage check box. Note that on this page, this is the only field to explicitly include "column" in the label, to emphasize that it is for the fee column, not for any actual fee.
Below the column selectors are two areas for the security identity. Depending upon your broker or financial institution, your file may contain entries for only one or for several securities.
If the file contains transactions for just a single security, with the name possibly in a header row, the name should be entered into the Security Name box. The name you enter will be added to the drop-down list for future use. You may subsequently wish to remove that name from the list. If so, select it, then click the Hide security button. This removes it only from this list, and has no effect on your main KMyMoney file.
If the file includes transactions for several securities, each will be identified by its ticker symbol in a column with further detail in another column. Select those columns in the Symbol and Detail selectors. It may be that a security has no official symbol, and in this case a pseudo-symbol may be invented; this is not a problem, as long as it uniquely identifies that security in the import file. Sometimes the actual activity type is embedded in the detail column, possibly prefixed by a standard text. For instance, if the field contains “type: dividend”, go to Filter text box and enter “type: ” including the trailing space.
When all required fields are selected, the Next button will be enabled, and clicking it will advance the wizard.
On this page, you indicate if any lines should be ignored at the beginning or end of the file. You also indicate the format of any date column.
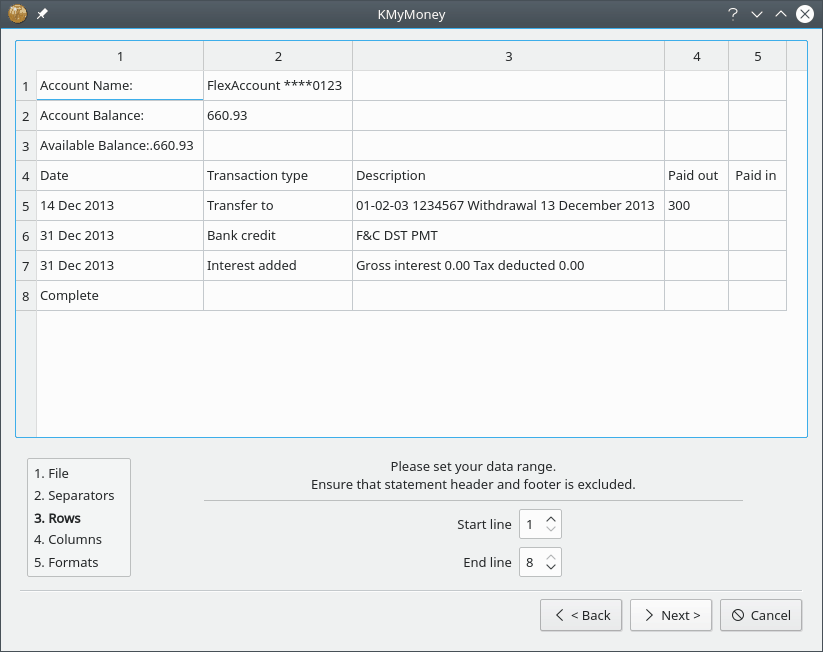
Start line. Set this so the importer skips any header lines in the file. Your choice will be saved in this profile for future use. The start and end lines interact, and the start line may not be higher than the end line. If the Start line selector does not respond, check the end line setting.
End line. The importer will automatically set this to the last line in the file, or to the setting last saved. You will only need to adjust it if there are footer lines in the file the importer should ignore. Otherwise, you are likely to get a data error warning when the plugin attempts to parse incorrect data. Again, if the End line selector does not respond, check the Start line setting.
Date format. This needs to be set according to the order of year, month, and day in the dates in the file. If the plugin finds data incompatible with this setting, it will complain when you try to import. However, if the setting is wrong, but it produce invalid results not detected (such as data with no days higher than 12, so month and day could be switched) you will simply get incorrect data, because the plugin cannot know you made a mistake. In this case, the error will be obvious in the ledger after import.
Once ready, the Next button will be enabled, and clicking it will advance the wizard.
For an Investment file, after the Lines page has been accepted, you need to assure that each security in the file is matched to the correct security in your KMyMoney file, before import can proceed. At this point, another window will open, showing the securities and symbols contained in the import file. Note that unlike the data display in the main wizard windows, the changes you make on this page are imported.
Completing this page is straightforward, if you consider these items:
Each row represents one transaction, and so it may appear there are duplicate rows. This is OK.
Each security name must match exactly the existing security as specified in KMyMoney. If it does not match, it will be created as a new security, which you probably do not want, unless it represents the purchase of a new security.
A symbol must be shown for each security.
The only information on this page should be the security symbol and name. Any other information initially shown (such as date or activity type) is still in the actual import file, but should not be shown here.
You can edit a symbol or security name by double clicking the cell. For each security, if necessary, edit the name in one of its rows, If the correct security name appears in the imported file, double click on it to select it, then copy and paste/edit, taking care if you have used a variation or abbreviation within KMyMoney. If you edit a security name, that edit will be applied to all rows with the same symbol.
Any line without a symbol will be treated as a brokerage-type checking item. If any transaction involves another account, e.g., a checking or brokerage account for a received dividend or for making a payment, a message box will pop up for the account name to be entered for the transfer. This will generally be the Brokerage account you chose or created when you created the Investment account. Similarly enter the column number containing the payee, if requested. If a mistake is made when entering the account name, the import will go ahead, but KMyMoney will not recognize it, and will flag those transactions as missing a category assignment. If the required account name is rather long, just enter a few characters. The import will proceed but the transactions will be flagged by KMyMoney as missing a category assignment, and you will need to select the correct transfer account after the import. Click when done. The import process then gets handed over to KMyMoney.
If you have more that one transaction referring to the same security, you can edit all of them at once, using multi-select. For instance, to add a symbol for several lines, press and hold the Ctrl key, and in the symbol column, select each transaction. While still holding the Ctrl key, all those symbol cells should still be selected, so click on one and enter the symbol. Click inside the window but outside that column, or hit Enter (not ). Now that those transactions all have the same symbol, double click one detail entry and edit the security name as you wish. Click elsewhere on the window (or Enter) to accept the edit, which will then change all those entries. The remaining entries will show the symbols picked up from the transactions in the import file.
Now click , then . In the Enter Account box, enter the name of a Brokerage/checking account for funds. If you enter a valid name that account will be used. If you can't be bothered entering a correct but long name, enter a few characters. The import will accept that but the transactions in the ledger after import will need a proper account to be selected. For the Brokerage box, enter the number of the column containing that detail. Now, on the Invalid transaction box you may get a few entries because the activity type does not match the qty/price/amount combination. On each message, click Select Transaction Type, and a drop down will appear indicating valid activity types for that combination of values.
Now the import has occurred and you're into KMyMoney to select the investment account to use. Then the checking account, if there were any brokerage type transactions.
On reaching the Final page, the plugin automatically validates the values. If the numeric value column/s is/are highlighted in green, then the validation was successful and all that is necessary is to click and control then passes to the main KMyMoney program. However, if the start and/or end lines are incorrectly set, or if the wrong columns were selected, the highlighting will be in red, and an error message will appear indicating where the error lies. The user will then need to click to get to the relevant page to correct the error.
It might also be that if debit and credit columns are in use, one of those columns may legitimately contain no entries. This would mean that that column has no decimal symbol present, and this would result in a warning. If you see that this is the case, you may click either of the buttons to accept ( or .)
Decimal Symbol. Another possible problem might be that the selected decimal symbol is incorrect. Selecting the symbol to match the data should clear that error. Normally, you should not need to change this selection. Note that the Decimal Symbol must be set to match your file, not your locale. If your locale setting has a different value, conversion will be seen to take place. The display of the file in the upper part of the window will show numeric fields highlighted in green if the current setting produces valid results, otherwise in red. The highlighting also reflects the Start line and End line settings. There could be warnings if any of the selected cells appear not to contain the selected symbol.
Thousands Symbol. This does not need to be selected, as it is set automatically based on the Decimal Symbol. It is provided purely as a guide. In addition, the selector will be inactive if none of the values to be imported is greater or equal to 1000.
Import CSV. Clicking this button tells the plugin to actually import the data from the file, based on the choices you have made above. KMyMoney will prompt you for the correct account into which to import the data.
This button gives you the ability, after the import has been completed, to save the data from the CSV file as a QIF file, should you require one for any reason. This was actually the original functionality that drove the creation of this plugin. However, as KMyMoney itself is now able to export a qif file, the capability is now probably of little use and is likely to be removed eventually.
For a Banking import, the plugin has finished, and KMyMoney will prompt you, as stated above, for the correct account into which to import the data. For an Investment import, however, a little more may be required. If, during import of a transaction, the plugin finds no valid transaction type, it will display the offending transaction, and the user may select a valid type to substitute, depending on the combination of quantity, price, and amount values. For every transaction, the plugin will validate the column contents to ensure they match the action type. For instance, if a quantity appears but no price or amount, it is assumed that the transaction can be only an Add or Remove Shares. Or, if there is an amount but no quantity or price, then a Dividend is assumed, etc.
If you wish to save your settings, remember to click the button, and the plugin will then close.
If you find that your investment statements keep including activity types that
are not recognized, just add them to the section in the resource file. (See
below for more details on
this file.) For instance, in the [InvestmentSettings] section
of the file, the BuyParam field includes entries for
Purchase, Buy, New Inv,
and Switch In. If you find a different one, add it to the
correct list and restart the plugin. You may notice that there are similarities
in the entries in different fields, and you may find that the wrong activity type
is being selected. The plugin checks these lists in the following order:
Shrsin, DivX, Reinvdiv,
Brokerage, Buy, Sell, and
Remove. Re-ordering the lists to suit this does not work as
might be expected, since the entries in the resource file get sorted into
alphabetical order. If the offending parameter is one you don't need, just delete
it from the file. If that is not possible, you may need to edit your file before input.
A well-known drawback of QIF format is that it is a fairly loose format.
With CSV files, there is this same problem, only more so, in that there is
no agreed standard at all. With investment files, in particular, there is
much more scope for variation in specifying the different types of activities
represented in the data. The plugin handles this by listing these activity
types in a resource file, called csvimporterrc. The location
of this file depends on your distribution. On a Linux® system, this will be in
$KDEHOME/share/config where
$KDEHOME is usually “.config” within your home folder.
If you are migrating from a version of KMyMoney prior to 5.0 or later, the old
location of $KDEHOME was .kde4.
Using this resource file allows the user to add an activity type that the developer
had not encountered. If the file does not exist when the importer first runs, the
plugin will create a default version, containing a few of the more obvious
descriptions.
A number of sample CSV files are provided (in the
kmymoney/contrib/csvimporter/ folder in the source tree) in the hope
that they may help. For example, in the investment sample, an activity type is
"ReInvestorContract Buy : ReInvested Units". In the validation
process, the first successful match is on the ReInv in
ReInvestorContract Buy, so the transaction therefore gets
classed as Reinvdiv, even though Buy also is
mentioned. Another example which has been observed is an activity type of
Reinvest even though the transaction included neither price nor
amount, but only a quantity, so that needed to be treated as Add
Shares, or Shrsin.
When this plugin was created, only a few investment formats had been seen as
examples, and it may well be that you will encounter one which cannot be
handled correctly. If you find such a file, please send a suitable example
(edited to remove or replace personal information) to the KMyMoney user list
(kmymoney kde.org) or developer list (kmymoney-devel kde.org), the developer will do his best to
modify the plugin to handle it.