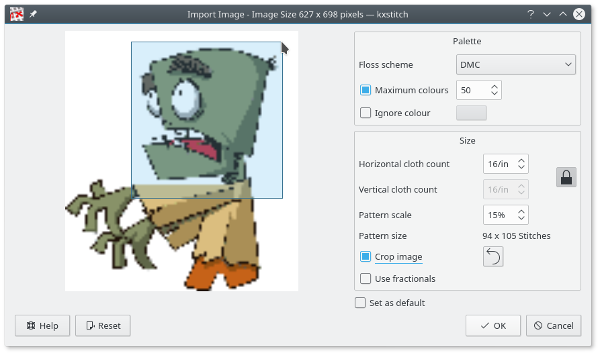
On the left of the dialog there is a preview of the imported image, based on the parameters on the right.
The floss scheme for the finished pattern can be selected, by default this is the same as the New Pattern Properties dialog defaults. The maximum colors to be used for the pattern can be enabled and changed as required, by default the imported pattern will have as many colors as are defined in the original image that are converted to floss colors. Checking the Ignore Color box allows you to click the dropper tool to select a color in the image that will be ignored on import. This is useful to remove backgrounds that you don't need converting to stitches. The ignored color will be displayed as a checker board pattern in the preview.
The cloth count value defaults to the New Pattern Properties dialog and the scale is set such that the final size is as close to the New Pattern Properties pattern size as possible. These values can be changed as required.
The Crop image checkbox enables cropping of the preview image. Click and drag across the preview image to select the area required. Guide lines are shown before selecting the starting point to allow more accurate placement. Once an area is selected the preview will be rerendered to show the cropped area. Further cropping can be done if required. Clicking on the reset button, or turning off cropping will revert the preview to the original image.
The Use fractionals checkbox will enable the use of fractional stitches in the imported pattern. This effectively doubles the import resolution without affecting the overall size of the pattern.
Clicking will convert the image into a pattern.