Sometimes you want to offer your modifications for review, before committing them, or you do not have write access to the repository (therefore you cannot commit). CVS offers standard formats to share the modifications in your working copy, so other people can review your changes, test them in their working copy and apply them to the CVS repository. A file containing these differences is called a patch, and is generated by the cvs diff command, in the same way as the differences in the section called “Watching Differences Between Revisions”. Sharing patches instead of sets of files requires less bandwidth, and patches are easier to handle, as you can send only one patch file containing all the differences from many source files.
Cervisia gives you access to this feature by choosing → .
Important
The action
creates a patch with all modifications in all files in your working copy
(sandbox) against the BASE repository. Therefore, the
selection of files in the main view does not affect the patch that will be
generated.
Another possibility is to select one file in the main view and choose from the menu or right click the marked file and choose from the context menu, in order to open the Browse log dialog. Now, select the version you want to create a patch against, as revision “A” and press the button Create Patch.... This will generate a patch with the differences between the marked file in your working copy and the version selected as revision “A”.
Before generating the patch, Cervisia displays a dialog allowing you to configure the output format.
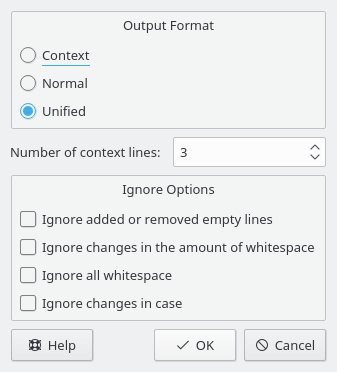
- Output Format
There are three output formats available:
Normal: a format that can be used to cause the ed editor to automatically make another copy of the old file match the new file. In the normal output format, the characters < and > mark the changes, and there is no context information.
Unified: the most used format for exchanging patches. The unified format uses context lines in addition to line numbers to record the differences. This makes the process of applying patches more robust. This format displays the differences in a compact and readable form, with a header for each file involved, and separate sections (chunks) for each difference. The context lines available for each difference make reading the modifications easier. In the unified output format, the characters + and - mark the changes.
Context, which presents the same information as the unified format, but in a less compact way. In the context output format, the character ! marks the changes.
- Number of context lines:
Set here the number of context lines for the unified or context output formats. This option is not available for the normal output format, as in this format no context information is recorded. More context information makes reading the raw output easier, and applying the patch more precise, but increases the patch size. It is recommended to use at least two context lines for proper patch operation.
- Ignore Options
Check here the changes that should not be considered as differences when generating the patch.
After setting the output format, Cervisia generates the patch and displays the Save As dialog. Enter in this dialog the file name and location of the patch file.