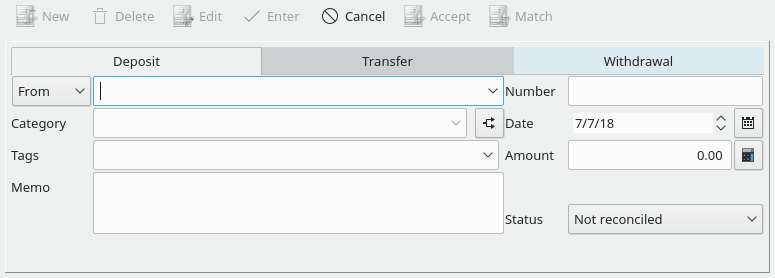
The transaction form at the bottom of the ledger view is the interface for manually creating transactions.
Depending upon the type of transaction you wish to enter there are several tabs available on the transaction form. Click on the tab that best defines your transaction (deposit, transfer, or withdrawal) and the form will load several fields available for your input.
Please note that the actual transaction method is not used directly by KMyMoney but is purely for grouping/reporting purposes.
If you are unsure which method to choose simply use Deposit for any money coming into the account, Withdrawal for money going out of the account, and Transfer for money moving from one account to another. The transaction methods and the differences between them are discussed in more detail elsewhere.
Select the transaction method by clicking on the appropriate tab.
Enter the information using the following notes on the available fields. Note that many fields have 'Auto Completion' turned on. That is, if you start typing, KMyMoney will offer alternatives matching the characters you begin to enter. To select the matching content simply click on the entry by using your mouse or selecting the appropriate keyboard keys. If the entry is not listed finish typing the content to add the new value. The next time you type the content, KMyMoney will find it for you as you begin to enter the initial characters.
The Payee is who the money came from/to. If the payee is a new entry KMyMoney will ask if you wish to add this to the list of Payees. Any other information related to a payee or payer, such as address, phone number and account number as well as notes can be updated in the Payees view.
The Category associates a transaction with an income or expense category for accounting and reporting purposes, and enables you to group certain transactions. Type the name of the category into the defined field. If you have entered the category and it does not exist then KMyMoney will ask if you want to create a new one. If the selection is Yes KMyMoney will then open a dialog box that allows for the further definition of the category based on General, Hierarchy and Tax characteristics.
If you wish to associate parts of the transaction with different categories, KMyMoney can handle this need. An example transaction might be a cash withdrawal of 50 of which you use 10 on food, 20 on beer and 20 as cash. The transaction will therefore be assigned three categories: Food, Beer, and Cash. To do this, you need to use Split Transactions, which is described in more detail below.
See the special KMyMoney fields section for more information on how to use this field.
Tags are similar to Categories, and can be used to maintain an orthogonal view to Categories. They provide the ability to group transactions within a Category based on your defined needs. This need could be defined by a specifics to Person, Place, or Thing. For example, you might have a Category for each different type of automotive expenses, and then have a Tag for each vehicle. As with Categories, you can select from the dropdown list, or type a new Tag name, and be prompted if you want to create a new Tag with that name. Within the Tag field KMyMoney will allow for multiple tags entered within a single transaction. Also, you can enter a tag on an individual split.
A multi-line memo can be entered if you wish to help you remember further details of a specific transaction.
The check number can be entered if needed. Note that the check number field can be made visible or invisible in the ledger if desired. This is configured in the Ledger Settings dialog.
The transaction's date must be entered to specify when the transaction took place. See the special KMyMoney fields section for more information on how the date input field can be used to make entering dates quicker and easier. For transactions in checking and credit card accounts, it is your choice whether to use the actual date (when you wrote the check or made the purchase) or the posting date as reported by the bank or credit card company. Using the actual date can help you track when you made the purchase, for example, but the statement or downloaded data from the bank is more likely to use the posting date.
Finally, enter the transaction amount into the required field. Note that a simple calculator can be displayed, either by clicking the icon to the right of the amount field, or by entering the % character into the field, or by entering any of these mathematical symbols: + - * / in a formula, as in 12 + 3. When entering the plus sign, the calculator will be opened. Note that only the final result of any calculation will be saved as the amount of the transaction.
When you are satisfied that all the fields have been adequately filled in, click on . If you accidentally press or click on before you have finished entering all the data, click on to resume entering the data.