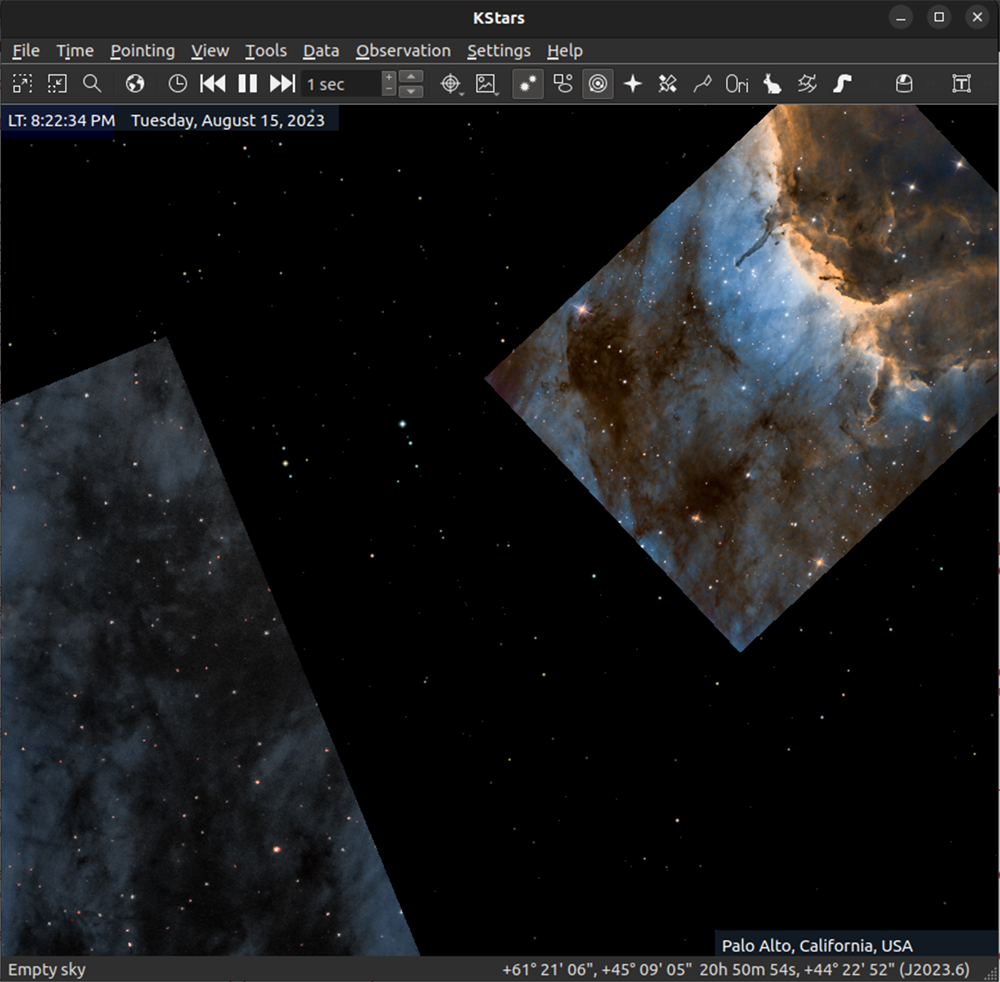
Image overlays are custom images (typically .jpg) that are rendered onto the
skymap over stars and other skymap items, but below the terrain. These images are added by you, the user, a sort
of personal sky catalog. If configured properly, these personal images can be displayed almost perfectly aligned
with other objects in the sky.
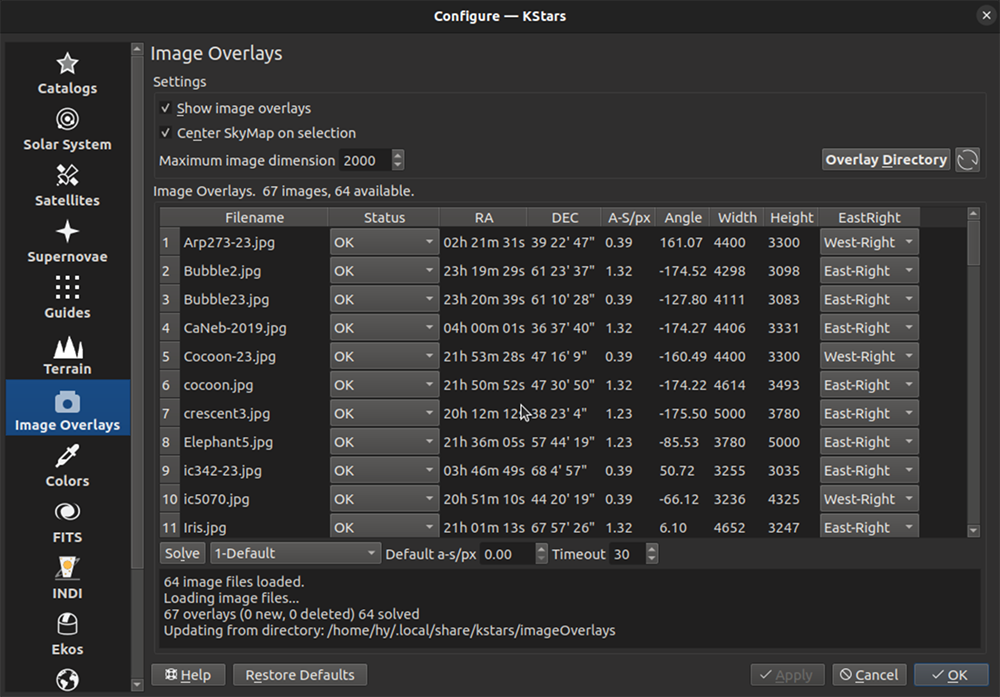
The Image Overlays page lets you configure whether image overlays will be shown on the skymap, and helps you add them to the system. The image at the start of this section shows the skymap with image overlays enabled and some image overlays loaded.
Each time it starts up, KStars looks for new image overlay images in a special directory, parallel to the logs
directory, named imageOverlays. On Linux this can be found in
~/.local/share/kstars/imageOverlays. The exact location for your system can
be found by clicking the button near the top of the
Image Overlays config page shown at the top of this section. To start, add your images to that
directory. Ideally, for performance reasons these aren't massive files, but probably images with widths 1000 or 2000
should be fine. To add additional images in the future, add them to the same directory and click the refresh button
or restart KStars. To remove overlays, remove them from the directory and click the refresh button or restart KStars.
Start KStars once you have images in the imageOverlays directory. If you then go to the
Image Overlays config page, you should see the new files listed in the table. The new images
will show their status as Unprocessed. Only images whose status is OK
are displayed on the SkyMap. That is because KStars needs to know the sky location, size, and orientation for
these images before it can display them. To change the status to OK you need to plate-solve
the images or add the required information manually--see below.
To prepare your images for display, you need to plate-solve the images (one time only). To do this, find an image in the table, click on its filename, and then click below the table. The button's label should switch to during the solve, and then when completed successfully, the solved parameters are displayed in the table and the status is changed to OK. A successful plate-solve's information is stored in the user database so that solving doesn't need to be repeated. The solved image should from then on appear in its proper position in the SkyMap. You can plate-solve multiple images in a single operation by clicking on the first image's filename, then holding down the Shift key and clicking on another filename. All the image files between the filenames should be selected. Then clicking will attempt to solve them all. However, KStars will not attempt to plate-solve images whose status is OK, it will skip those images. (If you wish to re-plate-solve images with status OK, then manually change their status to Unprocessed and click ). It is possible that if you select several images, a few of them will not be successfully solved.
Plate solving these images can sometimes be difficult. That is because at this point the system has no information as to the scale or position to look, and thus it is a blind solve. To improve your chance for success, you can enter an approximate RA/DEC center sky position into the RA and DEC columns for the row you are trying to solve. You can also add an image scale, in arcseconds-per-pixel. You can add a default scale to the right of the button in the box labeled Default a-s/px so that all solving attempts use this scale by default. You can also add a scale directly into the table-row-column, which would override the default. You can choose which StellarSolver profile the solver uses (these profiles can be edited in Ekos' Align tab). Finally, you can adjust the solver's Timeout in seconds.
If you have problematic images that won't solve, you can still display them by manually entering the values (that the solver didn't find) into the table. They are the RA, DEC, arcsecond-per-pixel, orientation angle, and east-to-the-right (or West-to-the-right) settings. Once you have done that, you can then change the status to OK and KStars will save these values to the user database as if they had been automatically solved.
There are a few more controls on the Image Overlays settings page. The Show image overlays checkbox at the top of the page enables or disables this feature--that is, toggles whether any image overlays are display on the SkyMap or not.
The Maximum image dimension: spinbox allows you to vary the maximum image dimension used for images.
That is, if you place images that are, for example, 5000 pixels wide into the imageOverlays directory,
but this input box's value is 1000, then the 5000-pixel-images will be read in, but then downsampled to 1000-pixels-wide
before display. This is done to reduce the memory footprint and cpu usage of this feature. It would be more efficient to
add image files with the desired image width.
The Center SkyMap on selection checkbox allows you to easily navigate to the overlay images without directly manipulating the SkyMap. With this enabled, you select a row in the overlay table (i.e., by clicking on the filename field) and the skymap is moved to that image if the image's status is OK. At that point you can move from one image to the next with Up and Down arrow keyboard commands.