When you have made a certain number of changes to your working copy, and you want other developers to have access to them, you commit them. With a commit, you place your versions of the modified files as new revisions into the repository. A subsequent update by another developer will bring your modifications into their working copy.
In order to commit a couple of files, select them in Cervisia's main view and choose → or right click the marked files and choose from the context menu.
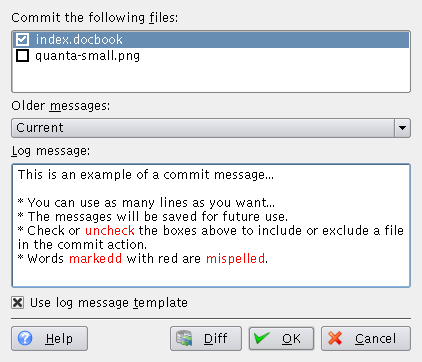
You get a dialog that shows you a list of the selected files on the top section and a log message for your changes below. Cervisia helps you in several ways to find a meaningful log message: first, in the file list you can double-click a file or press Return in order to see the changes you have made to the file. Second, it gives you a list of log messages you have previously used in a combo box. Third, this dialog is integrated with Cervisia's changelog editor described below. When you have finished the dialog, the command
cvs commit -m message file names
is used.
Note
A common error you may encounter when committing is Up-to-date check
failed. This indicates that someone has committed changes to the
repository since you last updated; or, more technically, that your
BASE revision is not the newest on its branch. In such a
case, CVS refuses to merge your modifications into the repository. The
solution is to update, resolve any conflicts and commit again. Of course, if
you are working on a software project, it is normally good style to check if
the program still works after you have updated - after all, there could be bad
interactions between your modifications and the other modifications which
break the code.
Note
Another popular mistake results in the error message Sticky tag 'X' for file 'X' is not a branch. This happens if you try to commit a file which you have previously brought to a certain revision or tag with the command
%cvs update -r X
(which is e.g. used by the menu item → ). In such a case, the tag on the file gets sticky, i.e. further updates do not bring you to the newest revision on the branch. If you want to commit further revisions to the branch, you have to update to the branch tag before you do further commits.
With Cervisia, it is quite easy to maintain a ChangeLog file that is
compliant with the format laid out in the GNU coding guidelines. To use it,
choose → . If a file with the name
ChangeLog exists in the toplevel folder of your
sandbox, this file will be loaded and you have the possibility to edit it. To
this end, at the top of the file, an entry with the current date and your user
name (which can be configured as described in the section called “General”) is inserted. When you are finished the dialog can
be closed by clicking , the next commit dialog you open
will have the log message set to the message you last entered in the ChangeLog.