Conflicts may occur whenever you have made changes to a file which was also modified by another developer. The conflict is detected by CVS when you update the modified file; CVS then tries to merge the modifications committed by the other developer into your working copy. The merge fails if both your and his modifications are in overlapping parts of the file, and the CVS server issues an error message.
In Cervisia's main view, files with conflicts are indicated with "Conflict" in the status column and with a red color. It is your job now to resolve these conflicts before you commit the file. CVS will refuse to commit any files with conflicts until they have been edited. From the main view, you can of course resolve conflicts the traditional way: just double-click the file in question and edit it with your favorite editor.
CVS marks the conflicting changes by placing marks in the middle of the files, in the following manner:
<<<<<<<
Changes in your working copy
=======
Changes in the repository
>>>>>>> revision_number
You should replace this whole block with the new merged version. Of course, you have a great amount of freedom when resolving a set of conflicts: for each conflict you can decide to take one of the two alternative versions. You can also decide that both approaches are broken and rewrite a whole routine or the complete file from scratch.
Fortunately, Cervisia offers a nicer interface for handling these conflicts. This does not mean that you will never need to manually edit the files, but at least can eliminate the need to do so for the trivial conflict resolution. To use Cervisia's CVS Resolve dialog choose → or right click the marked file and choose from the context menu.
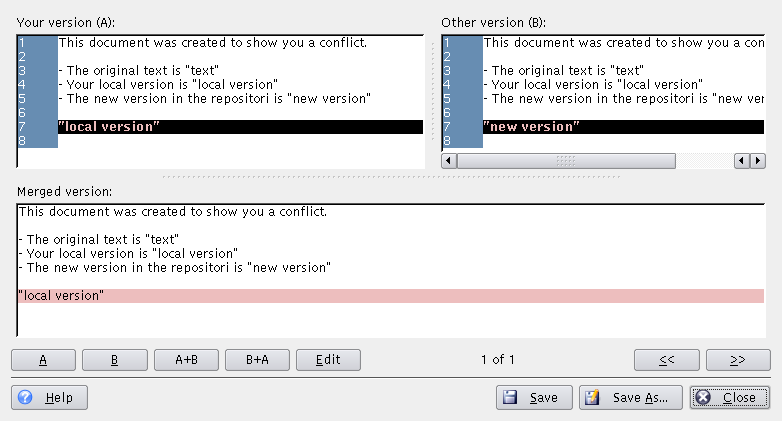
On the top of the dialog, you see Your version (A) of the file on the left hand side and the version in the repository, Other version (B), on the right hand side. The differences between them are marked in red color. Below these two versions, you can see the Merged version. The merged version reflects what that section will be in your working copy if you press the button.
You can go back and forward between the conflicting sections by pressing
and . In the
lower middle of the dialog you can see which section is currently marked. For
example, 2 of 3 means that you are currently at the second
differing section of 3 total.
Now you can decide section by section which version you want to have in the merged file. By pressing , you take over the version you edited. By pressing , you take over the version from the repository. By pressing , both versions will be added, and your version will come first. yields the same result, but the order will be different: first the repository version, then yours.
If you are not happy with any of these versions, press to open a simple text editor where you can edit the section. When you are finished editing, press to return to the CVS Resolve dialog and resume solving conflicts. You will see the section you just edited in the Merged version, with your modifications.
To save your modifications, overwriting the working copy version, press . Note that this will save the choices not only the section you are currently viewing, but all sections in the file. If you want to save it to another file, press . Press to exit the dialog. If you close the dialog without saving, the changes you made will be lost.
