Table of Contents
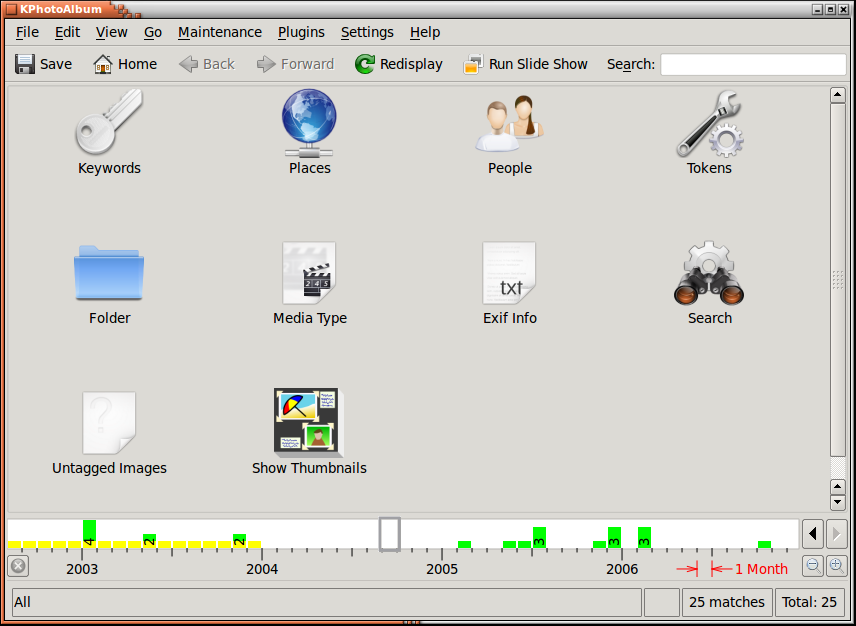
In Figure 2.1, “Starting KPhotoAlbum with your own images” you can see an example of the window that will greet you once you have started KPhotoAlbum with your own images.
At the top of the screen you will find a menu and toolbar, as you know from any KDE application. Below the toolbar you see the browser window. In browser window you can select different categories to limit the images you will be inspecting. In Chapter 3, Browsing we will get back to the browser, but for now, simply press the item, which will show you a thumbnail view of all your images.
The key feature of KPhotoAlbum is that you can annotate your images. This includes who is on a given image, where it is taken, etc. You can do this either one image at a time, or you can annotate a number of images simultaneously (For example, all these images contain the person Jesper, and is taken in Copenhagen.)
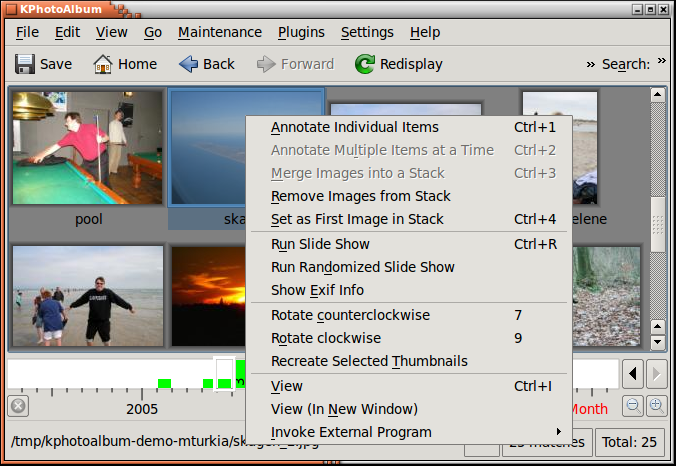
To annotate an images, select the images in question, and go to → . Now you annotate your selected images one after the other. If you instead choose , you will annotate all the selected items as if it was one single item. In other words, with this option you mass-annotate your image - e.g. saying all these images were shot in Copenhagen. These two options are also available from a context menu, that you get by right clicking the mouse in the thumbnail overview or using keyboard shortcut. An example of this can be seen in Figure 2.2, “Context menu for editing properties”.
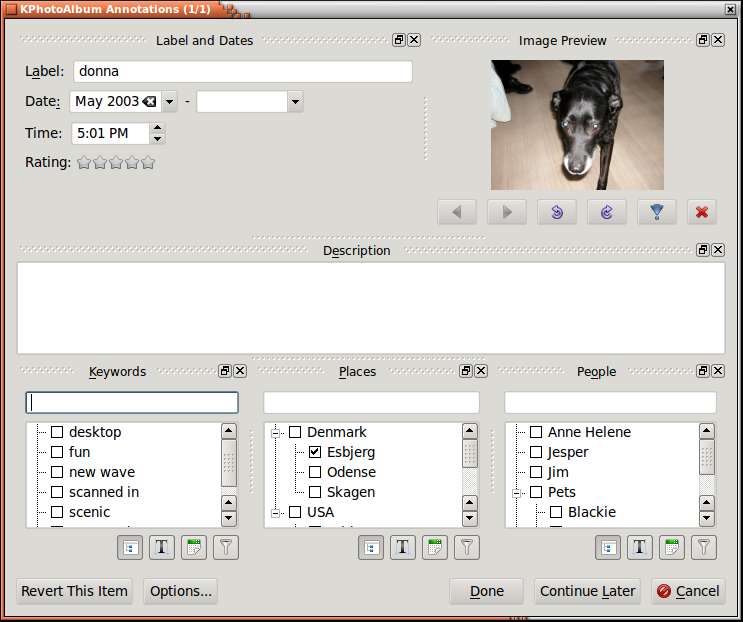
In Figure 2.3, “Annotating images and videos” below you can see
the window for annotating images and videos. In this window you can specify
the date of the item, the label of the item [2], a description for the item, and most important
different categories for the item. In the screen shot, these categories are
People, Places, and
Keywords, but as you will see in the section called “Categories”, these three predefined
categories may be changed to your preferences.
All these annotations may be used for searching and browsing, as we will see in Chapter 3, Browsing. On request you may see these annotations when viewing the items in the build-in viewer.
In Figure 2.3, “Annotating images and videos” there are three list boxes combined with line edits for specifying people, places and keywords. These widget are a very important part of KPhotoAlbum, as you will use them over and over again, when specifying information about your images.
You can specify a property from a list box, simply by
selecting it (Select say Donna to specify that Donna is
on the given image. Alternatively you may type its name in the line edit.
When you start typing a name in the line edit, KPhotoAlbum will look into the listbox,
and search for the first item matching what you've typed so far, and fill
it out. Thus typing Do might be enough to find
Donna. Once you have found the item you search for,
simply press enter to select this item in the listbox. The item will now be
moved to the top of the view, so next time you need the given item it is
even easier to find.
The idea behind moving items to the top when they have been selected is, that when going to, say a family party, you will get perhaps 50 images all with the same 5-10 people. When typing in information about these 50 images you will have the 5-10 people at the top of the listbox as soon as you have typed in their name the first time.
If you prefer to have the list alphabetically sorted instead, simply press the icon for sorting under the list box.
[2] The label is initialized to the name of the file. The label is used in the browser, and when the images are exported to HTML pages